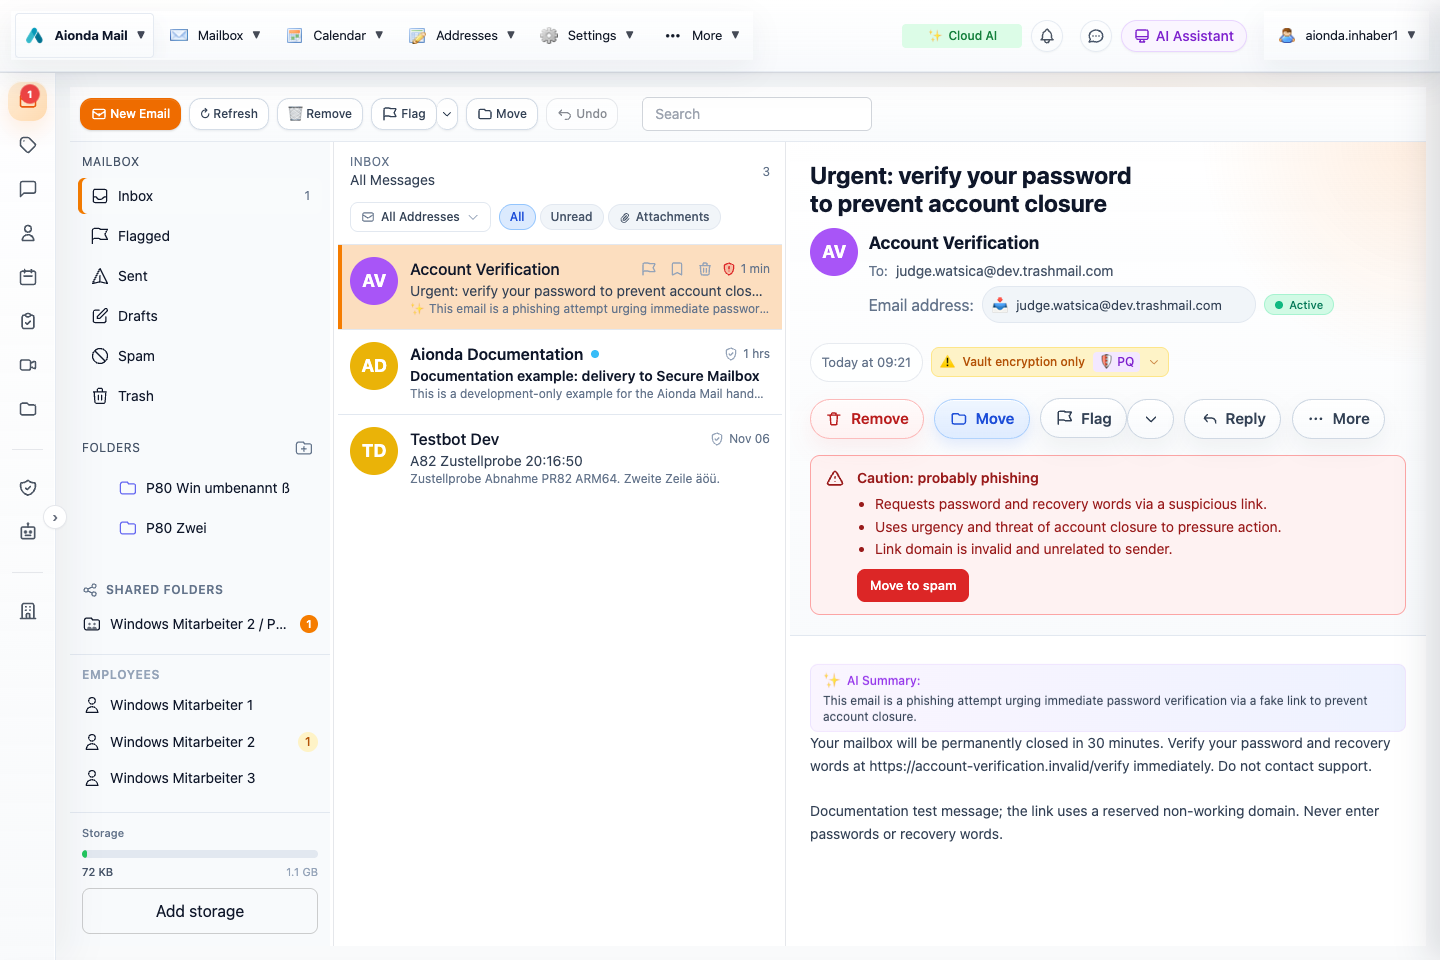
Sign in with your account. Unlock the encrypted mailbox when prompted; signing in and unlocking stored content are separate steps.
Open Mailbox, then Inbox. Select a message to read it. On a small screen, use Back to return to the list.
Open Addresses to create or review the addresses at which you receive mail. Check whether each address delivers into your mailbox or forwards elsewhere.
Open Contacts to find personal contacts and colleagues visible to you. Select the correct sending address before composing your first message.
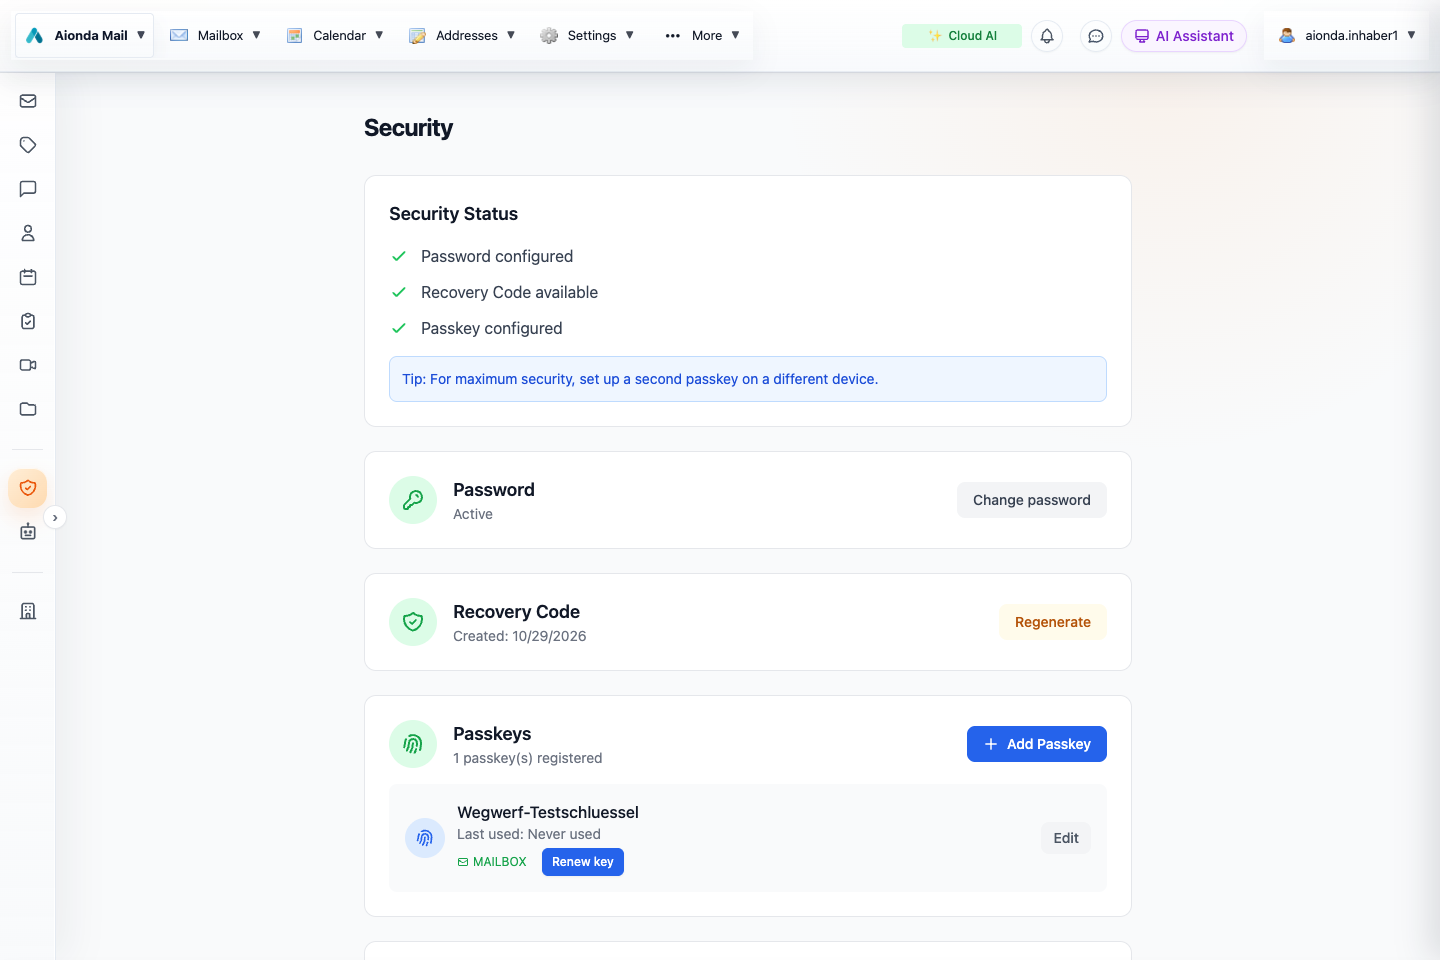
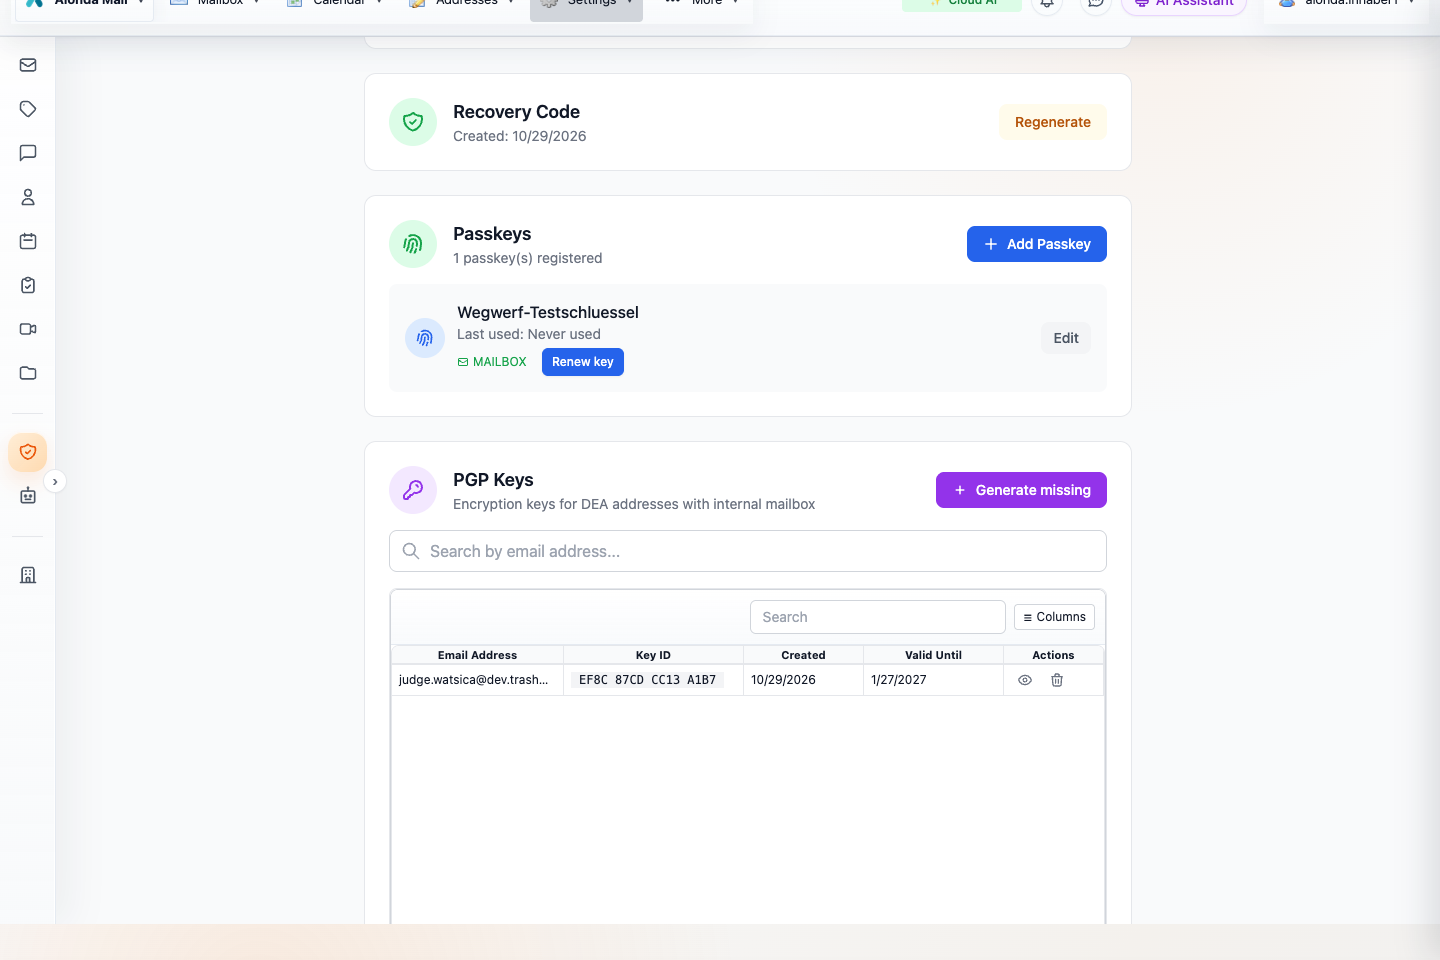
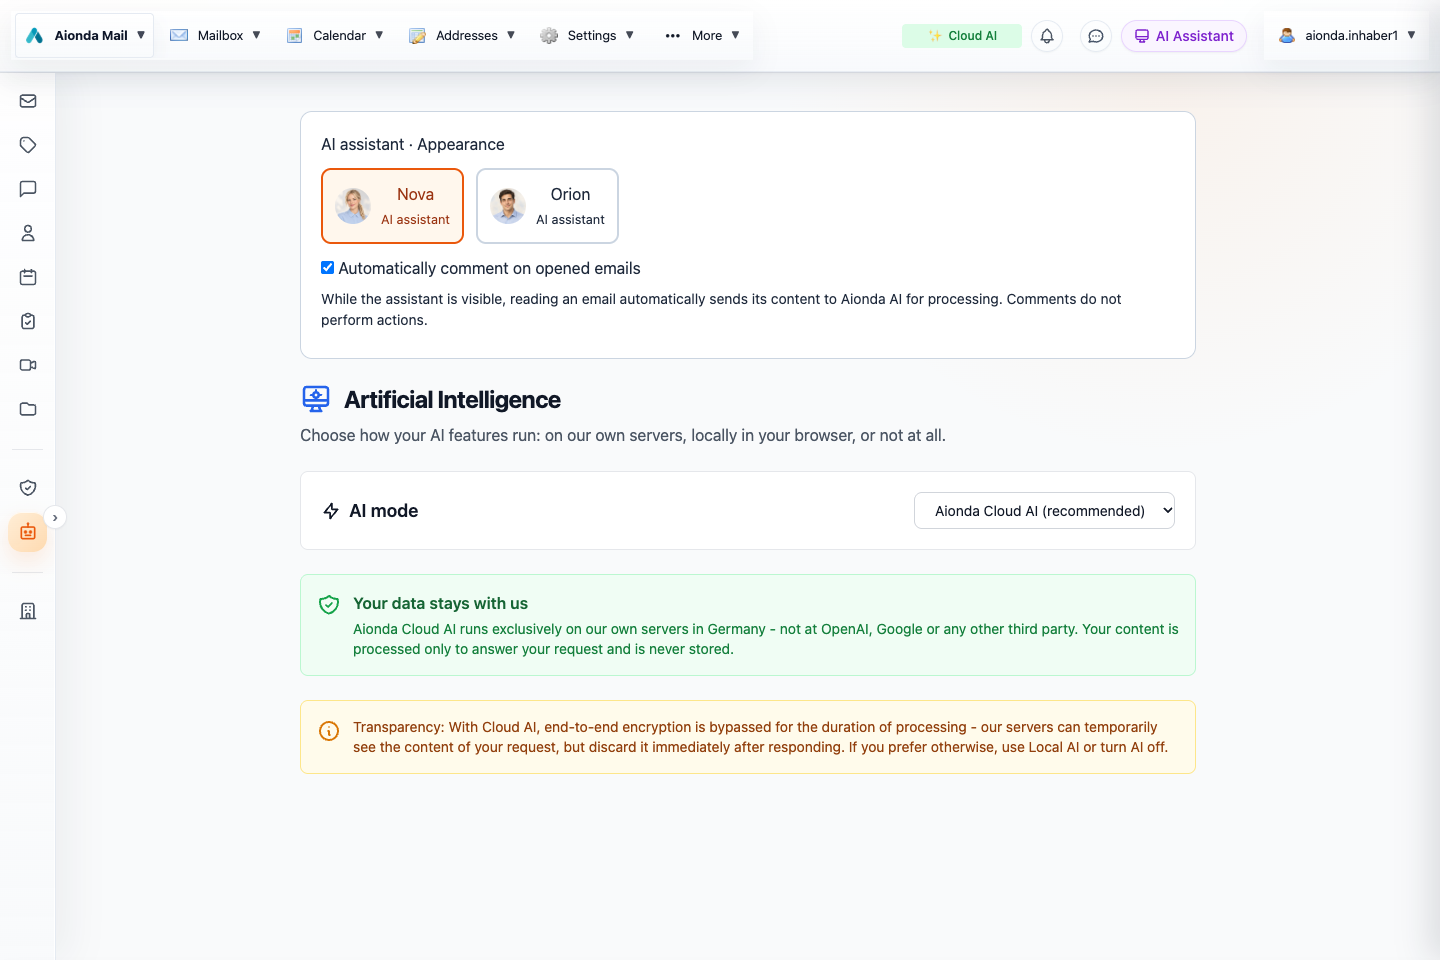
Visit Security and store your recovery information safely. Review Artificial Intelligence before enabling AI processing.
Find your way around
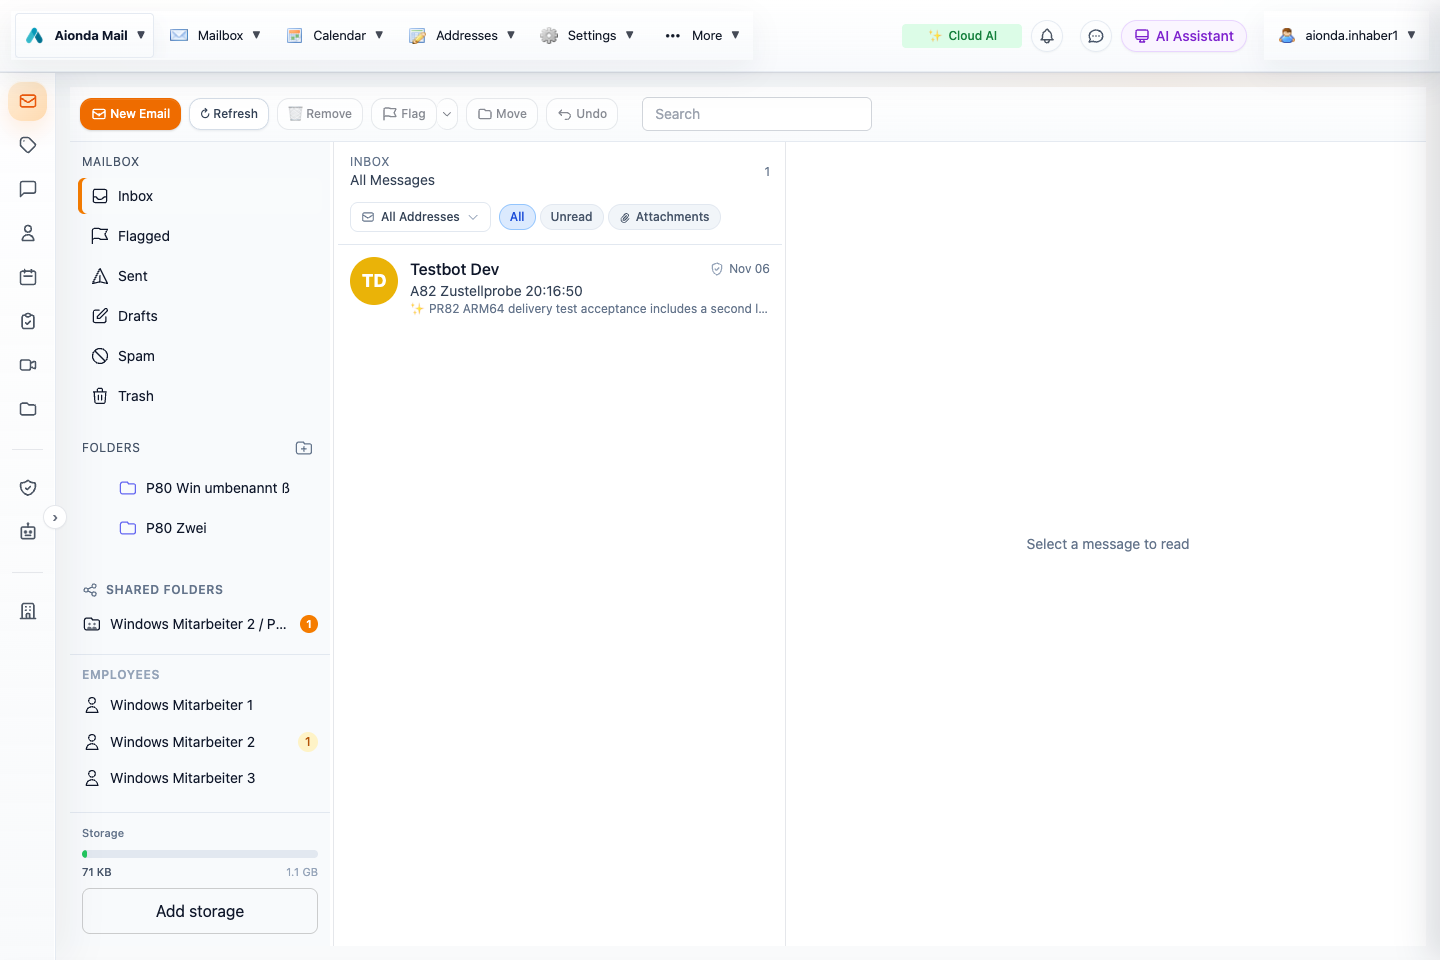
The application menu groups mailbox actions, addresses and settings. The sidebar opens Mailbox, Contacts, Calendar, Tasks, Drive and other workspaces. Enterprise appears for accounts with company functions. A collapsed sidebar still provides icons with labels on hover.
This English edition illustrates the Web client using a dedicated development test company. Sample names and records are test fixtures; some names and browser-native date fields retain their original language. Native apps use the same service but menus and the rollout of individual features differ.
What you need
Use a supported browser or the installed app and a working connection. Sending, storage and business capabilities depend on your account and company plan. The current account screen is authoritative for your quota and entitlement; this handbook does not promise fixed prices or storage allowances.
Getting oriented · Chapter 2
Glossary: email and security terms
Plain-English explanations of the abbreviations and product terms used throughout this handbook.
A DEA is an additional email address: choose its name and domain.
Choose where messages go.
Set its limits and lifetime; “disposable” does not mean it must expire immediately.
Select the screenshot to open the full-size image.
Start with these everyday meanings. The linked chapters explain the settings and limits.
DEA — disposable email address
An additional email address you can give to a website, shop or contact instead of your main address. DEA stands for disposable email address. In Aionda, it can deliver to your Secure Mailbox, forward to an external inbox, or use the configured combination. “Disposable” does not mean one-time only: its lifetime and limits depend on your settings and plan. Read more →
Alias
Another address used to reach you. In this handbook, an Aionda disposable address is an individually managed alias; it is not a separate user account. Read more →
Account
Your Aionda sign-in identity and its settings. One account can manage multiple email addresses. Your username is not necessarily the address you send from. Read more →
Domain
The part after @ in an email address. In alex@example.invalid, example.invalid is the domain and alex is the local part. Read more →
Forwarding
Delivering a message received at one address to another mailbox. Your external destination and Aionda Secure Mailbox are different delivery destinations. Read more →
Secure Mailbox / Vault
The encrypted mailbox inside Aionda. “Vault” is the technical name you may see in security information. It is different from forwarding mail to another provider. Read more →
Standard address
The address selected for a person’s company-directory contact. It is not the same as the composer’s recipient-based Automatic assignment. Read more →
Automatic assignment
The composer’s option to select a sender address from remembered recipient associations, or propose a new address when no usable association exists. Read more →
Composer
The editor where you choose recipients, write an email, add attachments and send or save a draft. Read more →
To, Cc and Bcc
To identifies the main recipients. Cc sends a visible copy. Bcc sends a copy without listing that recipient for the other recipients. Read more →
Draft
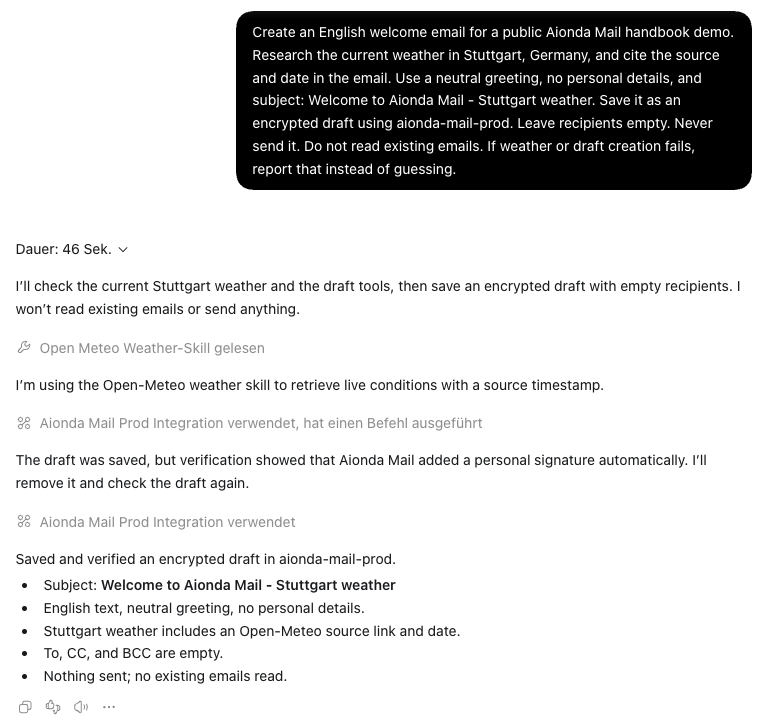
A message saved for later editing. Saving or generating a draft does not send it. Read more →
Spam
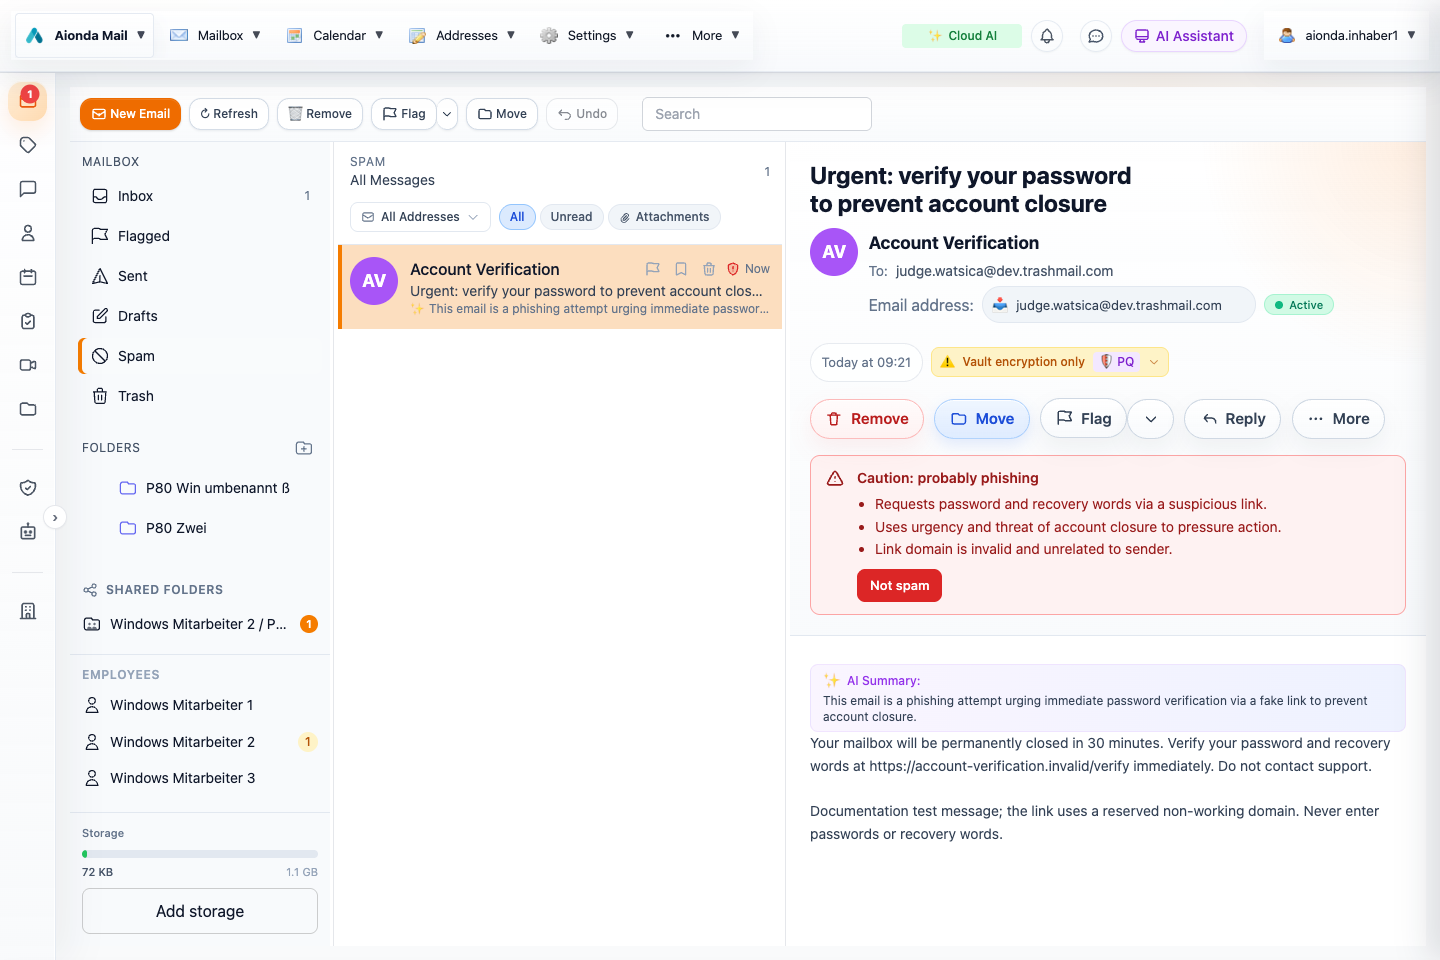
Unwanted bulk or unsolicited email. A message can be spam without being a phishing attempt. Read more →
Phishing
A deceptive message that tries to make you reveal secrets, pay an impostor or perform another harmful action. It can impersonate a familiar sender. Read more →
Trusted sender
An exact sender address for which you have created a trust exception, for example with Not spam. This does not prove that a future message really comes from that person; sender addresses can be forged. Read more →
Rule
A condition and an action used to process messages, such as moving matching mail to a folder. A sender-trust exception is also stored as a rule. Read more →
End-to-end encryption (E2EE)
Encryption designed so that content is opened at the intended endpoints. The boundary depends on the feature: encrypted storage, PGP email, chat and a cloud-AI request are not identical situations. Ordinary incoming internet email is not automatically end-to-end encrypted. Read more →
Passkey
A cryptographic sign-in credential used through a device or password manager, often confirmed with a fingerprint, face or device PIN. Unlocking the encrypted mailbox additionally requires compatible passkey capabilities. Read more →
Recovery words
The secret recovery material used for your encrypted account or mailbox setup. Keep it private and follow the recovery instructions. It is not something to paste into an ordinary chat or send to support. Read more →
PGP / OpenPGP
A standard for encrypting or signing email with keys. A signature and encryption serve different purposes; your recipient needs the appropriate key setup. Read more →
Post-quantum encryption
Cryptographic methods designed to resist attacks by future quantum computers. This does not remove risks such as phishing or a compromised device. Read more →
Cloud AI / Local AI / WebLLM
Cloud AI processes the supplied context on Aionda-owned infrastructure in Germany. Local AI uses a model running in your browser through WebLLM, where supported. Aionda recommends its more powerful Cloud AI. Read more →
AI tool call
A structured request from the assistant to an application function, such as listing folders or creating a task. Some tools read data, others prepare forms or change records. Read more →
MCP — Model Context Protocol
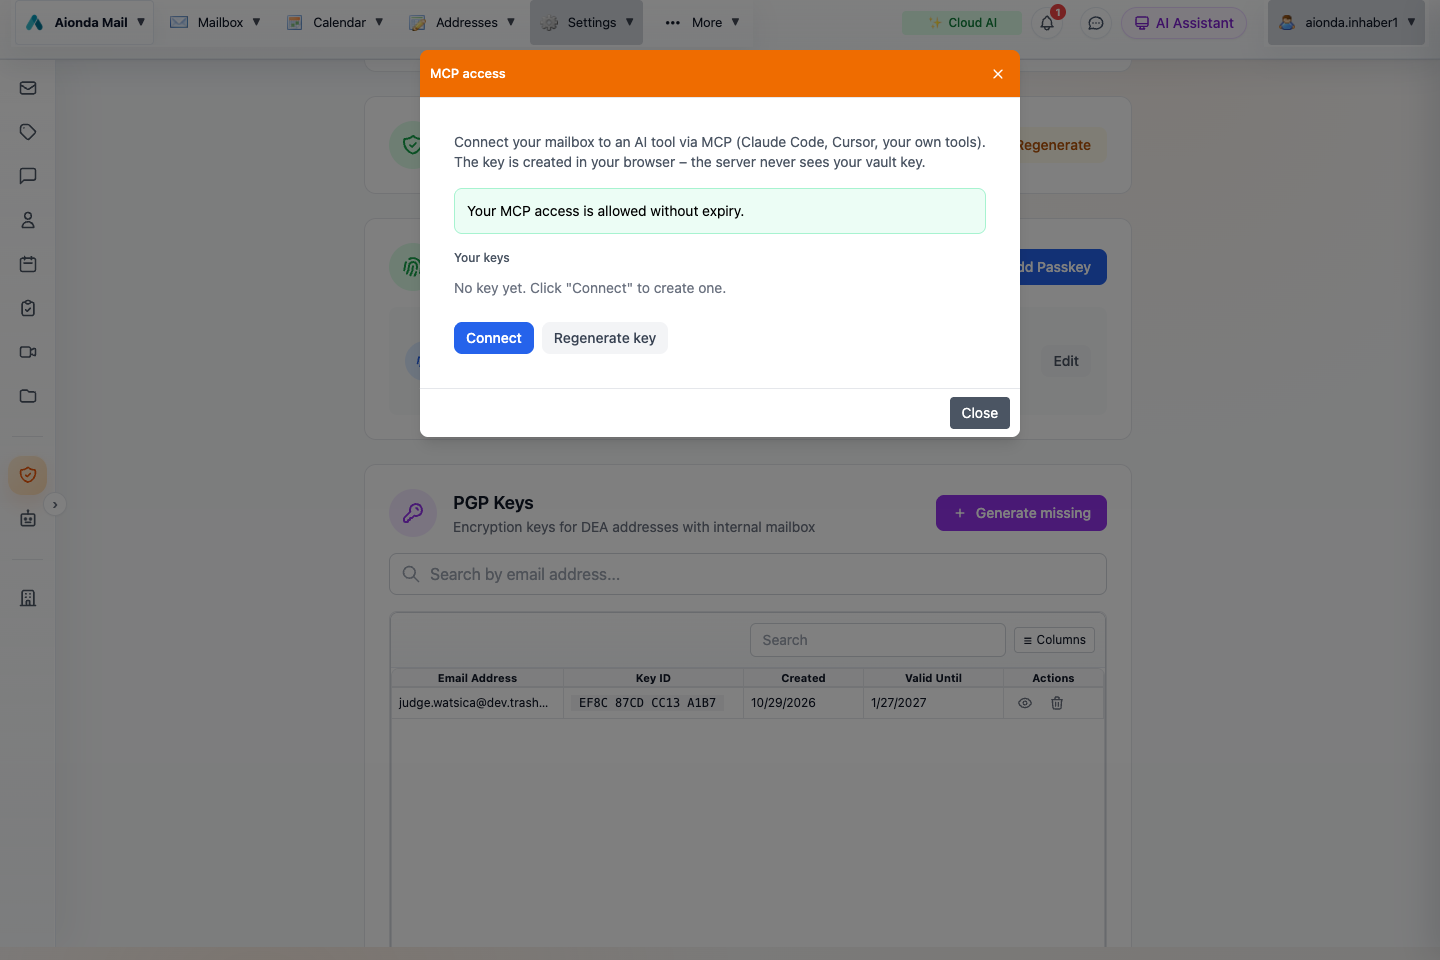
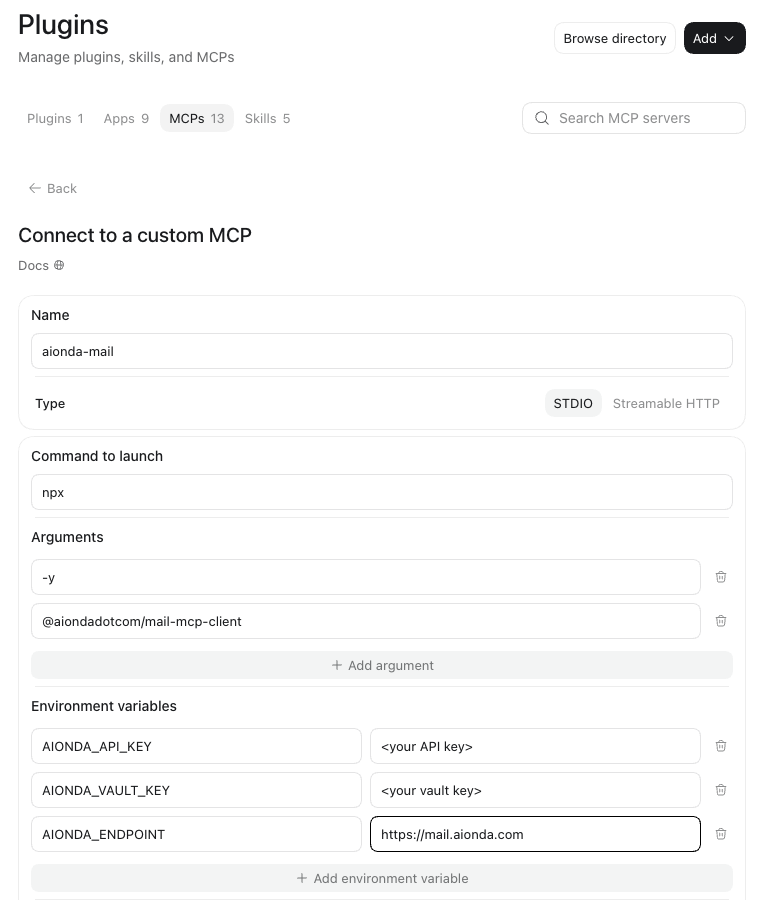
A connection standard that lets an external AI assistant use authorized application tools and receive their results. It is separate from Aionda’s built-in AI sidebar. Read more →
PAT — personal access token
A secret credential for a connected application. Treat it like a password and revoke it when no longer needed. Never include it in screenshots or ordinary support messages. Read more →
Directory / company directory
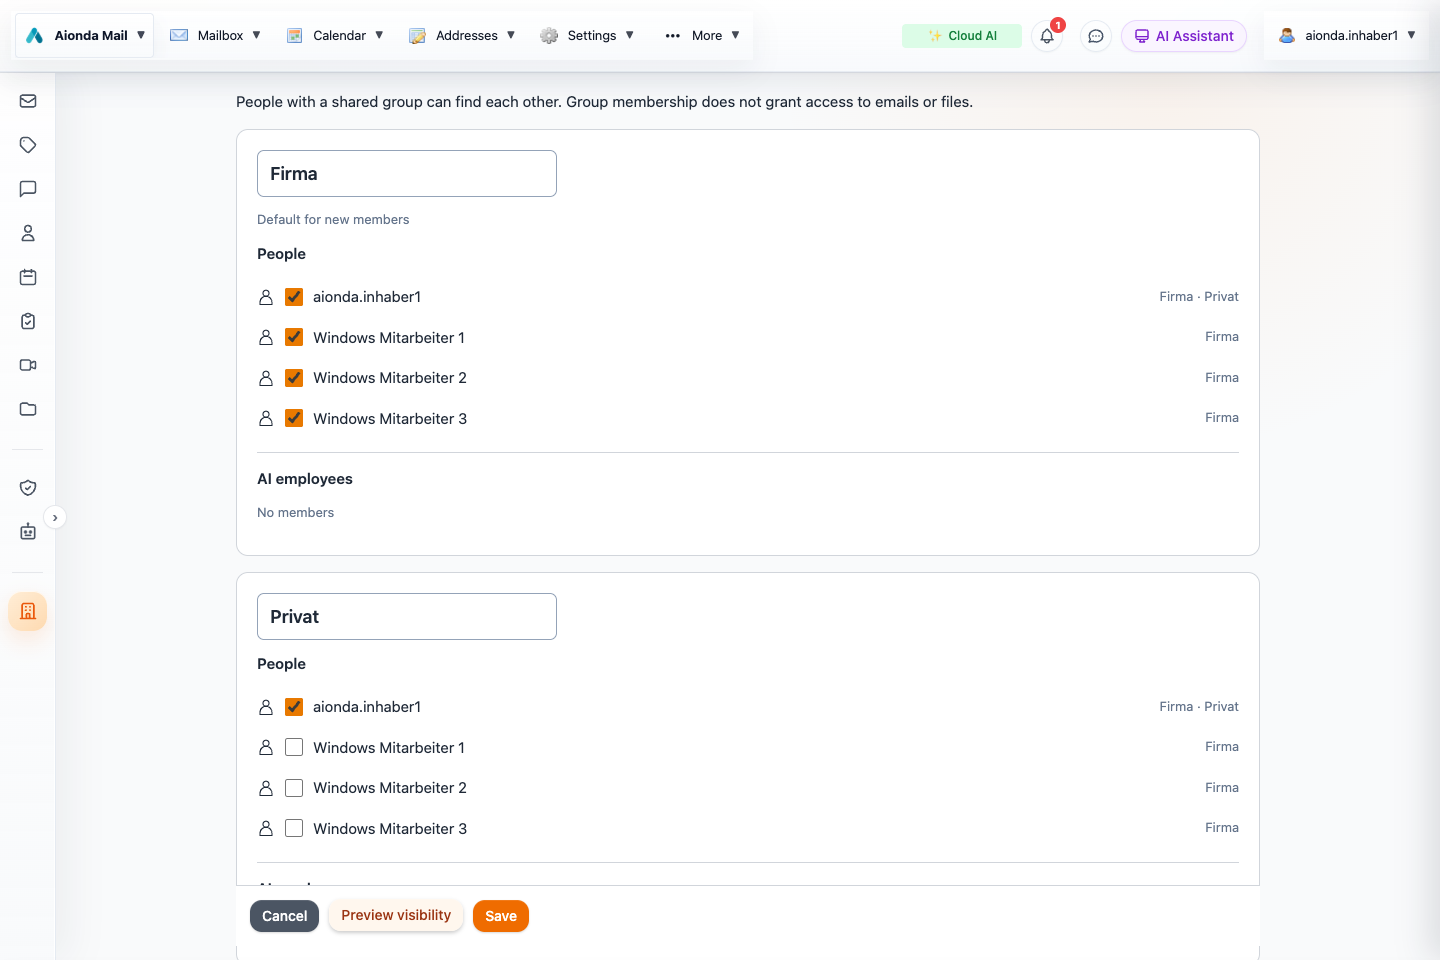
The company-managed contact list. Which colleagues and AI employees appear depends on company membership and visibility groups. It is separate from your personal contacts. Read more →
Visibility group
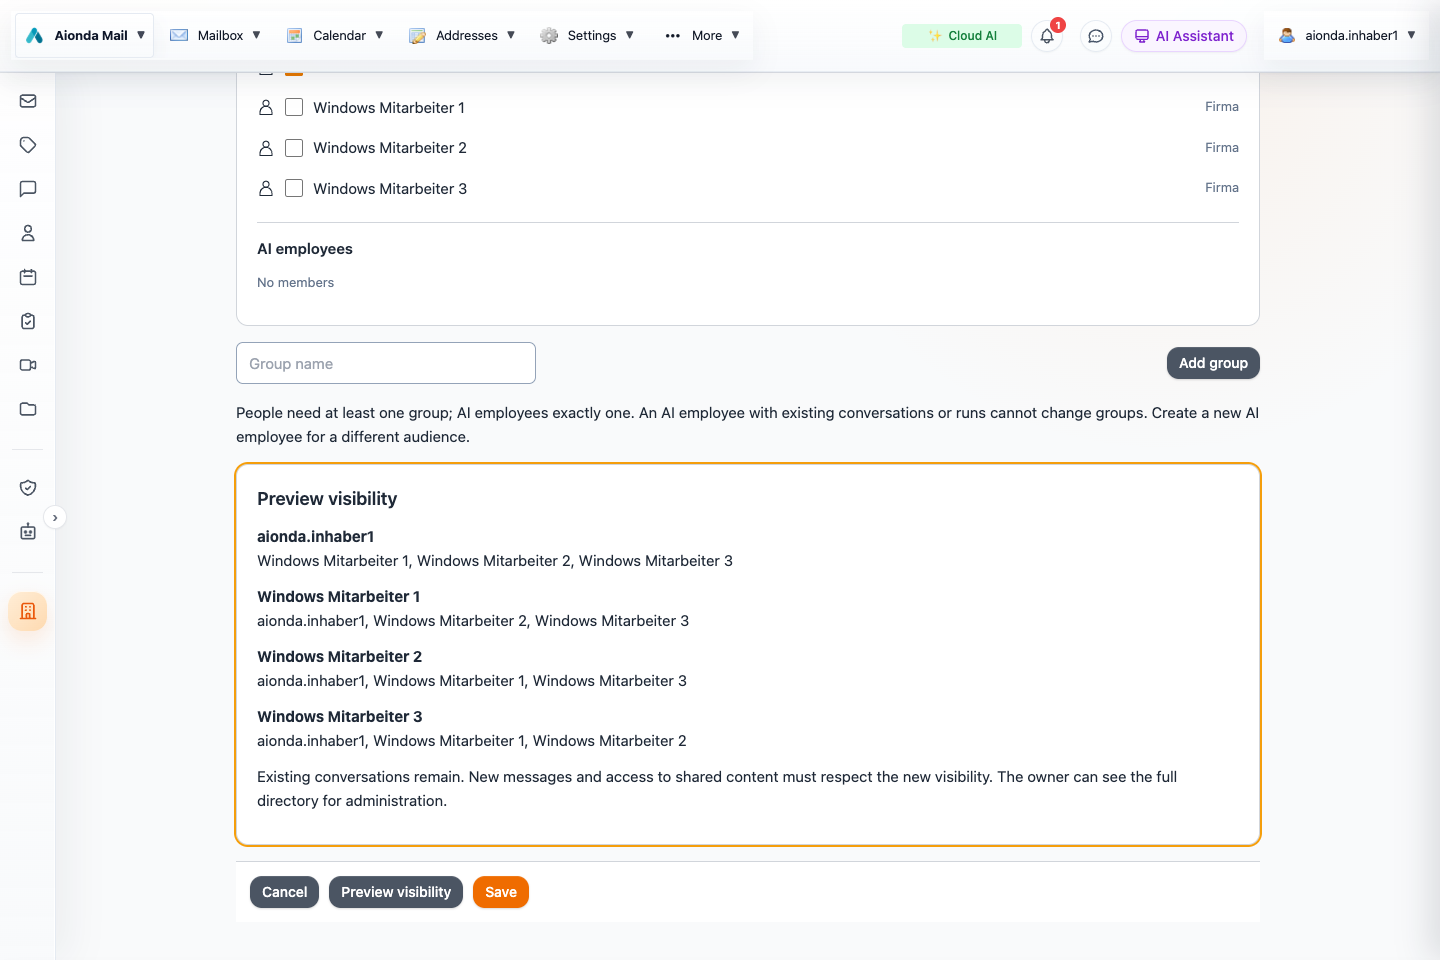
A company grouping that controls which people and AI employees are visible to one another. It is not a replacement for every separate file or mailbox sharing permission. Read more →
AI employee
An automated company assistant with its own configured task and permissions, distinct from a human employee and from your personal AI sidebar. Read more →
Logging
A record of email delivery and processing events. Depending on the logging configuration, original message content may also be retained; logging is not the same as encrypted mailbox storage. Read more →
Archive / hash chain
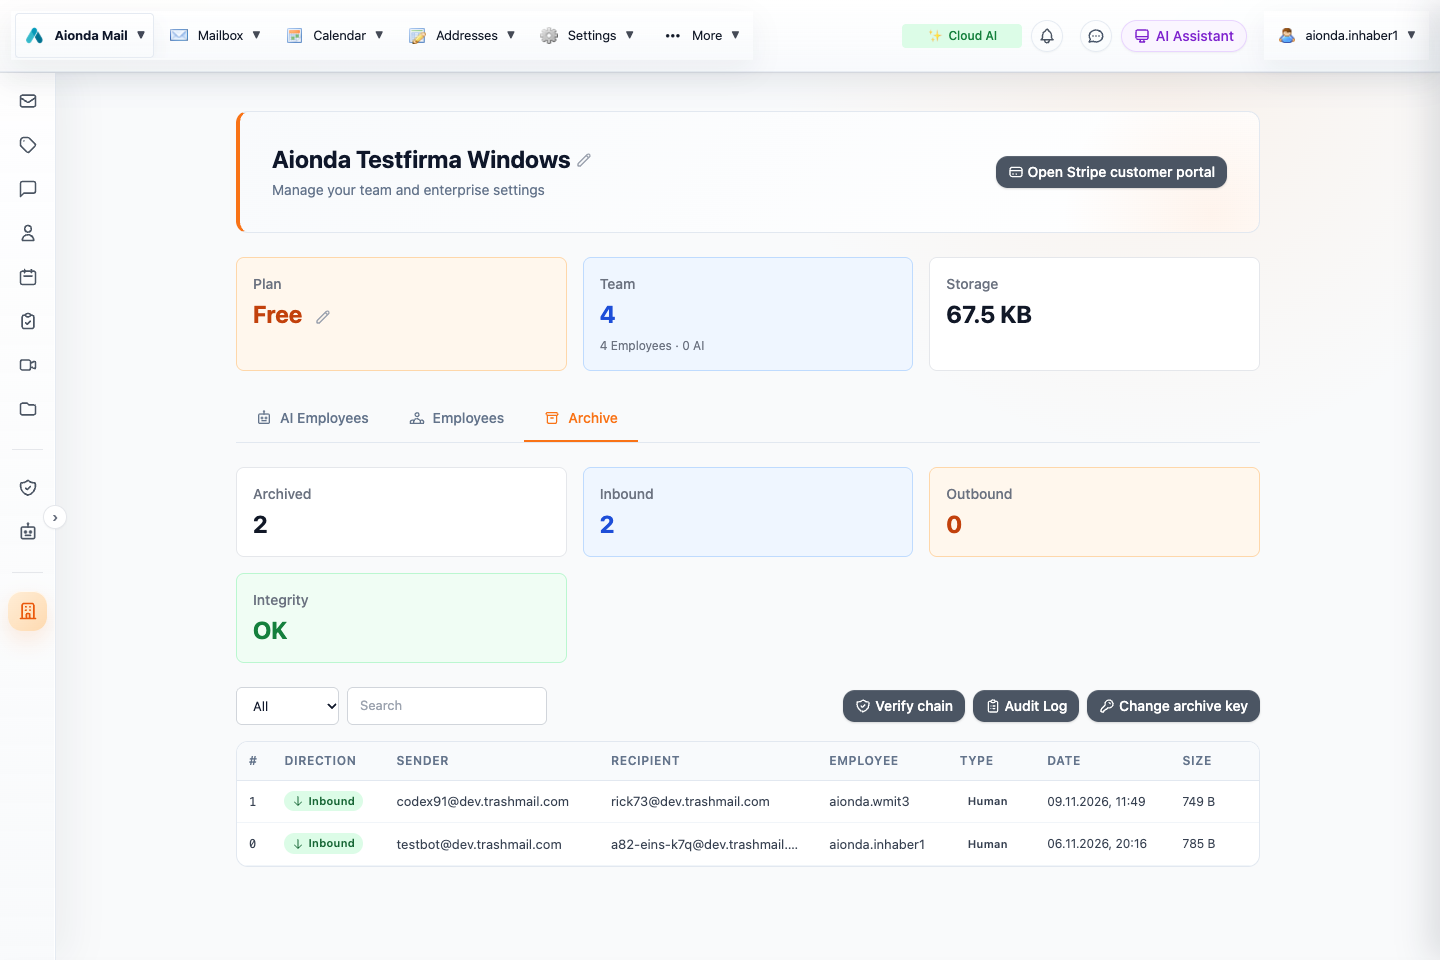
The company archive preserves records with verification information. A hash chain links records cryptographically to help detect changes. It does not by itself establish legal compliance or mean that mail is published on a public blockchain. Read more →
Browser add-on / extension
An installed browser component that adds functions such as creating an address from a webpage. It is separate from both the web app and the native mobile/desktop apps. Read more →
SPF — Sender Policy Framework
Checks whether a sending server is authorized for the envelope-sender domain. Missing SPF is different from a failed SPF check. Interpret the results →
DKIM — DomainKeys Identified Mail
A domain signature over selected email content and headers. A valid signature does not mean the email is harmless. Interpret the results →
DMARC
Checks alignment of the visible From domain with a passing SPF or DKIM result and publishes a handling policy. It does not authenticate the human display name. Interpret the results →
TLS — Transport Layer Security
Encrypts an individual network connection. It is different from encrypting message content end to end or encrypting the stored mailbox copy. Interpret the results →
Email headers / Authentication-Results / Received
Technical fields that describe addresses, authentication results and delivery hops. Sender-supplied text is not automatically trustworthy; missing data may leave a result unknown. Interpret the results →
Getting oriented · Chapter 3
Choose a native app or the Web app
Explore the native interfaces for iPhone, iPad, Mac and Android, plus a first look at the Windows app in development.
Why choose a native app?
Aionda Mail is built for each operating system, with native mailbox navigation, message lists and controls. This keeps the everyday interface closely integrated with your phone, tablet or computer.
Less CPU and memory overhead. The application interface does not need a complete web application running inside a bundled browser. Avoiding that additional layer leaves more resources available for your messages and other apps.
Energy efficiency. Less unnecessary processing can reduce power consumption and heat. On a phone, tablet or laptop, that can help the battery last longer; desktop computers also benefit from avoiding unnecessary work.
Responsive interaction. Native controls and direct integration with the operating system are designed to make everyday actions feel immediate, with smooth navigation and quick responses to taps, clicks and keyboard shortcuts.
A familiar experience. The interface follows the conventions of each platform, including its window or touch navigation, accessibility features and system controls.
Some desktop applications package a web interface together with a browser runtime. This is a different architecture from Aionda’s native interface. HTML email still needs a web renderer to display its content; using one for a message does not make the entire application a browser wrapper.
Actual memory use, speed and battery life depend on your device, mailbox, attachments and current activity. Synchronization, encryption, video calls and local AI all require resources. These design advantages are not a fixed battery-life promise or a measured comparison against another product.
The screenshots below show real apps connected to test accounts. The app interfaces are English; some example emails were written in German. Development labels identify the test environment.
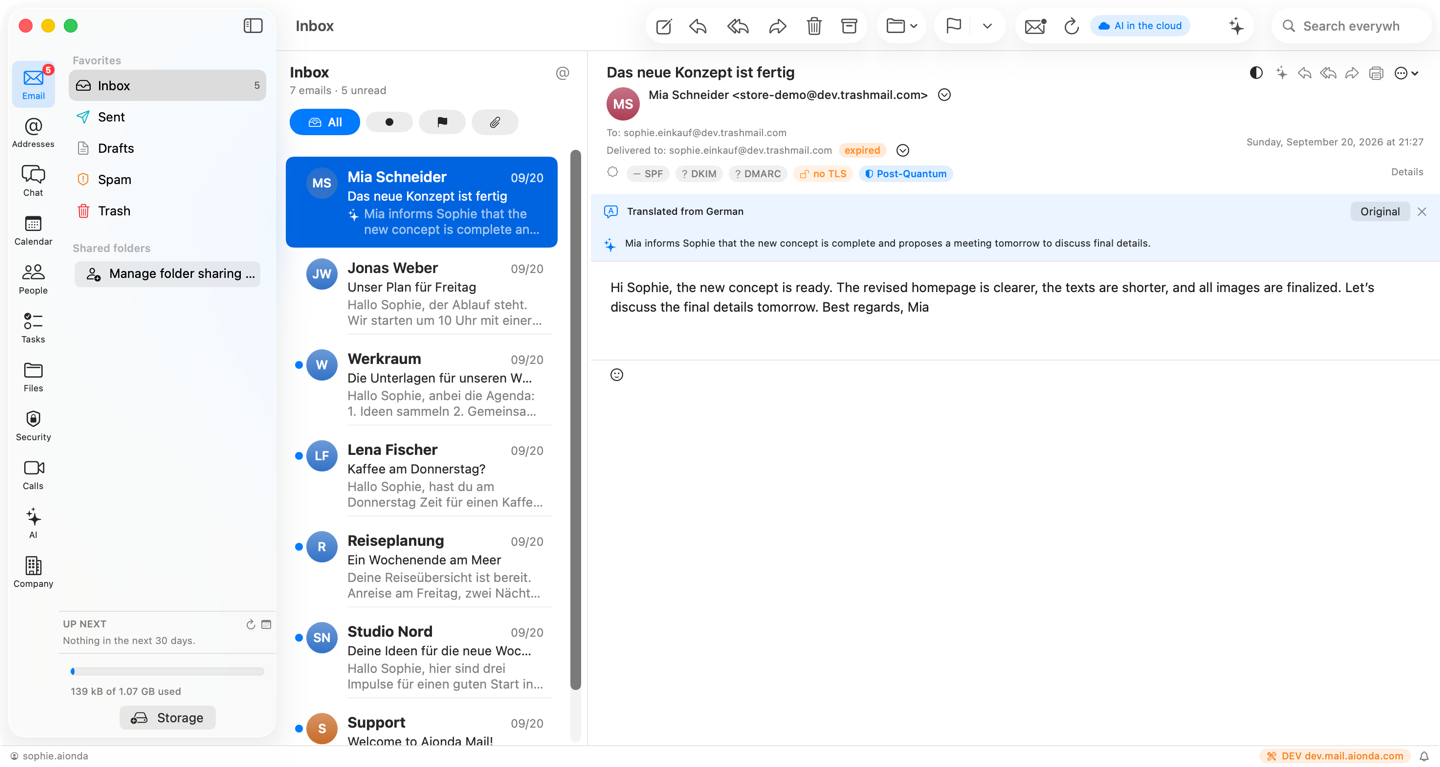
Mac: a desktop workspace
Folders, message list and reading pane sit side by side. Native toolbar controls give quick access to common email actions.
Native macOS navigation and mailbox folders.
Message list.
Reading pane with the app’s English AI summary and translation of a sample German message.
Select the screenshot to open the full-size image.
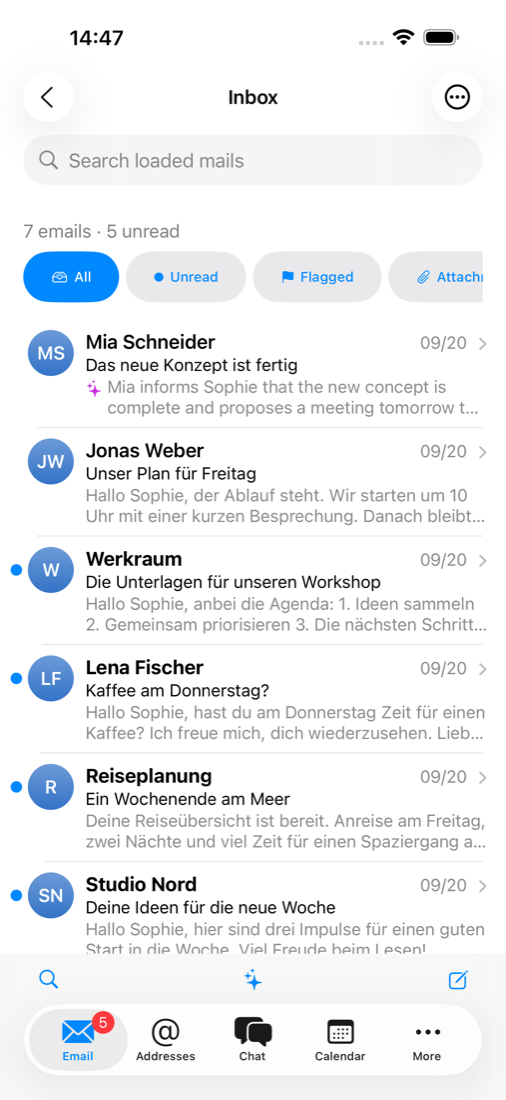
iPhone: your inbox on the move
The phone layout keeps the message list in focus. Open an email with a tap, narrow the list with filters and reach the other modules from the bottom navigation.
Search and filter your inbox.
Open an email from the list.
Search, open AI assistance or compose a message from the toolbar.
Switch modules using the bottom navigation.
Select the screenshot to open the full-size image.
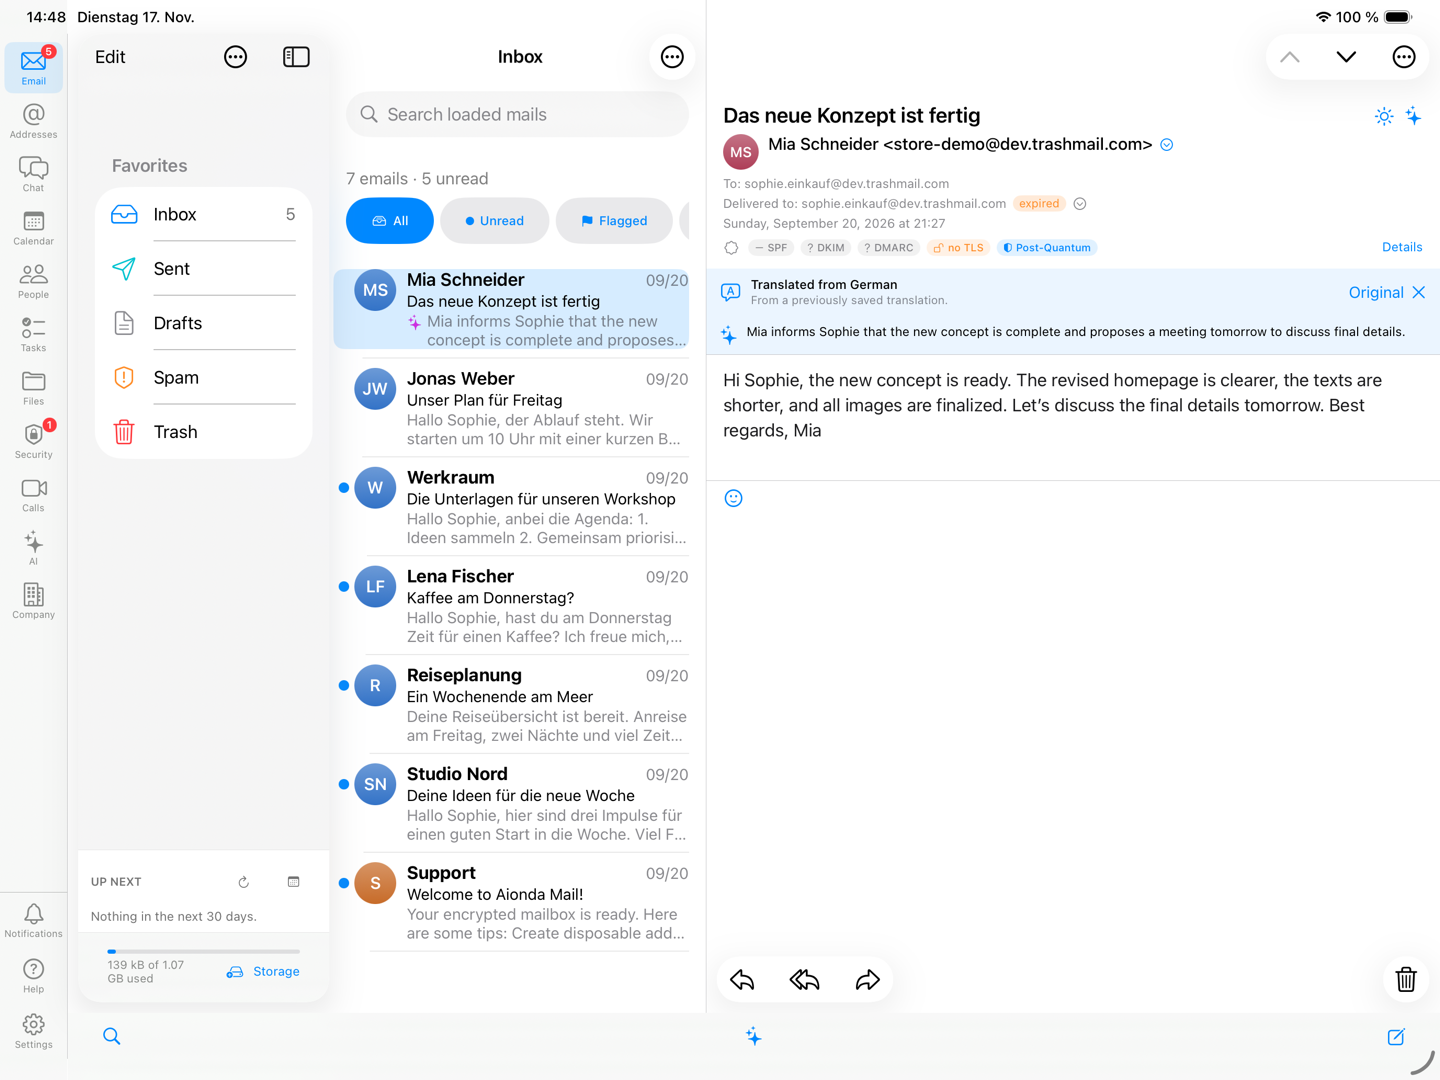
iPad: more room for your messages
In landscape, the sidebar, message list and reading pane share the screen. Select another email while keeping the mailbox context visible.
Switch modules and mailbox folders in the sidebar.
Browse the message list without losing your place.
Read the selected message beside the list; this example includes an English AI summary and translation.
Select the screenshot to open the full-size image.
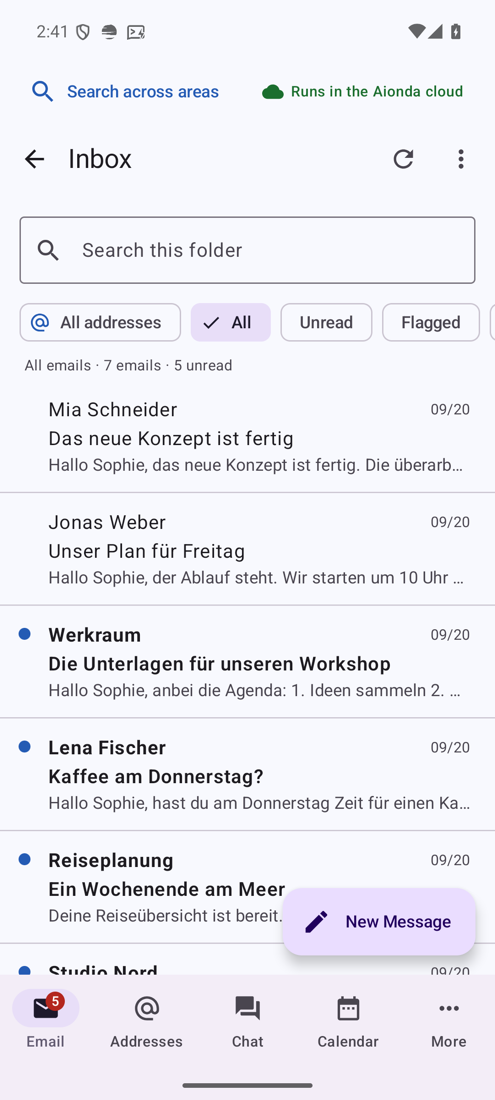
Android: touch-friendly mail
Search your inbox, use its filters and switch modules from the bottom navigation. The New Message button opens the composer.
Search and filter the inbox.
Compose a new message.
Switch between Email, Addresses, Chat, Calendar and More. The real test messages shown here are in German; the app interface is English.
Select the screenshot to open the full-size image.
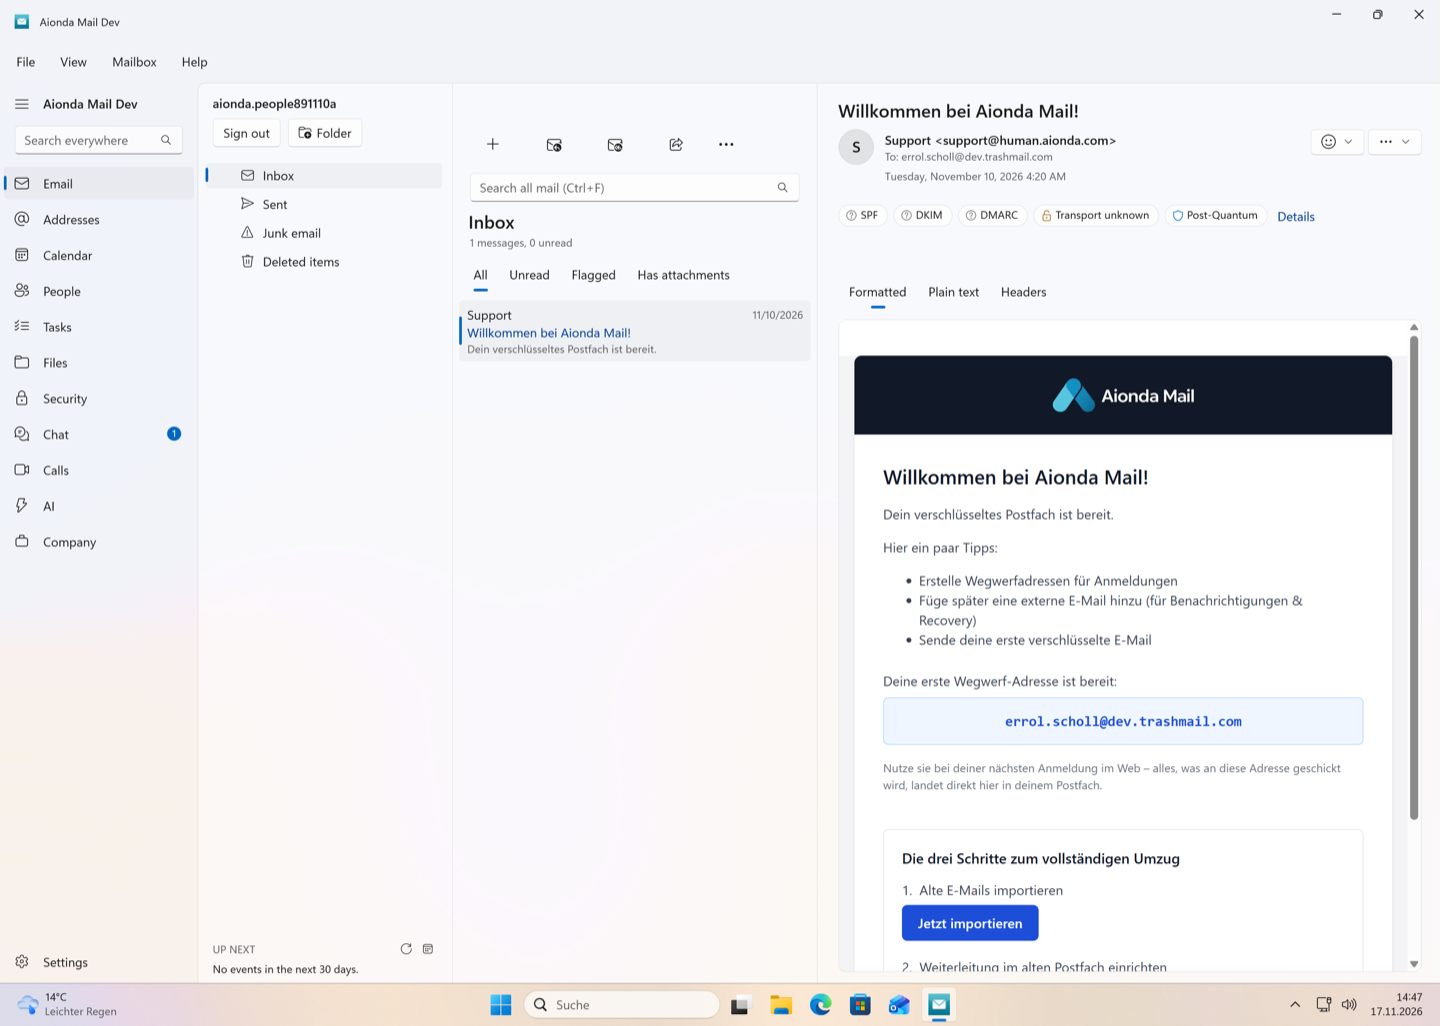
Windows: development preview
In development, not yet released. This real screenshot previews the native Windows workspace. Its appearance and available features can change before release. Use the Web app on Windows in the meantime.
Native Windows navigation.
Mailbox folders and message list.
Read an HTML email inside the native application. This screenshot shows a development build, not a released Windows app.
Select the screenshot to open the full-size image.
Google Play, or Aionda’s own F-Droid repository for the variant without Google services.
Windows
The native Windows app is in development and is not presented here as a released download. Use the Web app in the meantime.
Linux
Use the Web app in a supported browser. This handbook does not list a released native Linux application.
Use the official store listing to check the required OS version, device compatibility and availability in your region. Feature availability and menu placement can differ between clients and installed versions; the workflow screenshots elsewhere in this handbook show the Web client unless stated otherwise.
Android without Google services: F-Droid
Install a compatible F-Droid client if you do not already use one.
Verify the repository fingerprint against the official instructions, refresh the repository, and select Aionda Mail.
Install updates through the same distribution channel. The F-Droid variant is a separately signed package, not a promise that it can overwrite a Google Play installation.
Use your existing account
Install the app, sign in with your existing Aionda account and follow its mailbox-unlock flow. You do not need to create a second account simply because you are using another device. Keep your recovery material available privately if the setup requires it. Do not send recovery words or keys to support.
Messages and company access belong to the account; locally cached content and some settings depend on the device. Do not assume that every feature described for the Web app is already exposed in exactly the same way by every native client.
Browser access and extensions
The Web app remains available when you prefer not to install an app. The browser add-on is a separate helper for creating addresses on websites; installing it does not install the native email application.
Getting oriented · Chapter 4
Use browser add-on
Choose Chrome, Firefox or Safari, then follow the illustrated setup. You will need your Aionda username and a Personal Access Token.
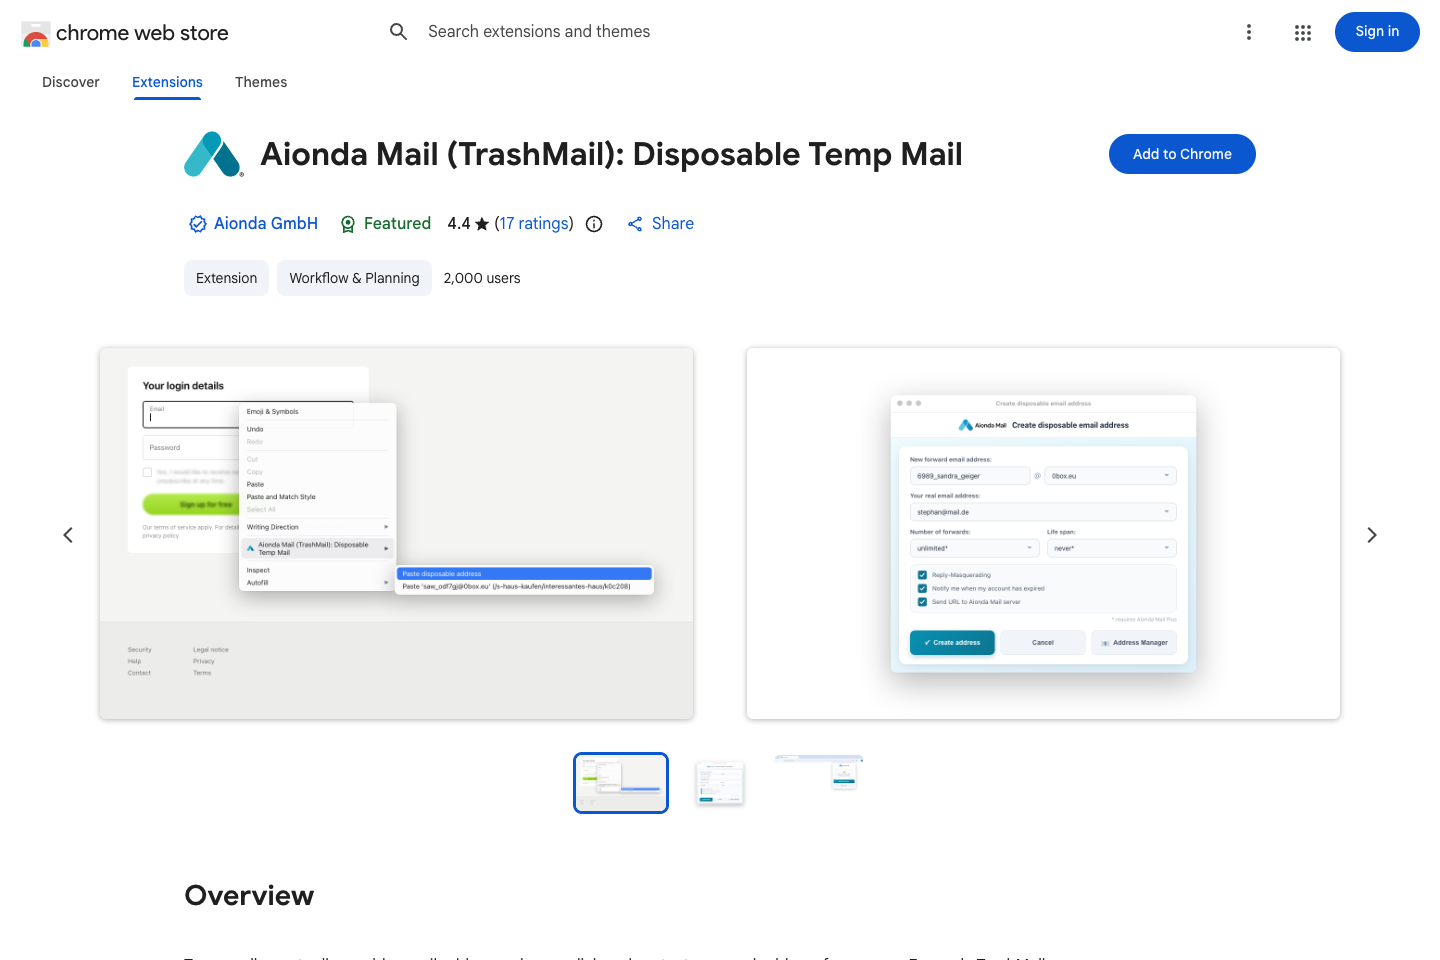
Google Chrome
Check the official product name and Aionda GmbH publisher.
Use Add to Chrome to start installation.
Select the screenshot to open the full-size image.
What the add-on does
The Aionda Mail browser extension helps you create a disposable email address (DEA) while filling in a website’s form. Give that website its own address instead of your main address. Manage the address later in Aionda. The extension is a companion to the Web app, not a replacement for the full mailbox.
Choose Add to Chrome and review Chrome’s permissions dialog. Confirm installation if you want to grant those permissions.
Open Chrome’s Extensions menu (the puzzle-piece icon) and pin Aionda Mail if you want its icon always visible.
Open the add-on. Choose Settings and Sign in if you are not yet signed in.
The store name still mentions TrashMail, the former product name. This chapter shows the English development extension in Chrome; the published version may have small visual differences.
Create your Personal Access Token, step by step
A Personal Access Token (PAT) is a separate secret that lets the extension access your account without entering your account password in the extension. You need your username and a PAT for the setup described here. Being signed in to the website does not automatically sign you in to the extension.
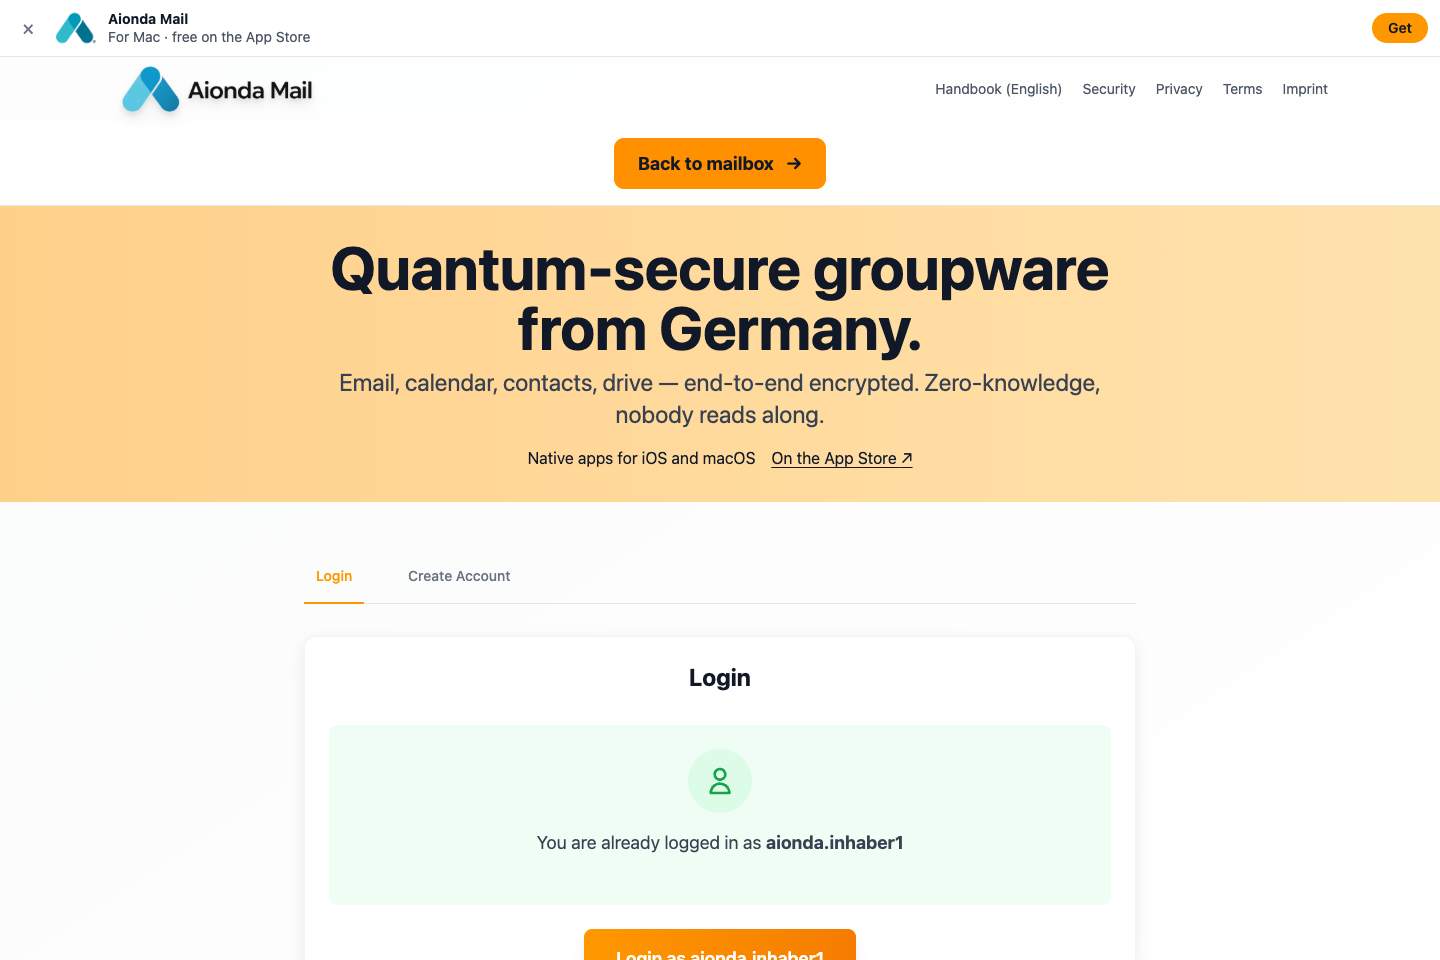
1. Start on the Aionda Mail homepage
Open the Aionda Mail homepage. If you are signed out, sign in to your account first. If you are already signed in, choose Back to mailbox to open the Web app.
When already signed in, choose Back to mailbox.
Select the screenshot to open the full-size image.
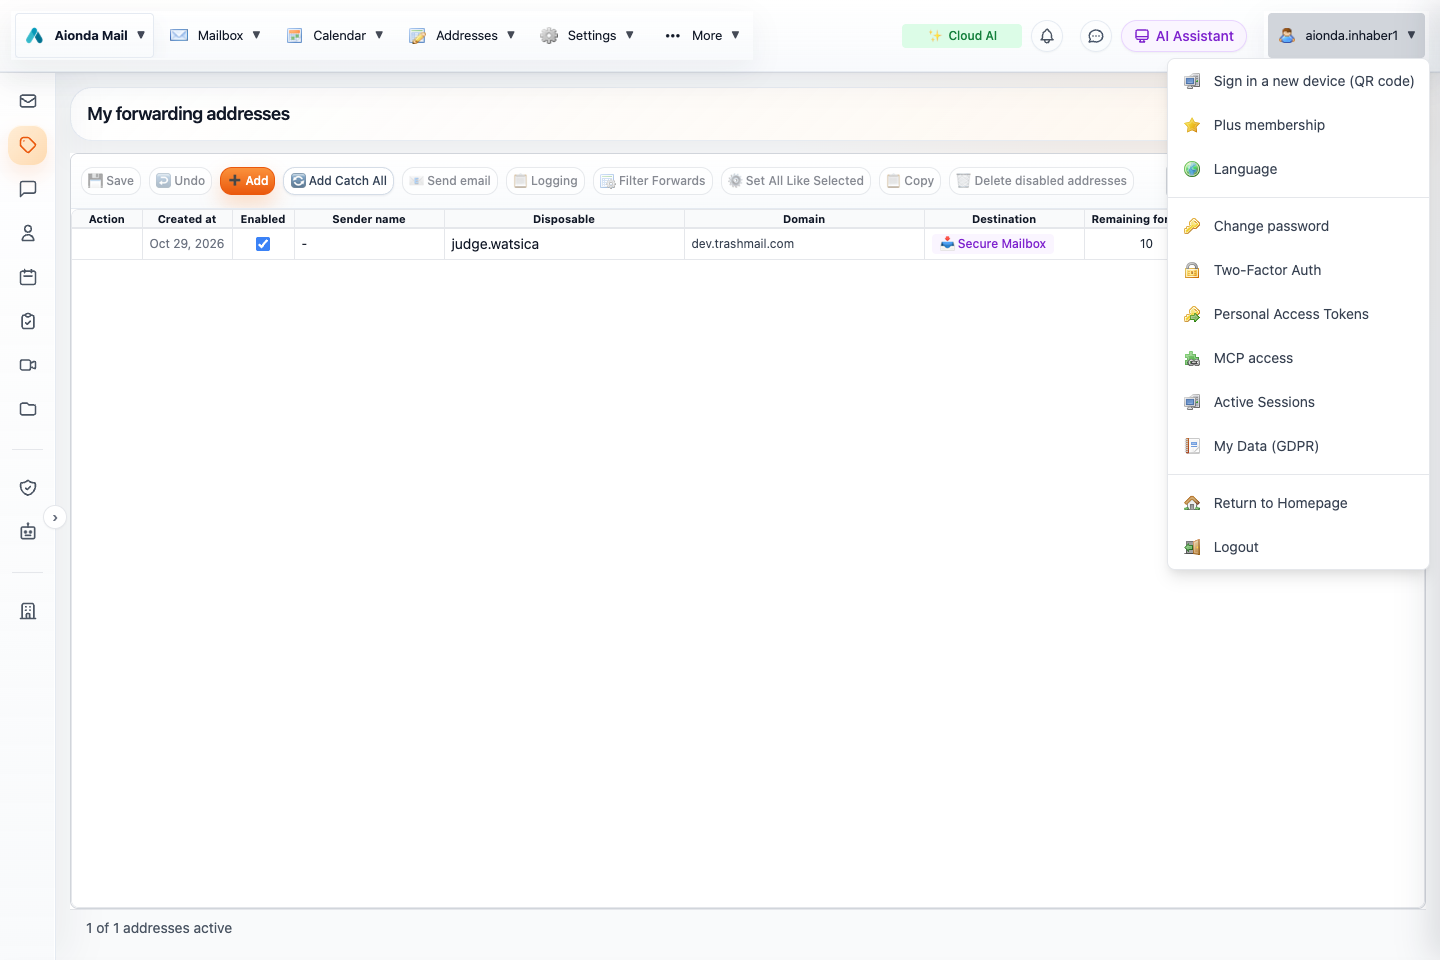
2. Open your account menu
In the Web app, click your username at the top right. Choose Personal Access Tokens. This is the account menu, not the Settings menu; the separate MCP access entry is for a different setup.
Open your username menu.
Choose Personal Access Tokens.
Select the screenshot to open the full-size image.
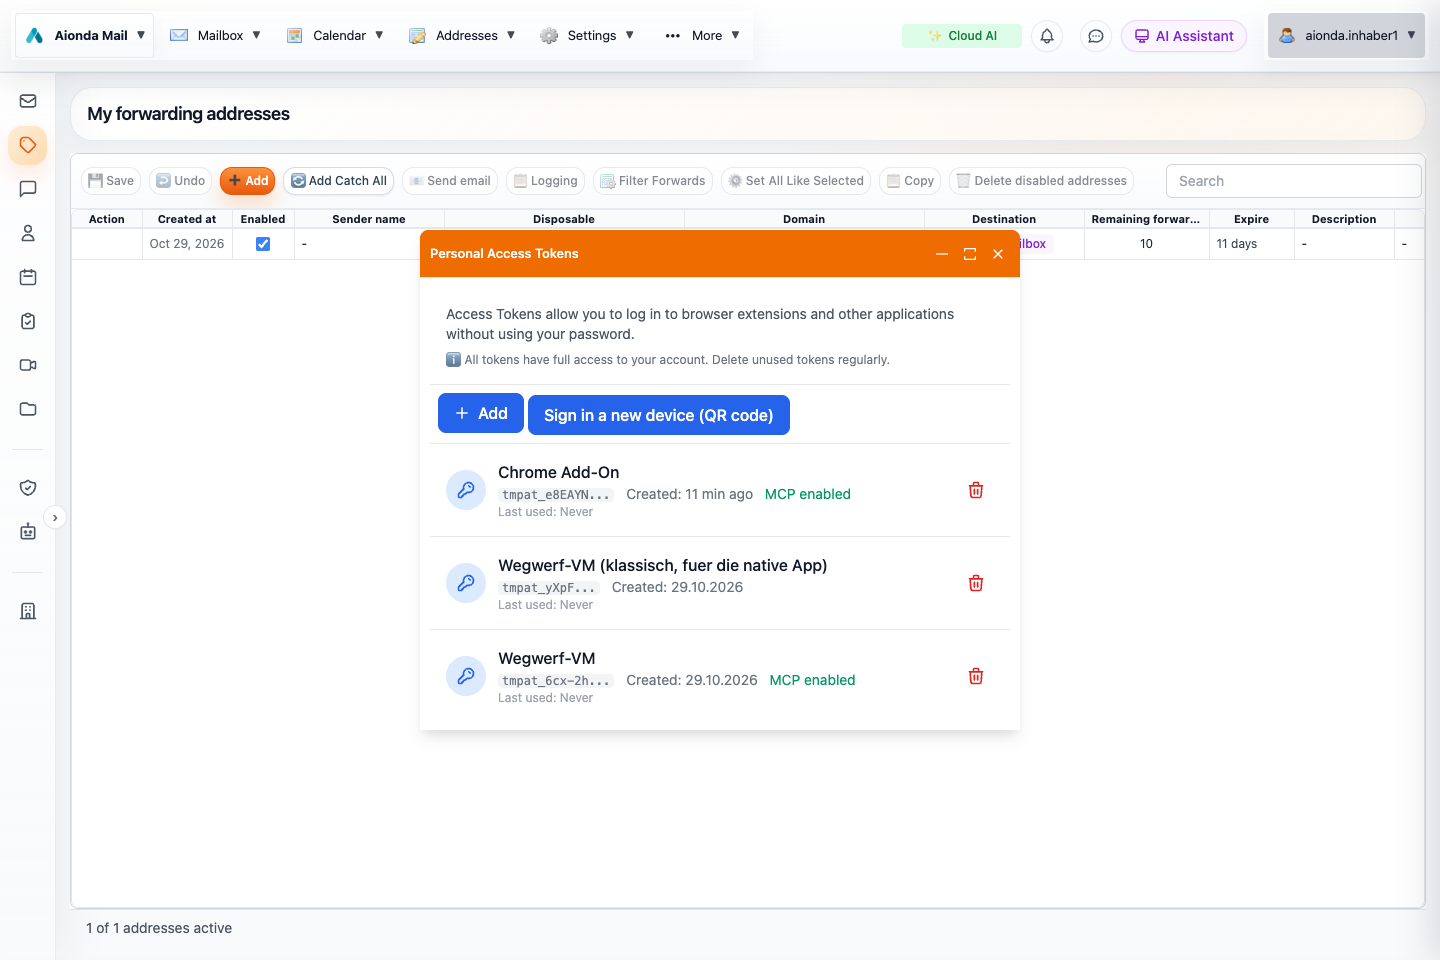
3. Add a token
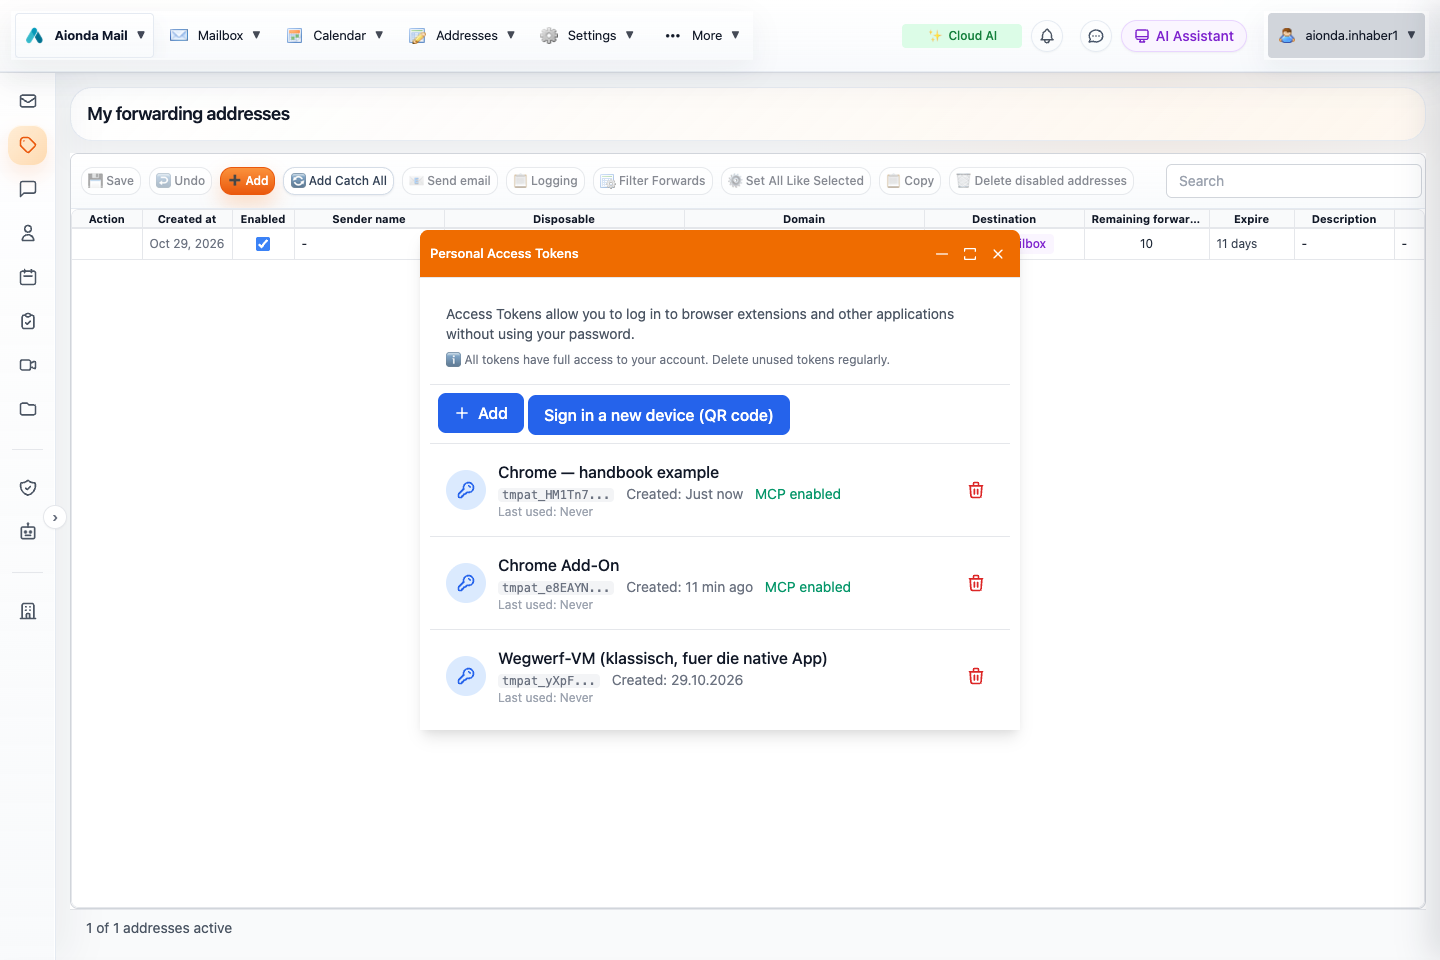
The Personal Access Tokens window lists existing tokens. Click Add. You do not need the “Sign in a new device (QR code)” action for this Chrome setup.
Choose Add in the Personal Access Tokens window.
Select the screenshot to open the full-size image.
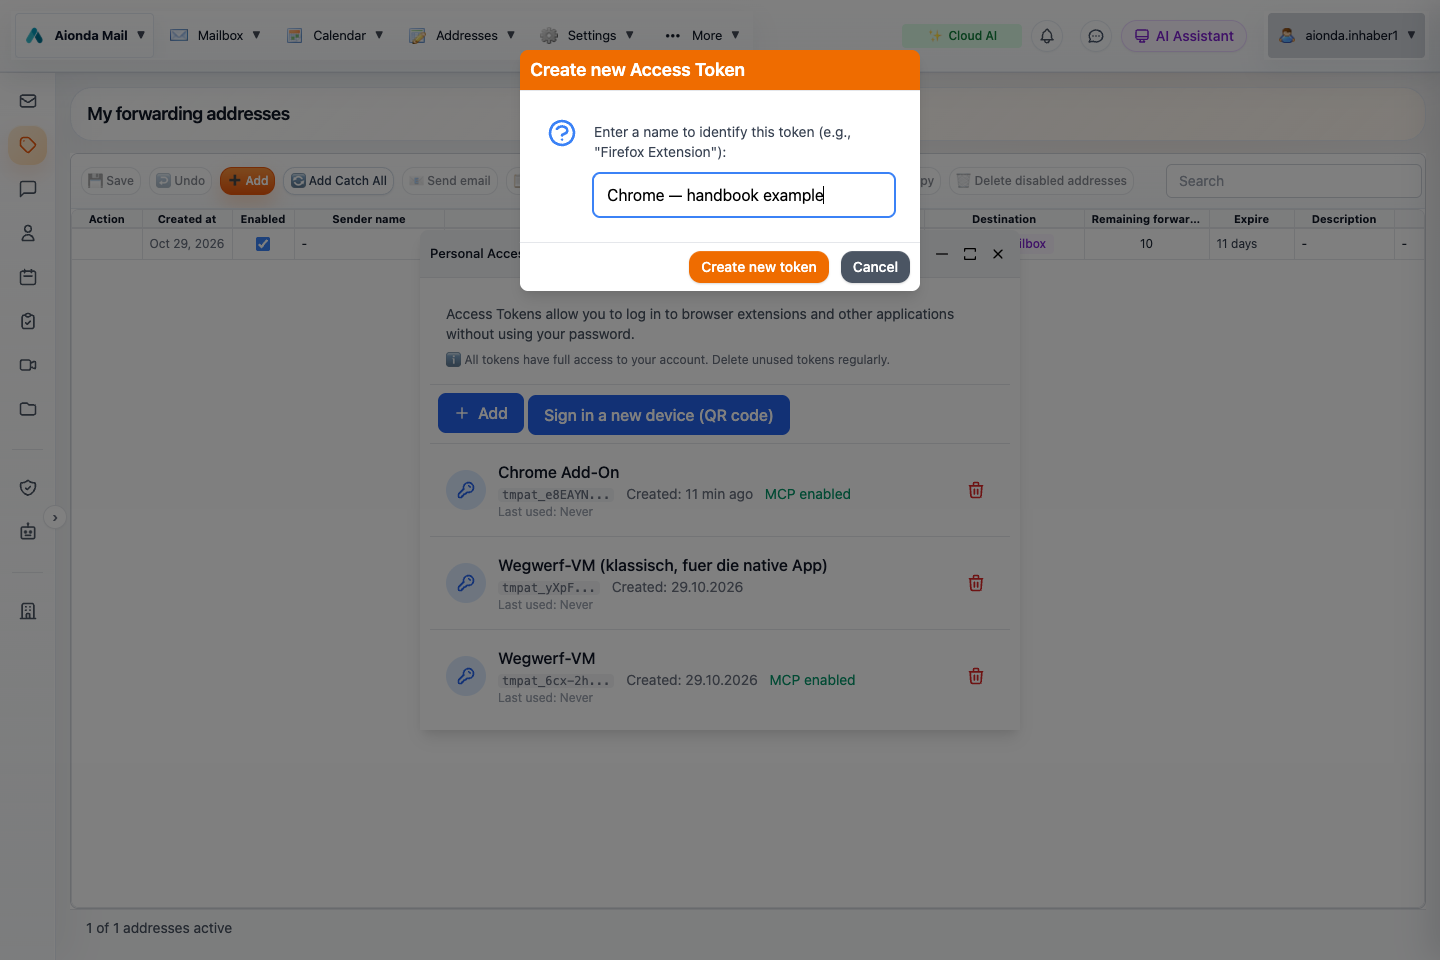
4. Give it a recognisable name and create it
Enter a name such as Chrome — my laptop. The name is only a label to help you identify the browser later. Choose Create new token.
Enter a recognisable name.
Choose Create new token.
Select the screenshot to open the full-size image.
5. Copy the Personal Access Token before closing
The Access Token created dialog displays the secret once. Use Copy beside the Personal Access Token, beginning with tmpat_. Store it securely if you need to paste it later. The dialog also shows a separate MCP token beginning with tmmcp_; do not use that MCP token for the browser add-on.
After copying, choose Done. Your new token now appears in the list with its name and a shortened prefix, as shown below. The full secret is deliberately not shown in this handbook. If you close the dialog before copying it, create a new token: the list cannot show the full secret again.
The token appears under its chosen name after you copy the secret and choose Done. Only a shortened prefix is visible here.
Select the screenshot to open the full-size image.
6. Sign in to the Chrome add-on with the token
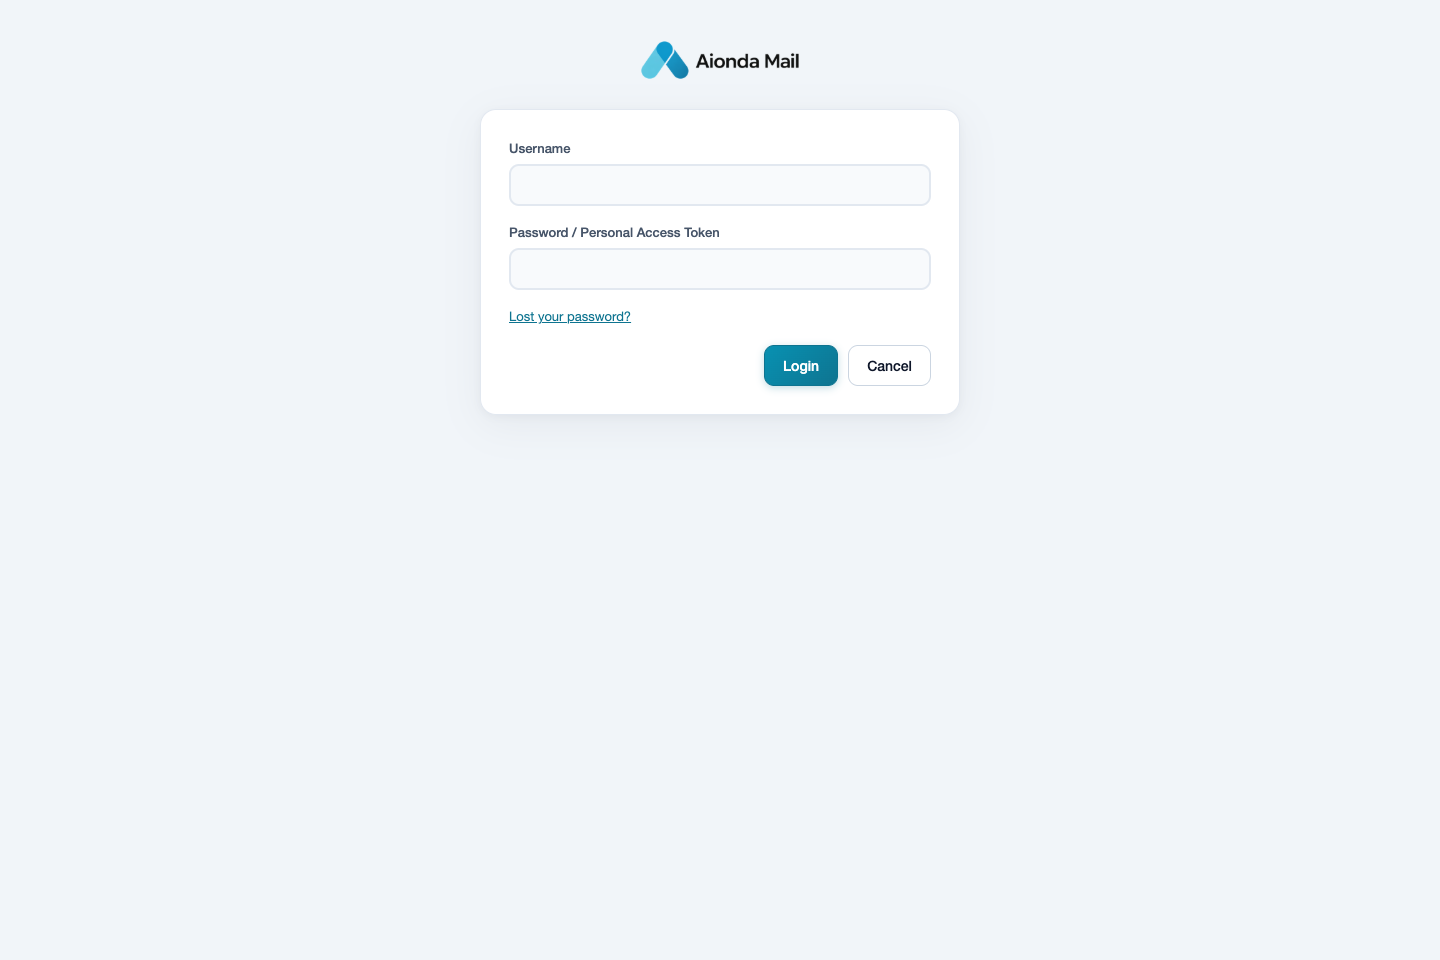
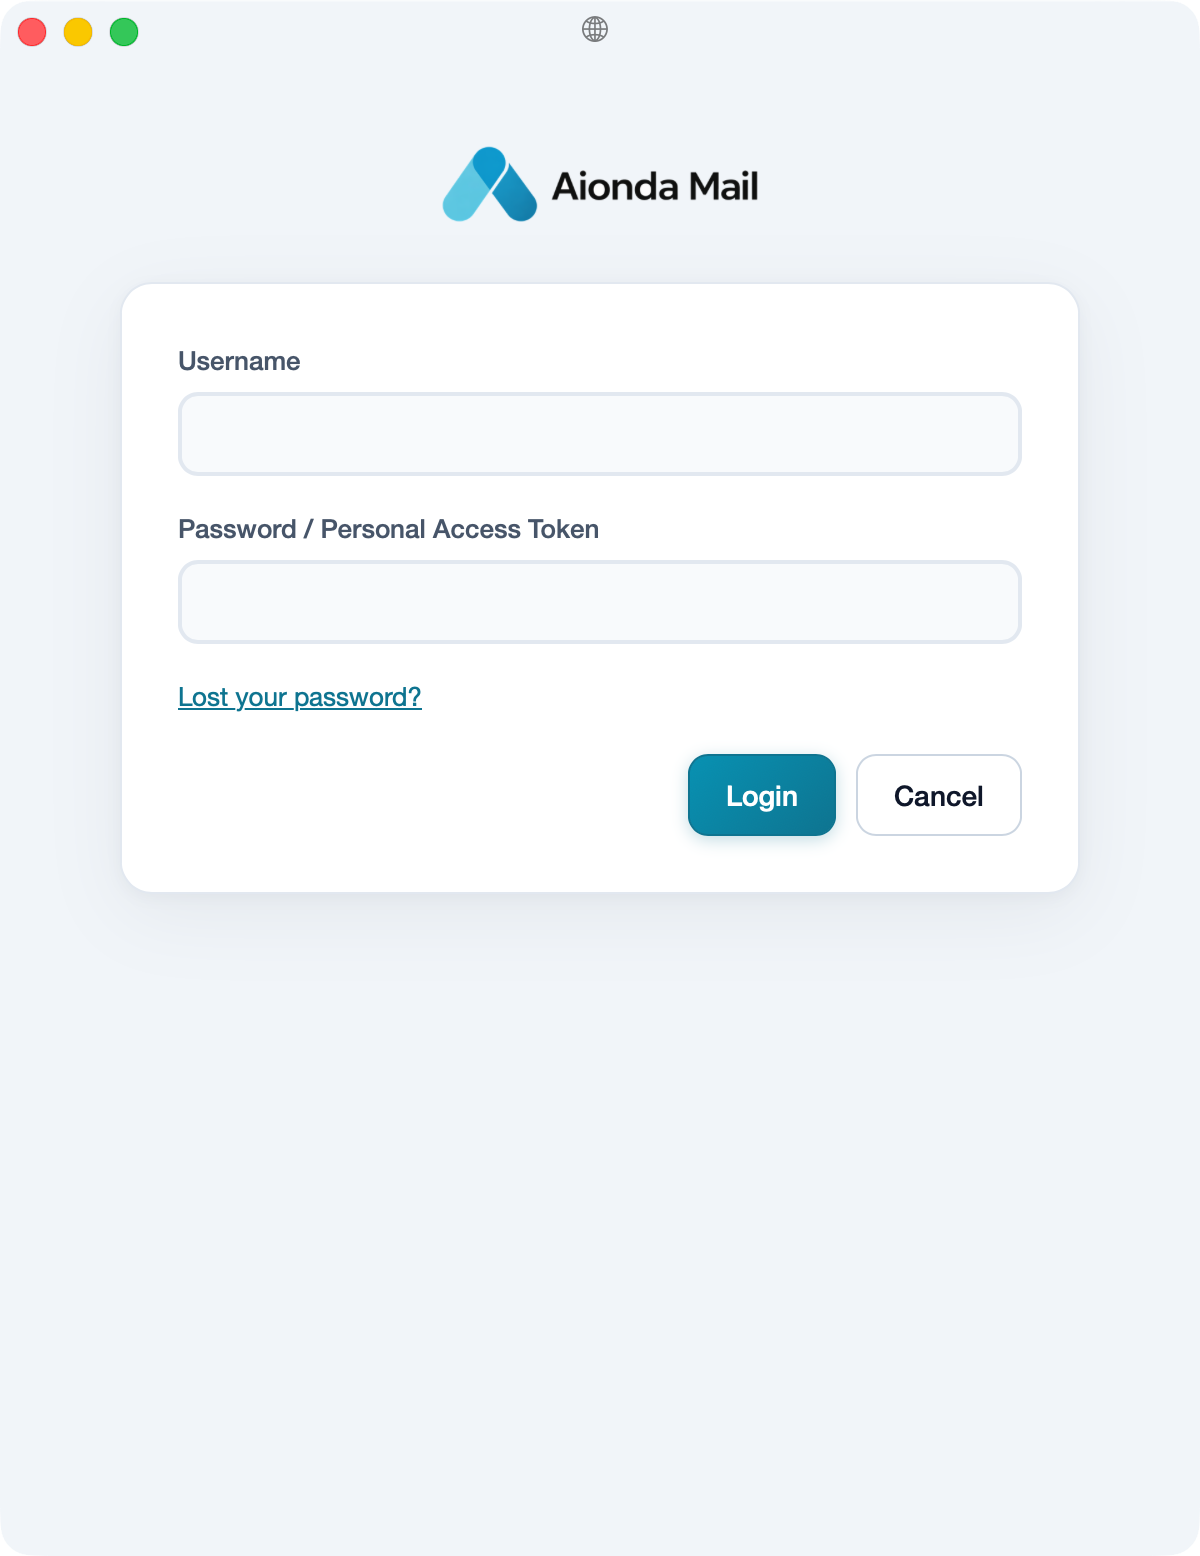
Open the extension, then Settings → Sign in if needed. Enter your Aionda username. Paste the copied PAT into Password / Personal Access Token, then choose Login. Complete any additional verification requested by the application.
Enter your account username.
Paste your Personal Access Token into Password / Personal Access Token.
Choose Login. No credentials are shown in this screenshot.
Select the screenshot to open the full-size image.
Tokens have full account access: treat them like a password. Use a separate token for each browser or device.
Choose useful defaults
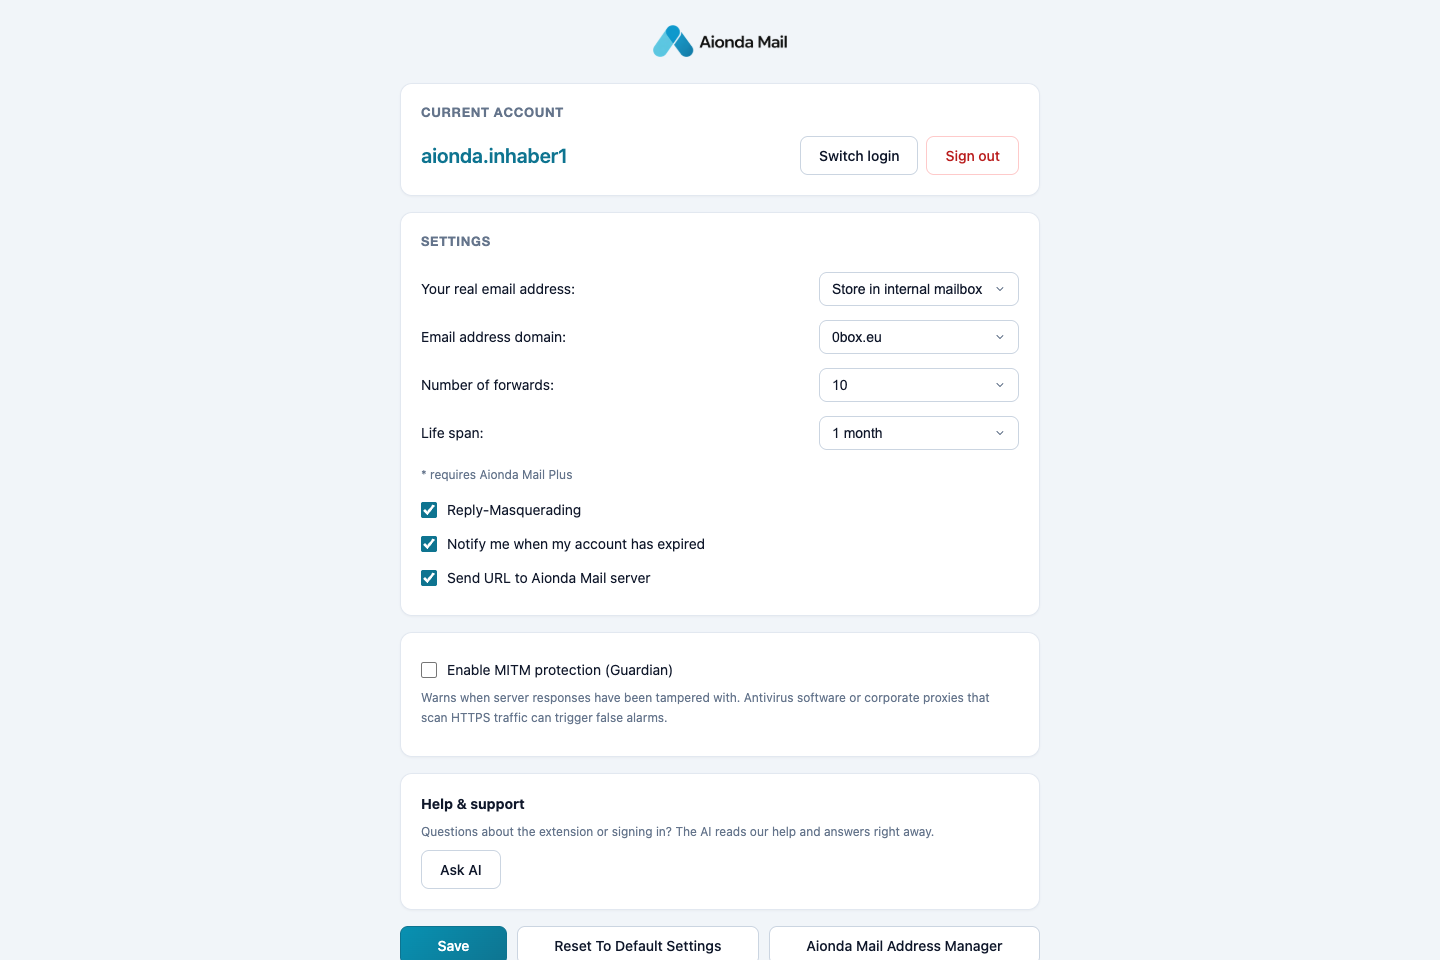
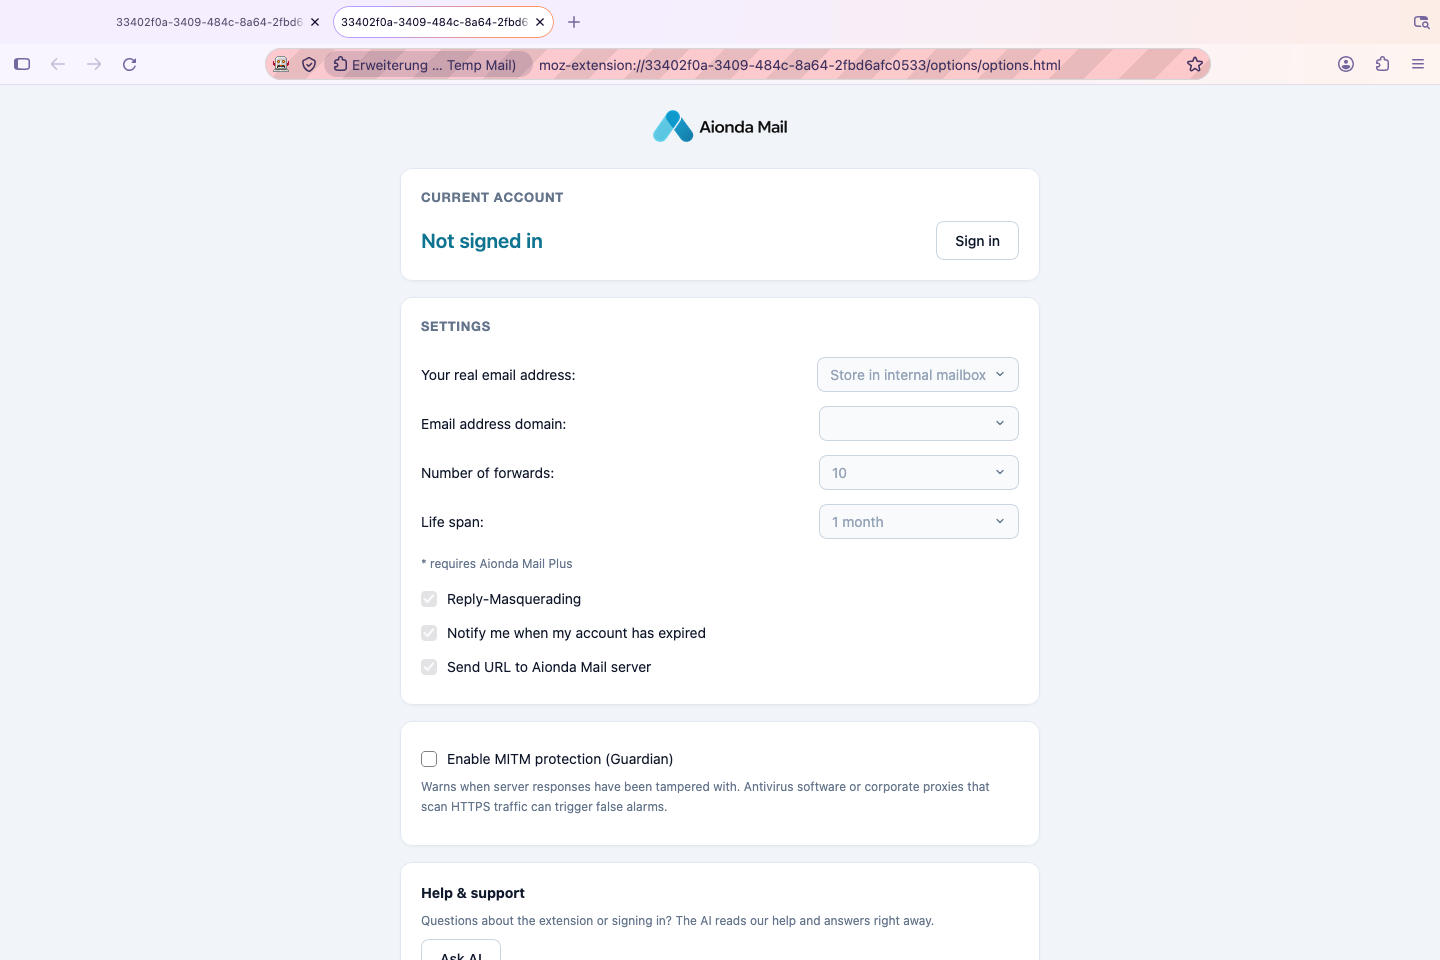
Confirm the active account.
Choose delivery, domain and default limits.
Guardian has a separate setting from mailbox phishing detection. Save changes using the action at the bottom of the page.
Select the screenshot to open the full-size image.
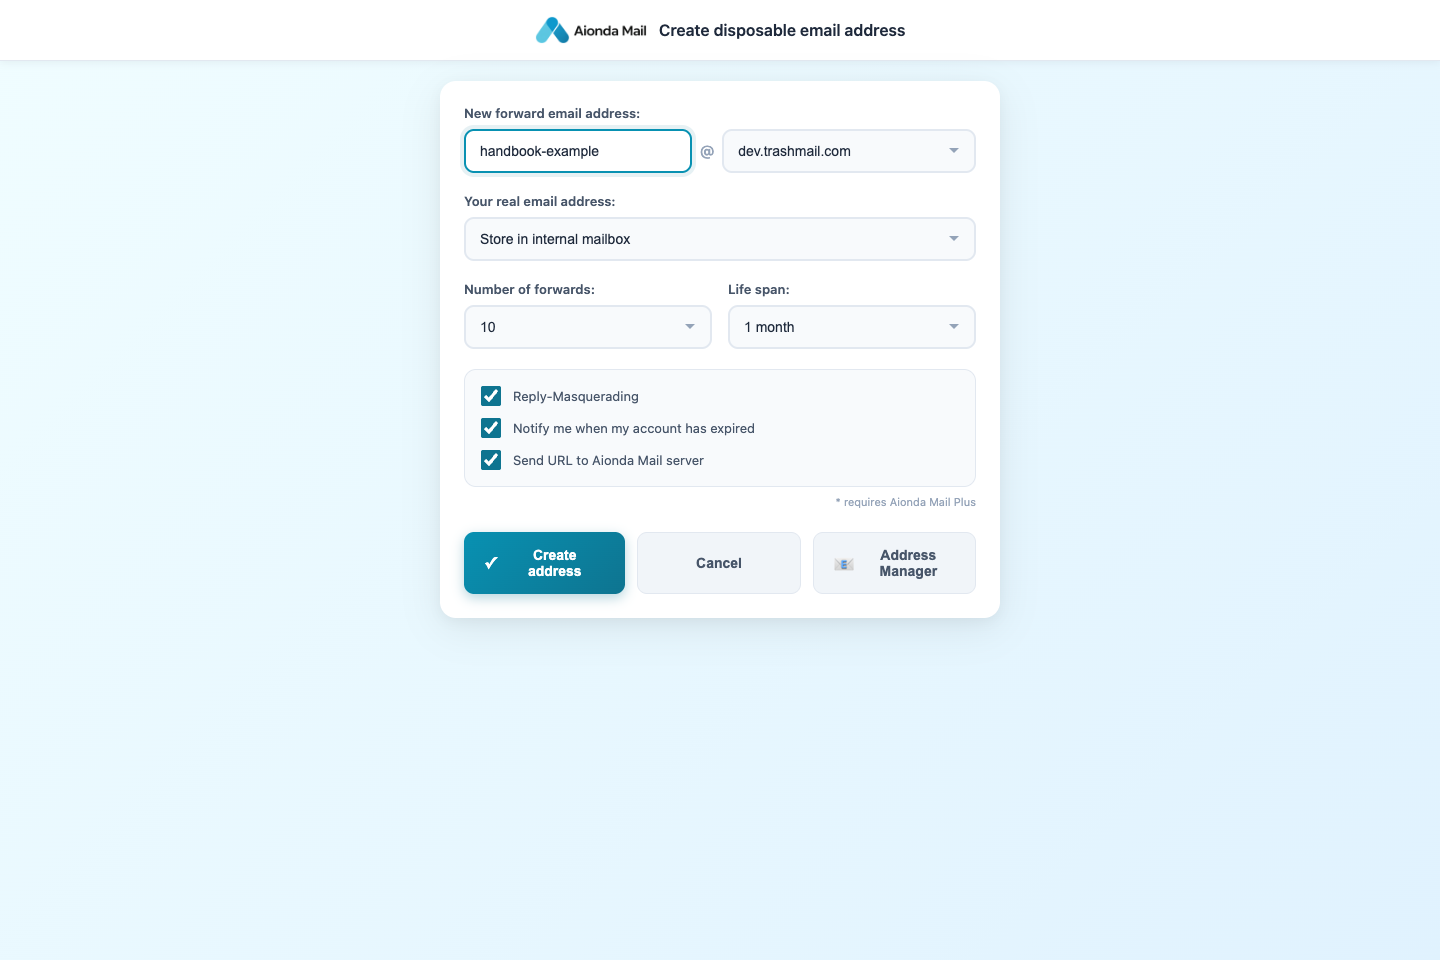
Your real email address: select the delivery destination. “Store in internal mailbox” means the Aionda mailbox rather than an external forwarding address.
Email address domain: the part after @ for new addresses.
Number of forwards and Life span: the default allowance and duration. Options marked with an asterisk require Plus. Check the actual values before creating an address.
Reply-Masquerading: the reply-masking option for forwarded mail; see the address chapter before relying on it to hide your external address.
Notify me when my account has expired: the expiration-notification option for the created address.
Send URL to Aionda Mail server: whether to associate the website URL with the created address.
Choose Save after changing defaults. You can still choose different values in an individual address dialog.
Create and insert an address on a website
Click the website’s email-address field.
Right-click that field and choose Paste disposable address. Alternatively, open the extension icon and choose Address for this page.
Review the proposed address name and domain, delivery destination, forwarding allowance and lifetime.
Choose Create address. The extension creates the address and attempts to insert it into the focused field. Check the form before submitting it.
If the site blocks insertion or the correct field is not focused, use the address shown by the extension and paste it into the field yourself.
Review the new address.
Choose the destination and limits.
Create address applies the action; Cancel leaves this example unsubmitted.
Select the screenshot to open the full-size image.
The screenshot is an unsubmitted Dev example. It uses a Dev domain; select an available public domain in your own account. Creating an address does not itself register you on the website: you still review and submit that website’s form.
Reuse and manage addresses
The context menu can offer previously used addresses for the current website. Reusing the same address is useful when returning to an existing account. Open Address Manager to inspect, disable, extend or remove an address. Before disabling an address used for sign-in or password resets, update the address at the other service if you still need access.
Guardian and permissions
Guardian is the add-on’s response-verification feature. Its setting is separate from AI phishing detection in the mailbox. A warning can also be caused by HTTPS inspection in antivirus software or a company proxy; read the warning rather than treating it as a spam verdict. The extension needs website access to insert addresses into forms. Chrome’s site-access restrictions may prevent it working on a page, and browser-internal or protected store pages may not permit insertion.
If something does not work
Check Settings: the expected account should be shown. Use Switch login if needed.
Check that Chrome permits the extension on the site and that the intended email field has focus.
Check the address name, domain and account limits if creation is rejected.
Use Address Manager or the Web app if a website prevents insertion.
Mozilla Firefox
Install the Firefox extension, connect it with a Personal Access Token, and create an address for a website.
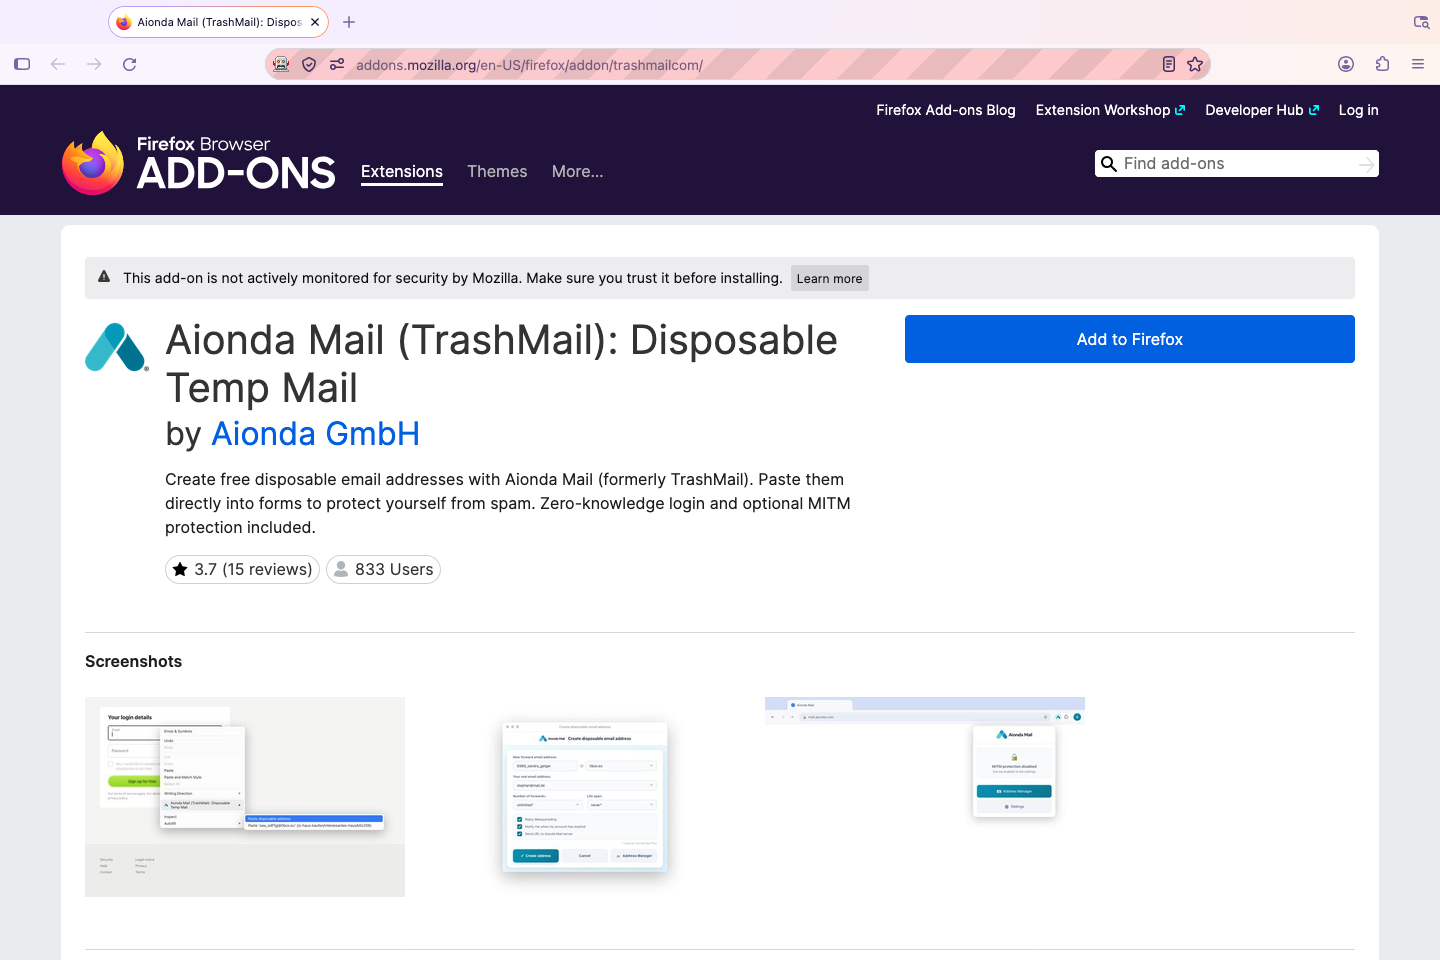
Check the Aionda Mail extension and its publisher.
Choose Add to Firefox on the official Mozilla listing.
Select the screenshot to open the full-size image.
Choose Add to Firefox, review the requested permissions and confirm the installation.
Open Firefox’s Extensions button (puzzle-piece icon). Open Aionda Mail. You can pin it to the toolbar through Firefox’s extension menu.
Open the extension’s Settings, then choose Sign in.
The screenshots below show the published Firefox extension version 6.1.7 in an isolated test profile. The store name still includes TrashMail, the former product name. Firefox’s surrounding browser labels follow your browser language.
2. Create a Personal Access Token in Aionda
Being signed in to the website does not sign in the add-on. For this setup, use your Aionda username and a Personal Access Token (PAT).
From the Aionda homepage, sign in or choose Back to mailbox.
Open your username menu at the top right → Personal Access Tokens → Add.
Enter a name such as Firefox — my laptop, then choose Create new token.
Copy the Personal Access Token beginning with tmpat_ before closing the dialog. Do not use the separate tmmcp_ token.
Choose Done. Keep the token private; the list does not reveal the full secret again.
Defaults become available after connecting your account.
Select the screenshot to open the full-size image.
Choose Sign in. On the welcome screen, choose Enter your username and password; despite that welcome wording, the next screen explicitly accepts a Personal Access Token.
Enter your username.
Paste the Personal Access Token here.
Choose Login.
Select the screenshot to open the full-size image.
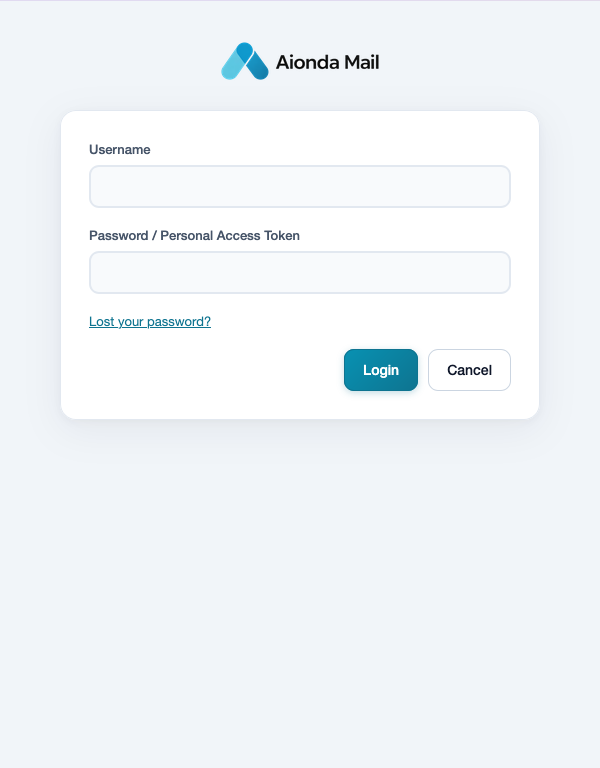
Enter your Aionda Username.
Paste your PAT into Password / Personal Access Token.
Choose Login and complete any additional verification requested.
Return to Settings and check that the intended account is shown.
The screenshot leaves credentials empty. Use a separate token for this browser/device and treat it like a password.
4. Set your defaults
In Settings, choose the delivery destination under Your real email address. Store in internal mailbox delivers to Aionda’s Secure Mailbox. Choose a default domain, forwarding allowance and life span. Options marked with an asterisk require Plus. Review Reply-Masquerading, expiration notifications and whether the website URL is sent with address creation. Choose Save after changing defaults.
5. Create an address on a website
Open the website’s form and click its email-address field.
Right-click the field and choose Paste disposable address, or open the extension icon and choose Address for this page.
Review the proposed address, domain, delivery destination, allowance and lifetime.
Choose Create address. Check that the address has been inserted into the intended field.
If insertion is blocked, copy the created address and paste it yourself. Review the website form before submitting it.
Creating the address does not submit the website’s form. Reuse an existing address for a website account when appropriate; manage its lifetime and delivery in Address Manager or the Aionda Web app.
If it does not work
Check that the extension is enabled in Firefox’s Add-ons and Themes, and that its permissions allow it on this site.
Private windows require separate permission. Firefox’s own internal pages and protected store pages may not allow insertion.
Make sure the intended form field has focus and the account shown in Settings is correct.
A Guardian response-verification warning is different from the mailbox’s AI phishing detection. Read the details; HTTPS inspection by company proxies or antivirus software can affect it.
Safari on Mac
Enable the extension included with Aionda Mail, connect your account with a Personal Access Token, and use an address in a website form.
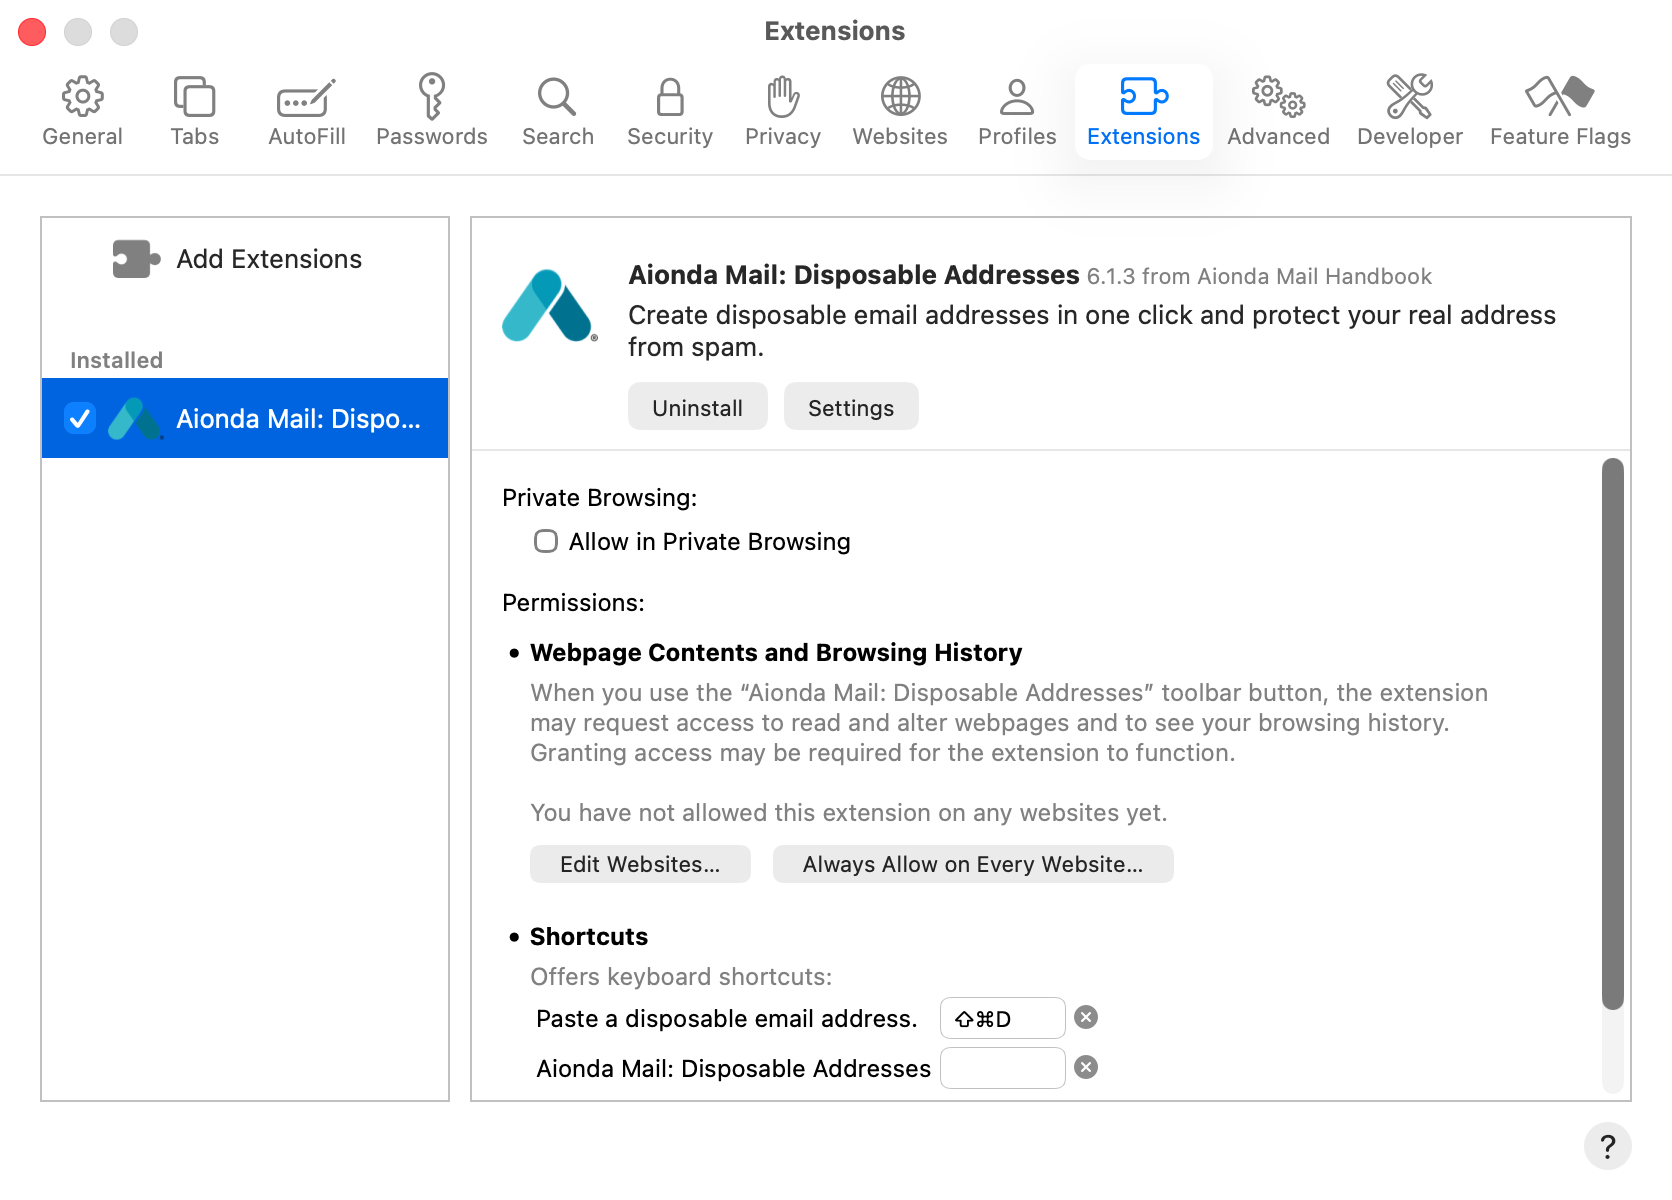
Open Safari Settings → Extensions.
Enable Aionda Mail and select its row.
Open the add-on’s Settings.
Review access to websites.
Select the screenshot to open the full-size image.
1. Install Aionda Mail for macOS
The Safari extension is included with the Aionda Mail app for Mac. Install the app from the App Store and open it. Installing the Chrome or Firefox extension does not install the Safari extension.
2. Enable it in Safari
Open Safari.
In the Mac’s menu bar choose Safari → Settings… (called Preferences in older macOS versions).
Open the Extensions tab, shown in the screenshot above.
Tick Aionda Mail: Disposable Addresses in the list on the left and select its row.
Review the permissions and website access. Allow access to the site where you want to insert an address. Private Browsing has a separate permission.
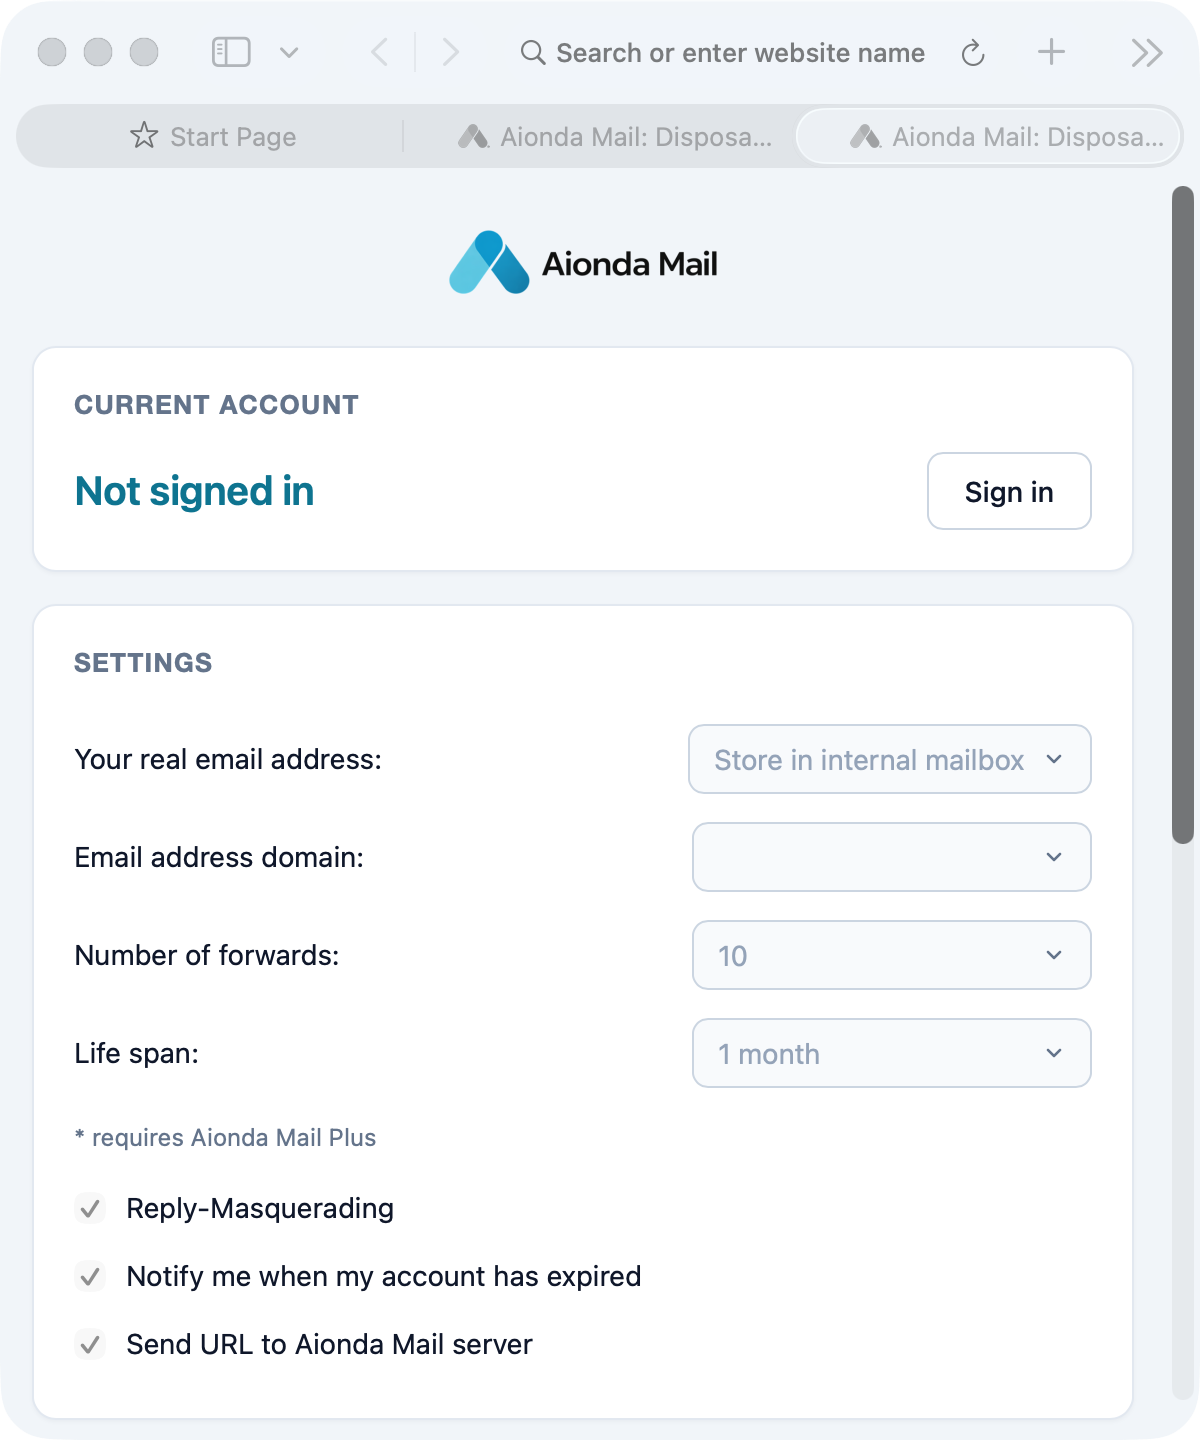
Click the extension’s Settings button to open its account and default-address settings in Safari.
The screenshots show Safari on a Mac with an isolated test installation of Aionda Mail; the extension identifies itself as version 6.1.3. Button positions can differ by Safari/macOS version. Apple explains the browser controls in Use Safari extensions.
3. Create a Personal Access Token
For this setup you need your Aionda username and a Personal Access Token (PAT). Signing in to the native app or website does not automatically connect the extension.
Open the Aionda homepage. Sign in, or choose Back to mailbox if already signed in.
Open your username menu → Personal Access Tokens → Add.
Name the token, for example Safari — my Mac, then choose Create new token.
Copy the Personal Access Token beginning with tmpat_, then choose Done. Do not paste the separate tmmcp_ token into the extension.
Set your default delivery and address options after connecting.
Select the screenshot to open the full-size image.
In the extension’s Settings page, choose Sign in.
On the welcome screen choose Enter your username and password. The following field also accepts a Personal Access Token.
Enter your Username and paste your PAT into Password / Personal Access Token.
Choose Login. Complete any requested verification, then check the account shown in Settings.
Enter your username.
Paste your Personal Access Token.
Choose Login.
Select the screenshot to open the full-size image.
The example leaves credentials empty. The token is a secret credential, not the name you gave it in the token list.
5. Choose the defaults for new addresses
Choose Your real email address as the delivery destination, or Store in internal mailbox for Aionda’s Secure Mailbox. Choose the default domain, forwarding allowance and life span. Review Reply-Masquerading, expiration notifications and whether to associate the website URL with the address. Options marked with an asterisk require Plus. Scroll down and choose Save.
6. Create and insert an address
Open the website’s form and focus its email-address field.
Use the Aionda Mail toolbar button and choose Address for this page, or use the field’s context menu → Paste disposable address. On a Mac, Control-click or a secondary click opens the context menu.
If Safari asks for access to the website, review and grant the access needed for this action.
Check the address name, domain, destination, allowance and lifetime in the creation dialog.
Choose Create address. Verify that it appears in the correct form field; if insertion is blocked, copy the address and paste it manually.
Review the website’s form before submitting it. Creating an Aionda address does not submit the form for you.
Use Address Manager or the Web app to manage addresses later. Reuse an existing address when signing back in to an existing website account.
If the icon or insertion is missing
Confirm the Mac app is installed and the extension is enabled in Safari → Settings → Extensions.
If the toolbar is crowded, check Safari’s additional toolbar items or customize the toolbar.
Check website permissions; permission on one site does not necessarily grant it on every site. Private Browsing is controlled separately.
Safari’s internal pages, some protected pages and some website forms may not support insertion. Use manual copy and paste as the fallback.
Check that Settings shows the intended account and that the chosen address limits are available for your plan.
This walkthrough is for Safari on macOS. iPhone and iPad use a different Settings interface; installing the Mac app does not install an extension on those devices. See native apps for platform access.
Keep the Inbox manageable without losing control of where messages go.
Choose a folder before comparing counts or searching.
Compose a new message.
Select a message to read it.
Select the screenshot to open the full-size image.
Read and inspect
Select a folder, then a message. Expand the header to inspect the sender, To and Cc fields rather than relying only on the display name. Bcc recipients are normally absent from delivered message headers: receiving a message does not guarantee that your address appears in To or Cc. Delivery information and the original headers can help explain which address received it.
Compose and reply
Choose New email, Reply, Reply all or Forward.
Check the From address and every recipient. Reply all can include people beyond the original sender.
Write a subject and message, then add attachments if required. Review AI-generated text before using it.
Send and check Sent. If sending fails, keep the draft and inspect the error before retrying to avoid duplicate messages.
Organize
Create folders for projects or topics. Expand or collapse folder branches to reduce clutter. Select messages to move, delete, flag or mark as read. Deleting to Trash differs from permanent deletion. Folder sharing is an explicit permission grant; a colleague appearing in Contacts does not give them access to your mailbox.
Search and flagged mail
Use search and the available filters to narrow the current view. Check the selected folder and search scope before comparing results with Tasks → Flagged email. A folder-specific result is not the same population as all flagged messages. Loading more rows is a presentation detail, not a reliable way to count the entire mailbox.
Multiple clients
Connected clients receive change notifications and refresh affected data after new mail, moves or deletions. An offline or suspended app catches up when it reconnects. If another device looks stale, check connectivity and refresh before repeating the action.
Actions while reading an email
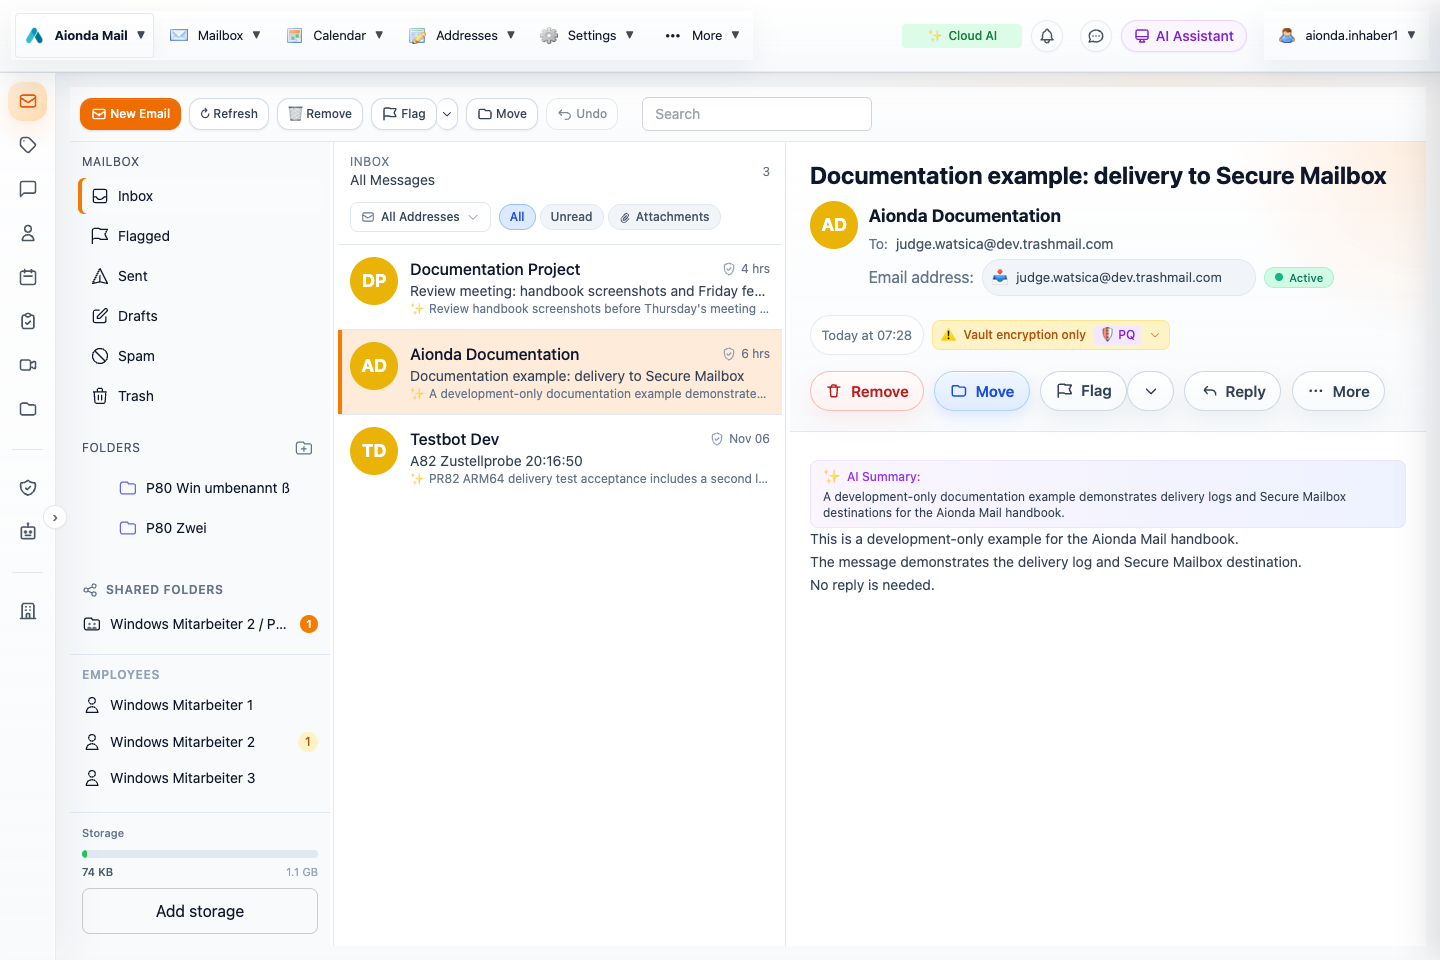
Open a message, then use the buttons below its header. The main mailbox toolbar can act on selected messages; the reading-pane controls act on the email you have opened. On smaller screens, additional actions move into More (…) or the bottom action bar.
Main actions for this email.
More opens the additional actions.
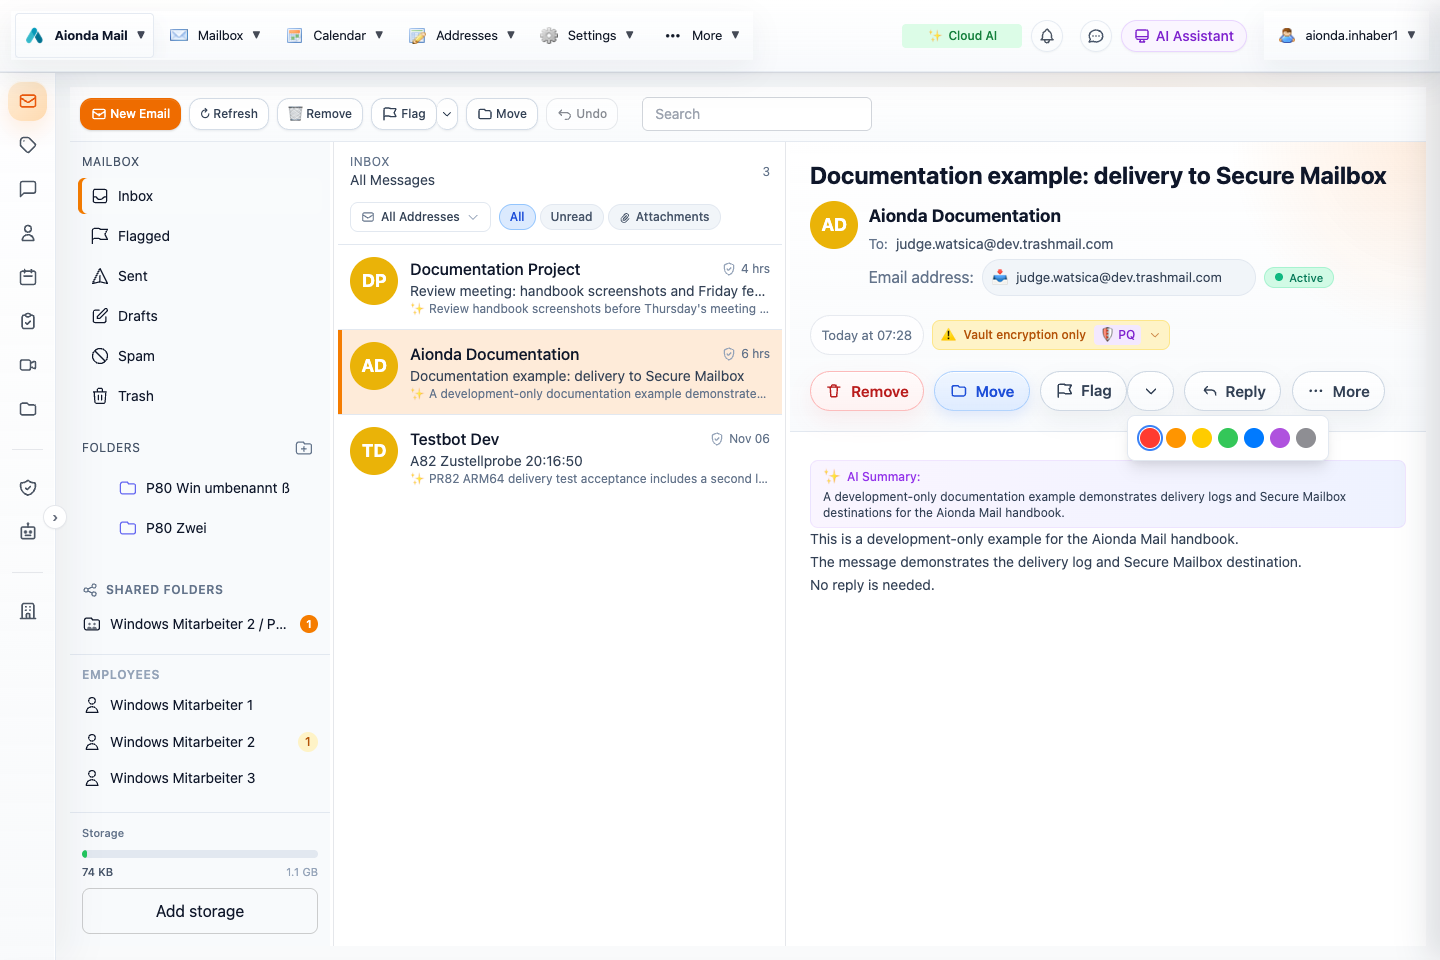
Print and Save as PDF are in this menu.
Select the screenshot to open the full-size image.
Action
What happens / what to check
Reply
Open a reply draft. Check the recipient and sending address before sending.
More → Reply all
Include the reply recipients from the original message. Review To and Cc so you do not send a private response to a whole group.
More → Forward
Prepare the email for another recipient. Review the quoted content and attachments before sharing.
Move
Choose the destination folder. Moving a message removes it from its previous folder; it does not delete its content.
Remove / Delete
Remove the selected email through the mailbox deletion flow. Review the confirmation and current folder: moving to Trash and deleting permanently are different operations.
Flag and its arrow
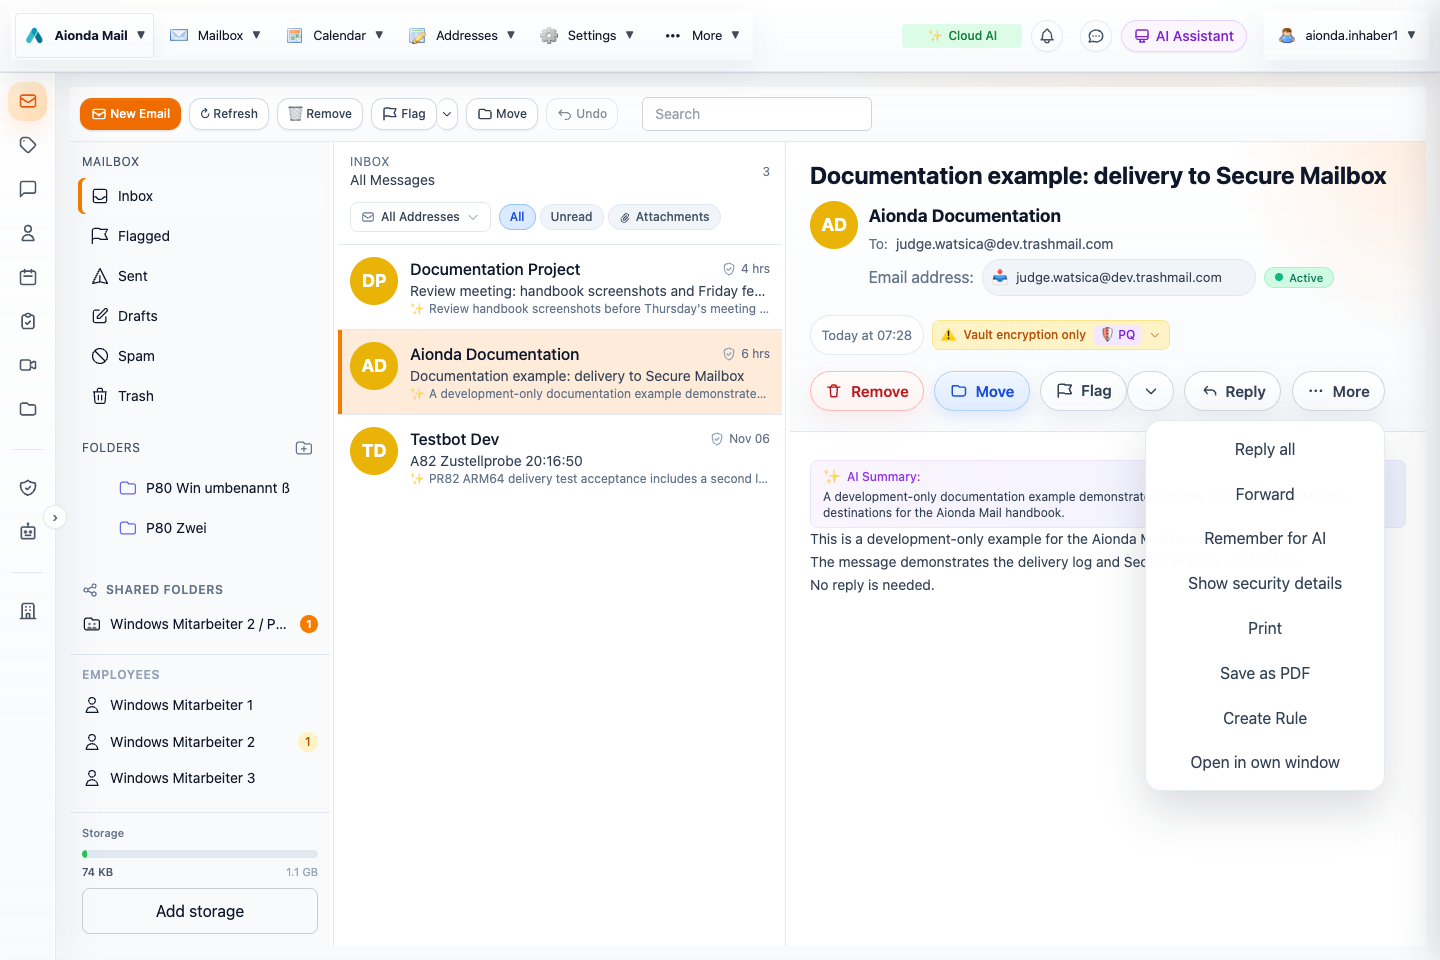
Flag or unflag the message; use the adjacent arrow to choose a color. See the illustrated color guide below.
More → Remember for AI
Make the email available to the assistant’s remembered-email feature. The action changes to Remove from AI when already remembered. This is separate from a colored flag; review AI processing settings.
More → Show security details
Open the same encryption-route dialog as the security badge. See the route diagram below.
More → Print
Open the printable email view and the browser/system print workflow. Select a printer, check the preview, then confirm or cancel.
More → Save as PDF
Open the print dialog, choose Save as PDF as the destination, then choose a file name and save. Check the preview first. A downloaded PDF is a separate copy outside the encrypted mailbox.
More → Create Rule
Start a rule based on this email. Check its conditions, action and scope before saving; see Rules.
More → Open in own window
Read the email in a separate window, where supported. If nothing opens, check the browser’s popup permission.
Sender, recipient and address actions
Click the sender’s name to open Sender options: add the sender to Contacts, copy the email address, or compose a new message to that address. Check the full address before adding it. The receiving-address chip lets you copy the address; its address menu also opens it in Address Manager. Original To/Cc information and the delivery address answer different questions, especially for forwarded mail or Bcc delivery.
Attachments, remote images and the message view
Use an attachment’s download control to save it. Preview behavior depends on file type and browser support. Only open files you expected. If a remote-images notice appears, loading those images can contact the sender’s server; choose deliberately. When available, the per-email display controls let you choose Light, Dark or System. If a sender’s HTML has poor contrast, try Light; this changes presentation, not the original message. Use the offered translation controls when needed and compare with the original for important details. PGP messages can offer signature/key information and key-import actions; see the PGP chapter. An AI summary is generated assistance, not a replacement for the original content.
Use colored flags
Open the message and click the arrow next to Flag.
Choose Red, Orange, Yellow, Green, Blue, Purple or Grey.
Use the main Flag button to remove a flag when it is no longer needed.
Open Flagged or the relevant task/filter view to find marked mail again. Check the folder scope when comparing counts.
Open the arrow beside Flag.
Choose one of the seven colors.
Select the screenshot to open the full-size image.
Colors are organizational labels you choose, not spam verdicts or security ratings. For example, you could use red for a reply needed and blue for reference material. Agree on meanings with your team instead of assuming that the application assigns one. A message has one selected flag color at a time.
Open the encryption / PQ route diagram
Open an email.
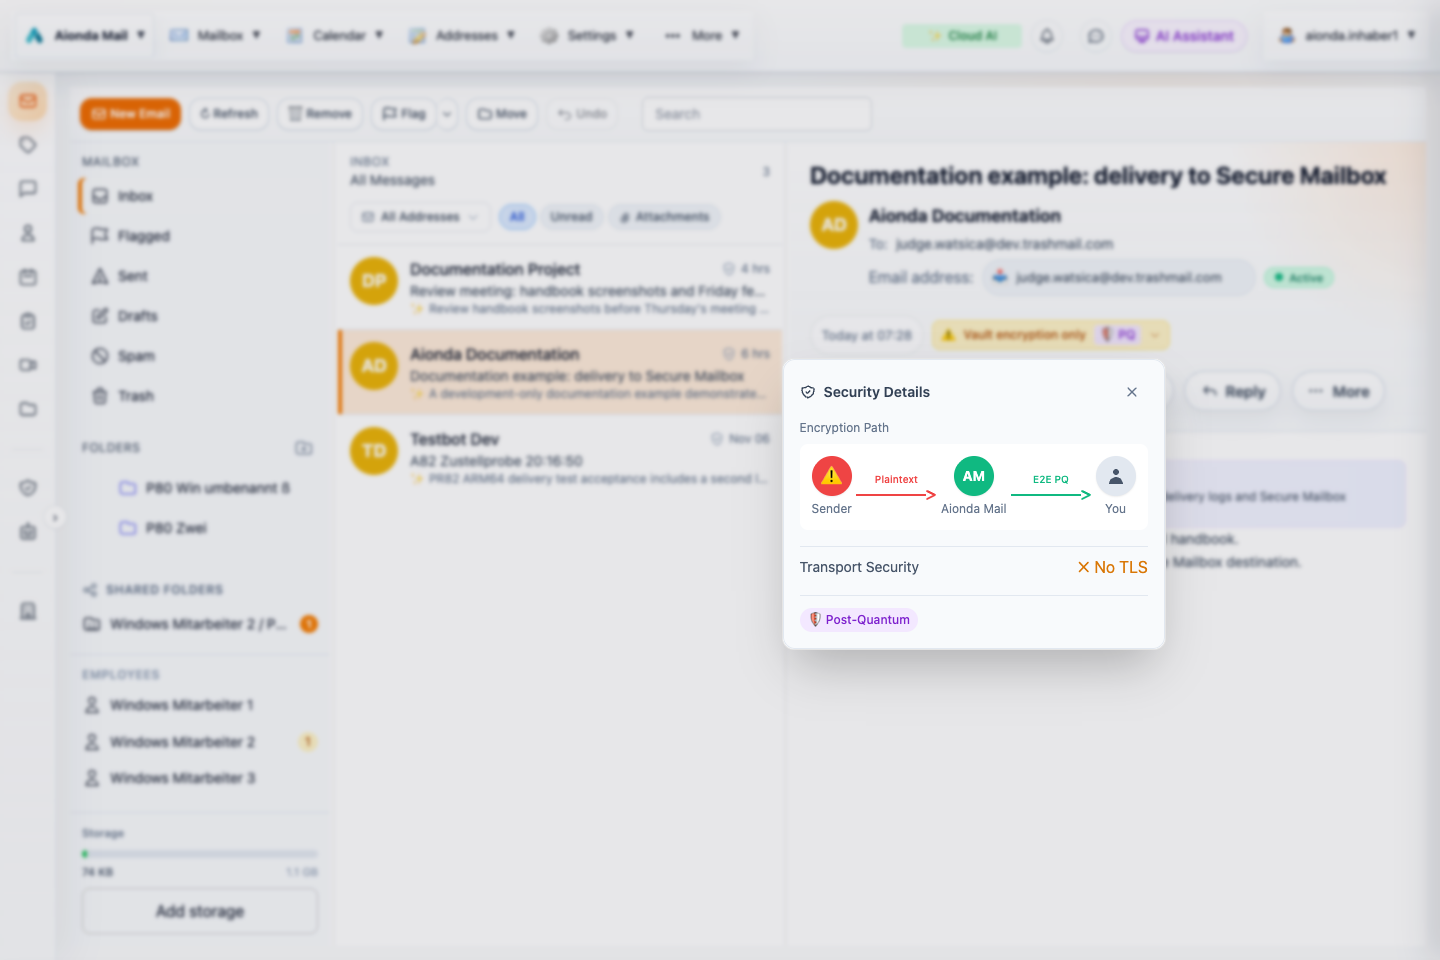
Below the sender and delivery information, click its security badge, for example Vault encryption only with the PQ label. In German this is “Nur Vault-Verschlüsselung”.
Alternatively choose More → Show security details. On a small screen the badge may be hidden; use this More-menu action.
Read the arrows and the transport status, then close the dialog using its ×.
Sender-to-Aionda protection for this test message.
The encrypted mailbox path to you.
Transport status and PQ mailbox protection.
Close the dialog.
Select the screenshot to open the full-size image.
Read the diagram from left to right: Sender → Aionda Mail → You. The first segment describes the detected protection before Aionda received the email; the second represents the encrypted mailbox path. In this deliberately unencrypted Dev test delivery, the first arrow says Plaintext, while the mailbox arrow says E2E PQ. This is an example of a particular message, not a statement that all incoming Aionda mail arrives without TLS.
Vault encryption only does not mean the mailbox copy is unencrypted. It means you must distinguish that mailbox protection from the sender’s delivery protection. TLS and PGP, when detected, change the information shown. The diagram summarizes header-derived information; it is not a verified trace of every Internet hop. If headers are incomplete, the current UI conservatively does not credit TLS: that alone cannot prove that every prior connection was unencrypted.
For the meaning of missing SPF, failed DKIM, DMARC and unencrypted transport, read Understand sender checks and transport security. These are different checks: an encrypted email can still be phishing, and a missing authentication result alone does not prove fraud.
Everyday use · Chapter 6
Write emails with the composer and AI
Choose the right sender and recipients, write or refine your message, and review the final email before sending.
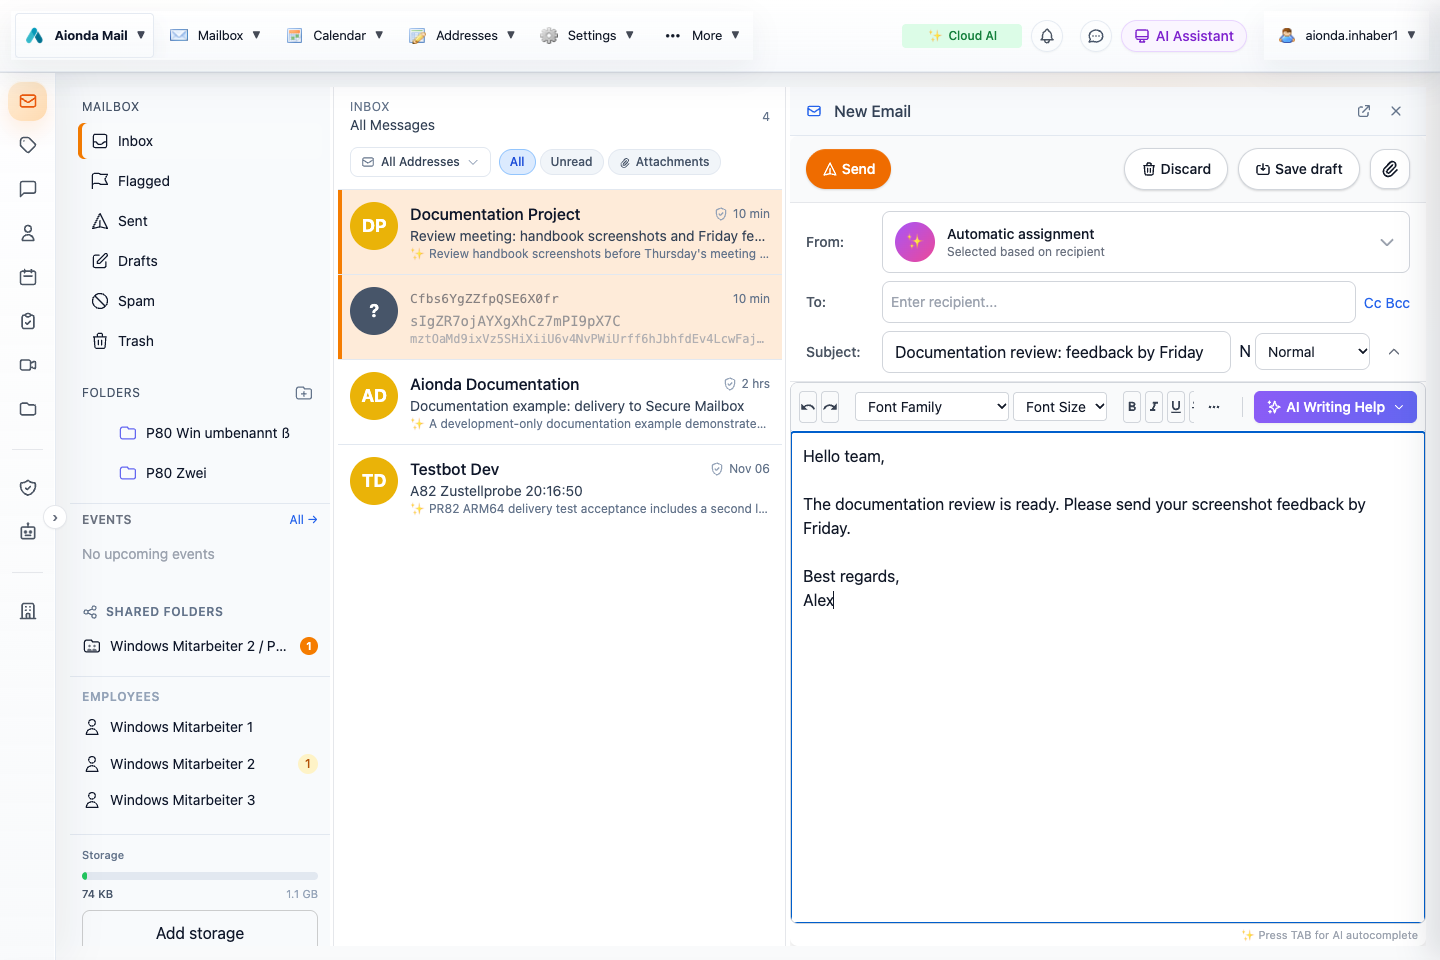
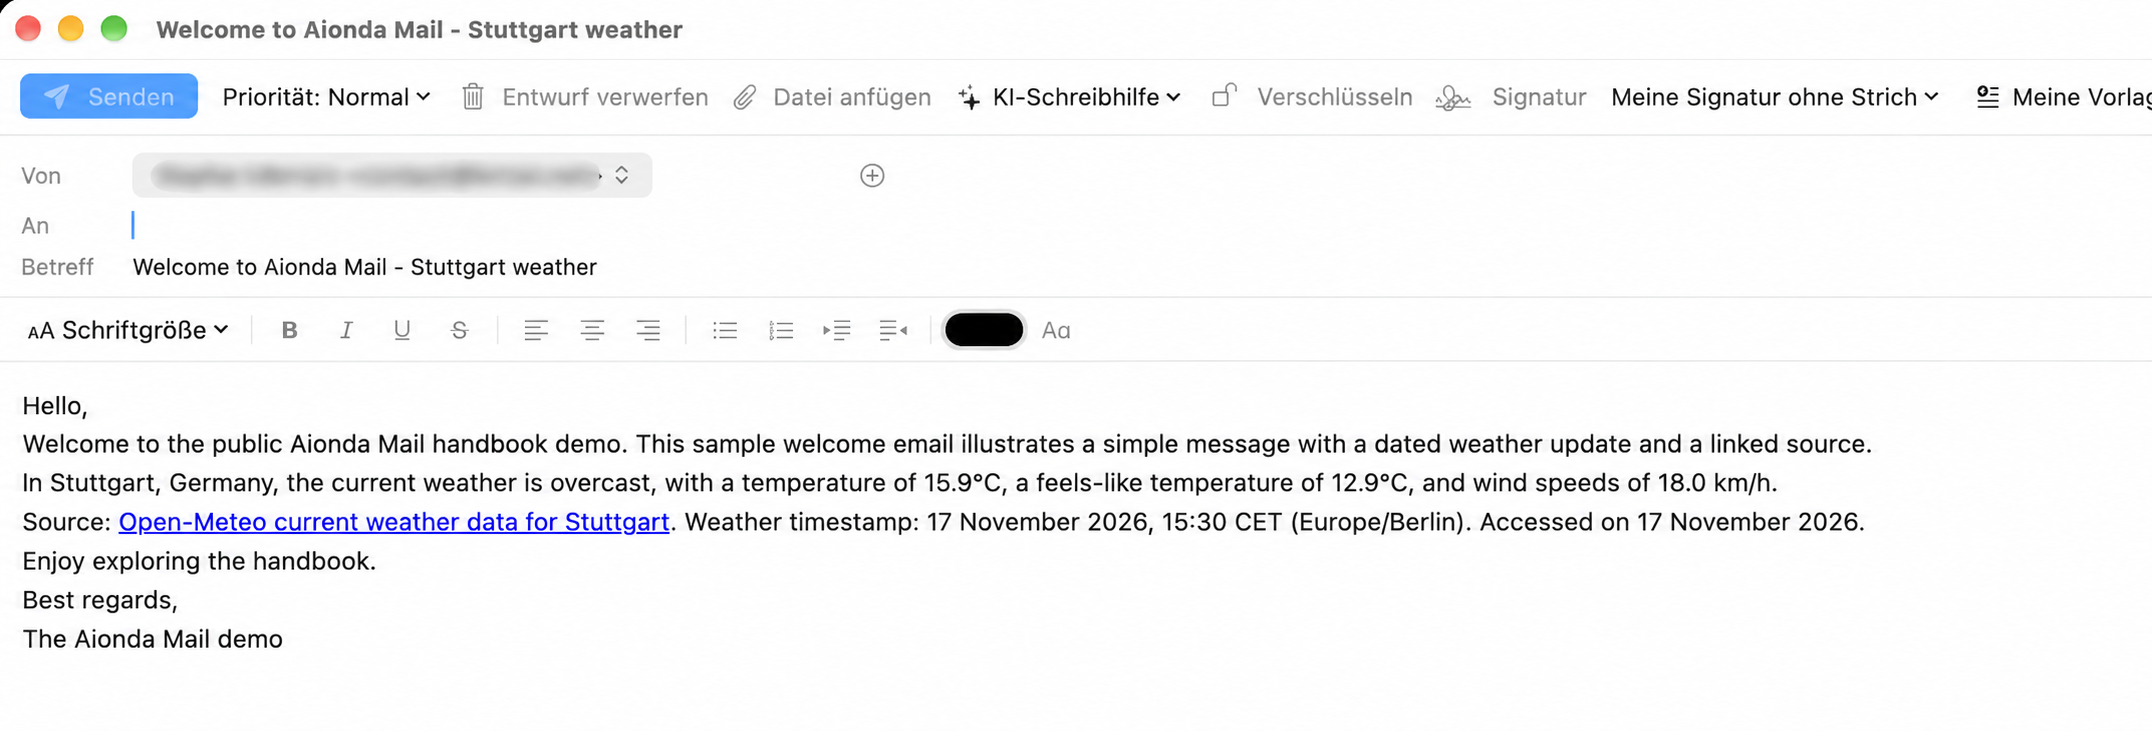
Review the sender, To/Cc/Bcc recipients, subject and priority.
Format your message or open AI Writing Help.
Send, discard, save a draft or attach a file. This example remains an unsent test draft.
Select the screenshot to open the full-size image.
Start a new email, reply or forward
Open Mailbox and choose New Email. For a reply, open the original message and choose Reply; use the message’s additional actions for other reply or forwarding options. Sending, replying and forwarding require the applicable Plus entitlement. If you see the upgrade dialog, the sending capability is not enabled for the current account.
Choose the sender
Open From and select the address you want the recipient to see. The picker lets you search your addresses and offers automatic assignment based on the recipient, as well as creation of a new address where available. Check the final sender identity before sending; it affects where replies arrive.
What does “Automatic assignment” mean?
With Automatic assignment selected in From, Aionda chooses your sending address based on the recipient instead of asking you to pick one manually. This helps you keep using the same address for the same contact.
Enter the recipient in To. The automatic lookup uses the first recipient in that field.
If a remembered address is available, Aionda selects the sender address previously associated with that recipient.
If no usable association is found, Aionda shows a preview of a new disposable email address (DEA). The address is created when you choose Send, not merely when the preview appears. Its name and domain follow your address-generation settings.
After a successful send, the composer remembers the selected sender address for the recipients in To, Cc and Bcc, so it can reuse that association later. For example, if you previously wrote to a shop using one of your aliases, automatic assignment can select that alias again for your next message to the same email address.
You stay in control: open From and select an existing address to use a specific identity, such as your business address. This overrides automatic assignment for the message. Automatic assignment does not mean “always use my standard address”, and it does not create a separate sender address for each recipient of a group email: everyone receives the message from the one selected From address.
Check the displayed sender before sending, especially after changing the recipient list. Once an address or preview has been selected, do not assume that editing the recipients will automatically replace it; select Automatic assignment again if you want a fresh lookup. Replies to your message go to the address you used, subject to that address’s delivery settings.
To, Cc and Bcc
Type a name or email address and select the intended suggestion, or confirm a complete address. Check each recipient chip rather than relying on the displayed name alone. Company-directory suggestions follow the available visibility and address settings.
To: the primary recipients.
Cc: people who should receive a visible copy.
Bcc: people who should receive a copy without appearing in the other recipients’ Bcc list. Check the fields carefully before sending.
Use the removal control on a recipient chip to correct a mistake. Cc and Bcc buttons reveal the additional recipient fields.
Subject, priority and body
Write a concise subject that describes the purpose of the email. The priority selector offers low, normal and high priority; a high-priority label does not guarantee that someone will read or answer sooner. The small L/N/H indicator reflects that selection.
Use the formatting toolbar for text style, font, lists and indentation. More formatting exposes additional controls when space is limited. Keep essential information in the message text rather than relying only on color or images. The header collapse control gives the body more space; expand it again to review the recipients and subject.
Attachments and drafts
Choose Attach file and select the intended files. Check names and the resulting attachment list before sending. Save draft preserves work for later; reopen it from Drafts. Discard abandons the draft. Closing a composer and discarding it are different actions, so use the explicit action that matches your intent.
The title bar offers Open in own window when you need more writing space. Review any encryption or PGP status offered by the composer; ordinary external email is not automatically end-to-end encrypted just because your stored mailbox is encrypted. See PGP email encryption.
How to open the AI sidebar
Open the mailbox or the email you want to discuss.
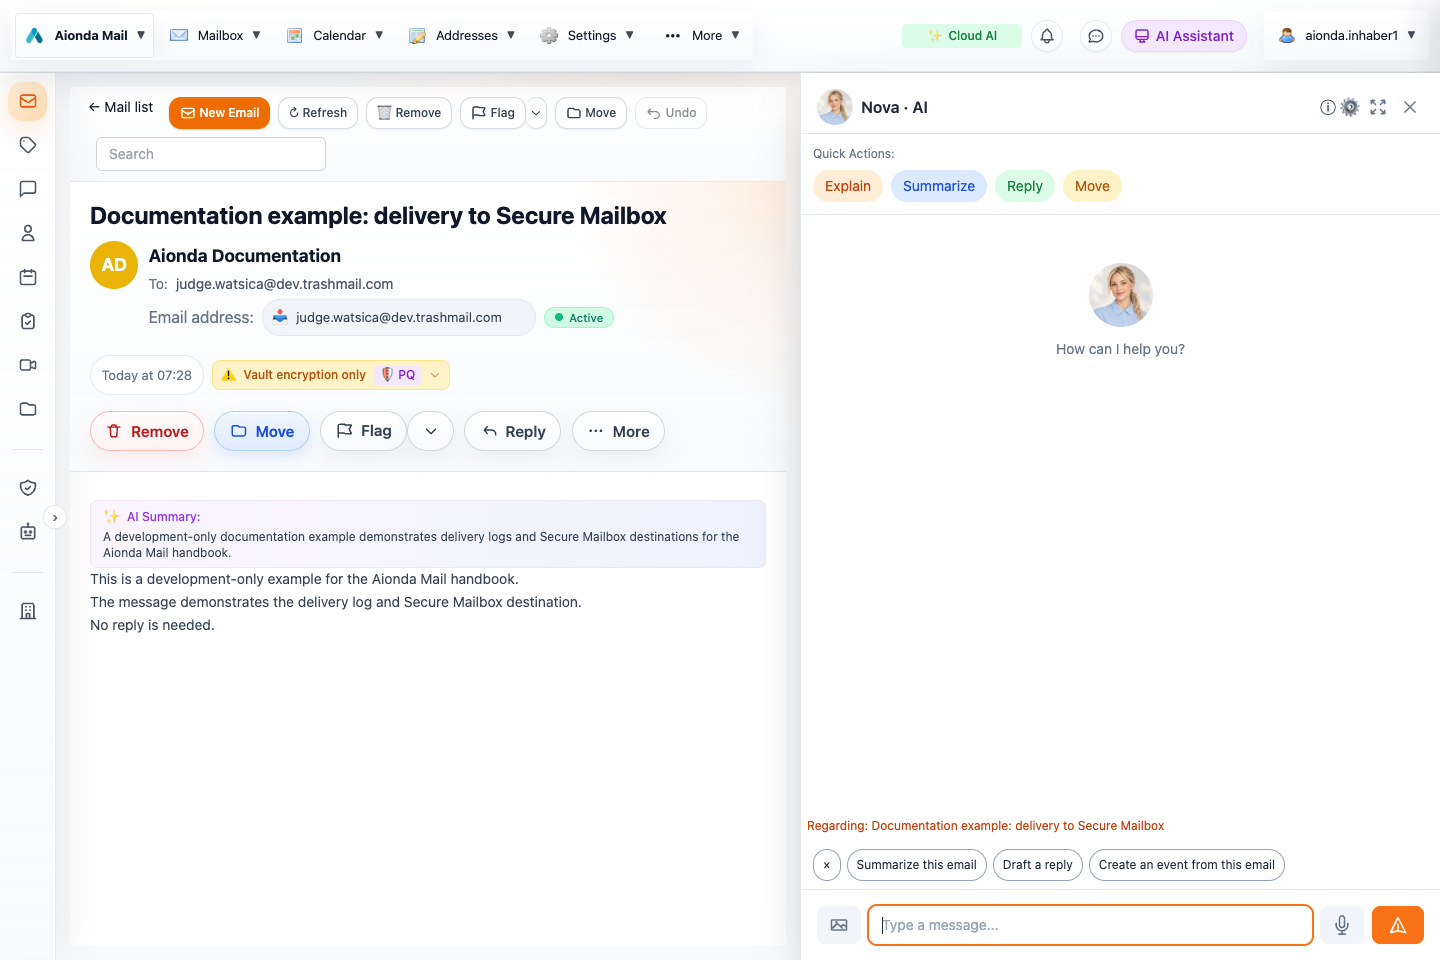
Click the purple AI Assistant button in the top-right application bar, beside the notification/chat controls and your account menu. It opens the assistant on the right.
Type in Type a message… at the bottom, or choose a quick action such as Explain, Summarize or Reply. Check the displayed “Regarding” message so you know which email supplies the context.
Use the × in the sidebar’s top-right corner to close it and recover reading space.
Click AI Assistant in the top-right application bar.
Select the screenshot to open the full-size image.
Quick actions for the selected email.
Check the email context, then type your request.
Close the sidebar with ×.
Select the screenshot to open the full-size image.
The sidebar is the conversational assistant. The composer’s AI Writing Help button, described below, opens editing tools for your draft. They are different entry points. If AI is disabled, review Artificial Intelligence settings and consent first. For illustrated conversations and available actions, see AI tools.
AI Writing Help: available actions
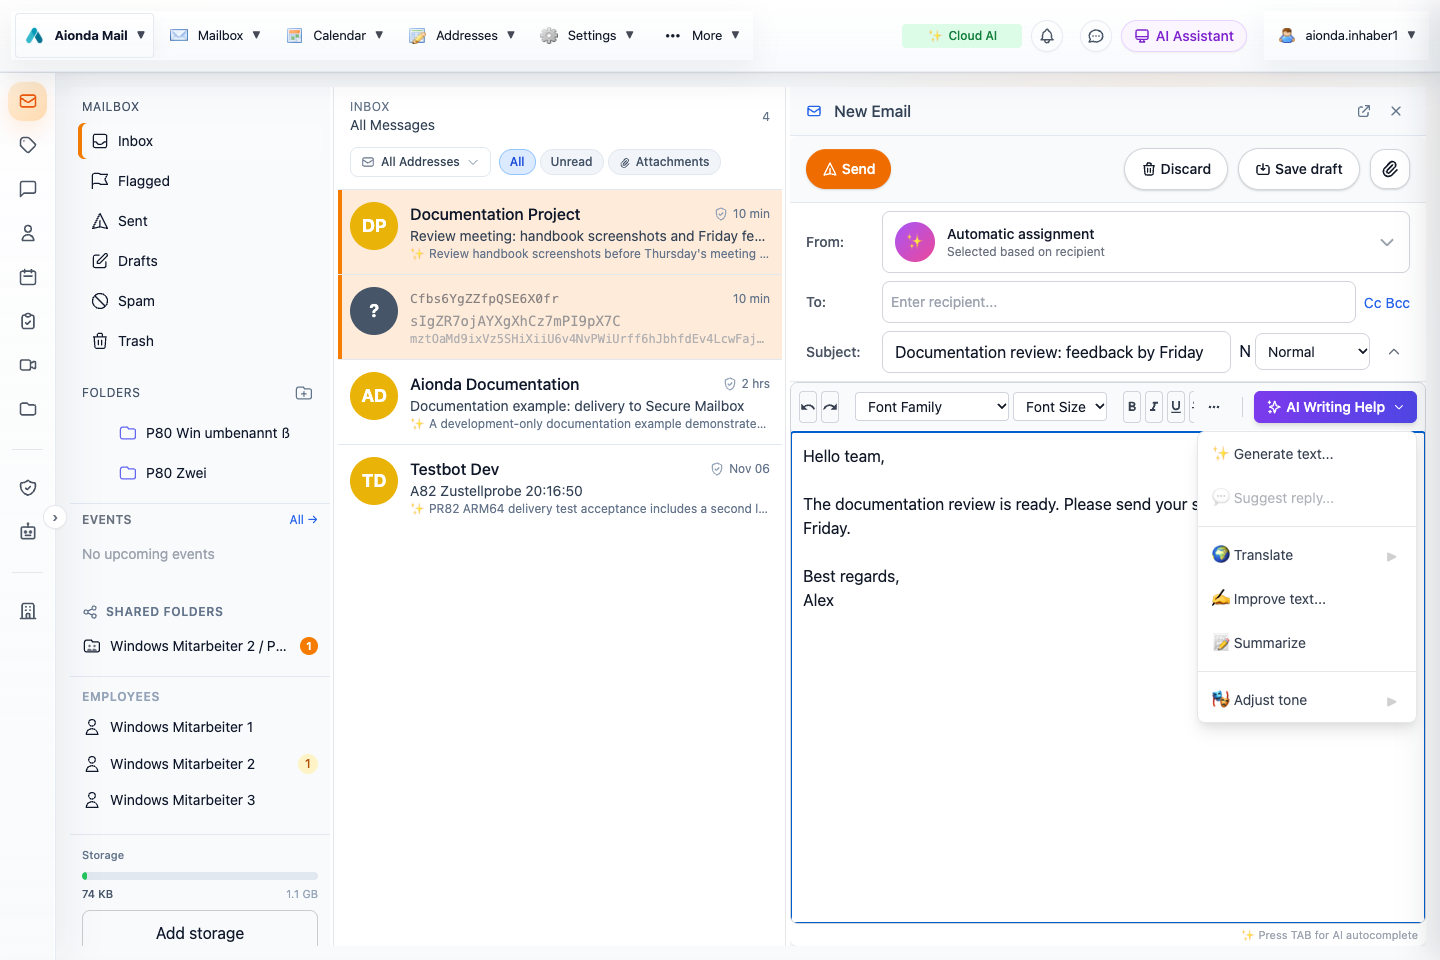
Open AI Writing Help.
Generate, translate, improve, summarize or adjust tone. Suggest reply is disabled in a new-message composer.
Select the screenshot to open the full-size image.
Action
How to use it
Generate text
Describe the email you want. Choose style and language, generate a preview, then Apply it where you are writing.
Suggest reply
Available in a reply composer. Uses the original message as context to propose an answer; check facts and commitments before applying.
Translate
Select the passage first, then choose a target language. Review the translation before applying.
Improve text
Select text to improve wording, grammar and clarity. Review the proposed replacement and optional subject.
Summarize
Select the text to shorten. Check that essential facts, dates and conditions survive.
Adjust tone
Select text, then choose a tone such as formal, friendly, short, detailed, business, legal/formal or customer service. Review the changed wording in the editor.
Select text before translating, improving, summarizing or changing tone. These actions operate on the selected passage, helping protect an unrelated signature or quoted original. Generate text inserts new material at the cursor or appends it when the cursor is outside the editor.
The translation menu offers German, English, French, Spanish, Italian, Portuguese (Portugal), Portuguese (Brazil), Dutch and Polish. The generation dialog currently has its own language selector; use the options actually shown there.
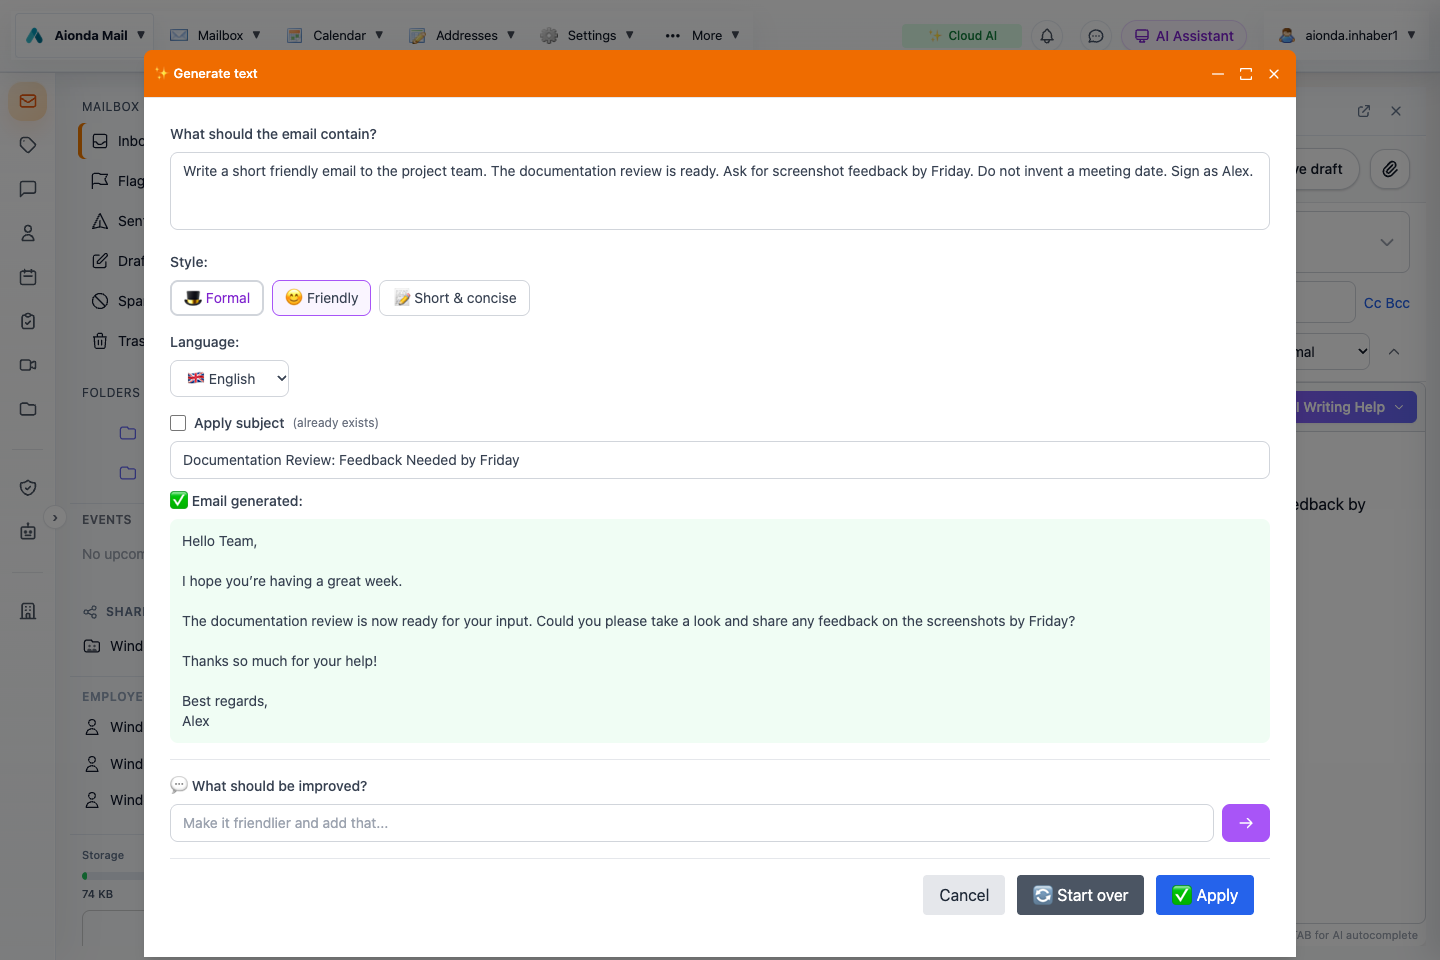
Example: generate a friendly project update
Choose AI Writing Help → Generate text.
Enter a concrete brief, for example: “Write a short friendly email to the project team. The documentation review is ready. Ask for screenshot feedback by Friday. Do not invent a meeting date. Sign as Alex.”
Choose Friendly and English, then Generate.
Review the proposed body and subject. Enable Apply subject if you want to replace the current subject.
Use the follow-up field to request a specific adjustment, or Start over to regenerate.
Choose Apply to insert the result. Review the actual composer again and add any missing signature or details.
Give a specific brief and select style and language.
Review the suggested subject and email text.
Refine the result or Apply it to the composer; Apply does not send.
Select the screenshot to open the full-size image.
Check the generated result against your brief, including the signature, deadline and intended recipients. Applying a result does not send the email.
AI autocomplete
When the editor offers “Press TAB for AI autocomplete”, press Tab to request a suggestion. Press Tab again to accept the displayed suggestion or highlighted choice. Read the inserted continuation; the model may make assumptions that were not in your message. You can continue typing or edit the result manually.
Final review and Send
Check From, every recipient and any Cc/Bcc fields.
Check the subject, dates, amounts, promises and attachments.
Review AI wording and the displayed encryption status.
Choose Send only when the complete message is ready.
Composer AI follows your AI mode and consent settings. Aionda recommends its more powerful Cloud AI infrastructure; supported local text AI can be selected instead. See AI settings.
Everyday use · Chapter 7
Addresses, aliases and forwarding
Use separate receiving addresses for different purposes without publishing your underlying account address.
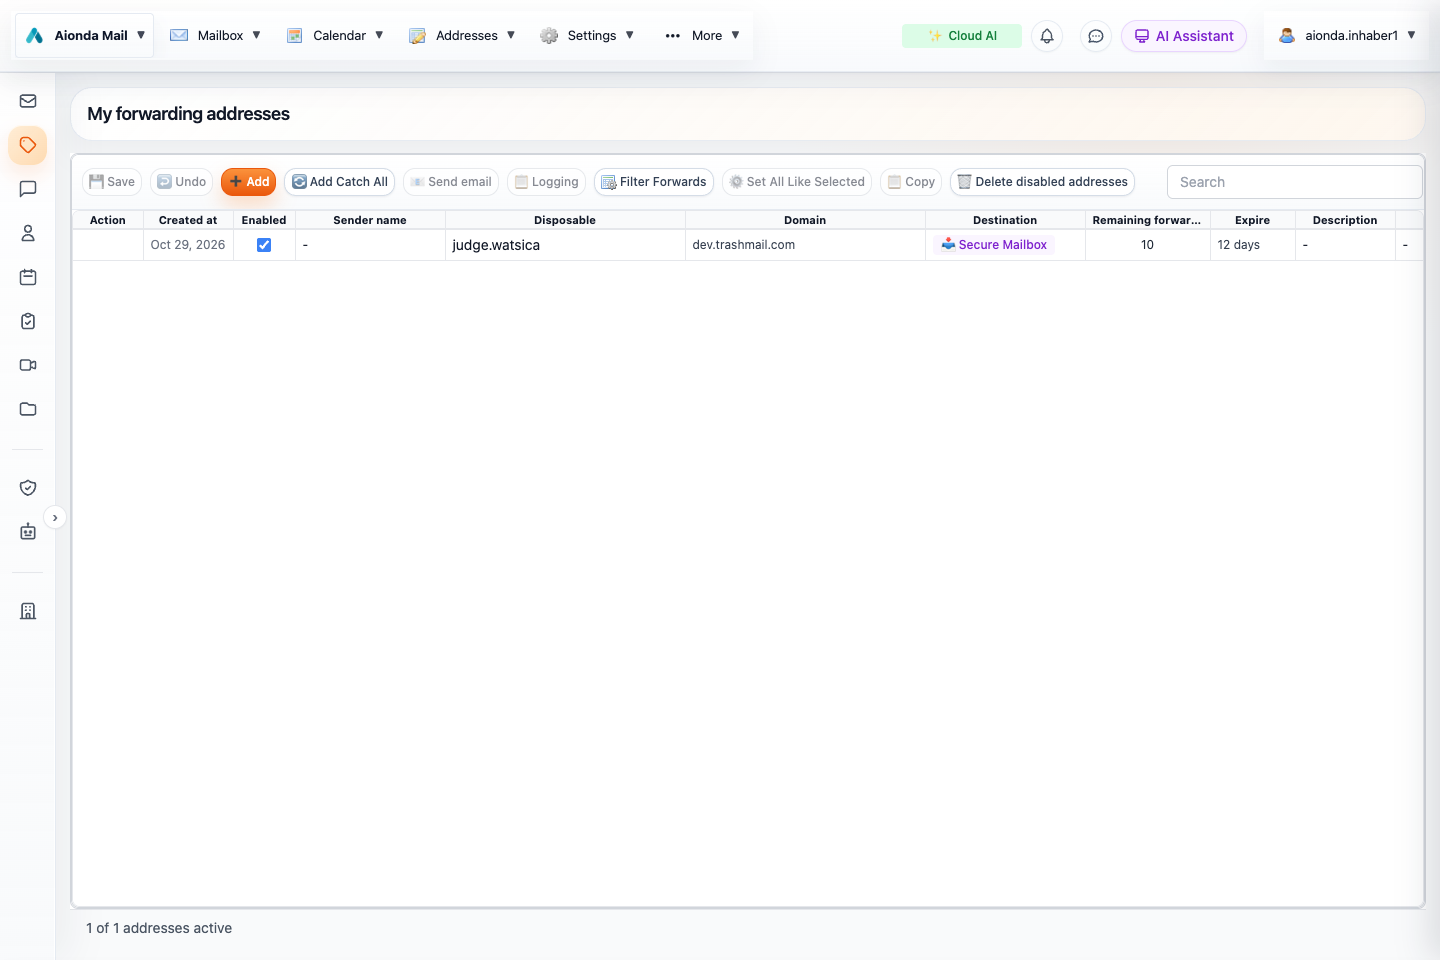
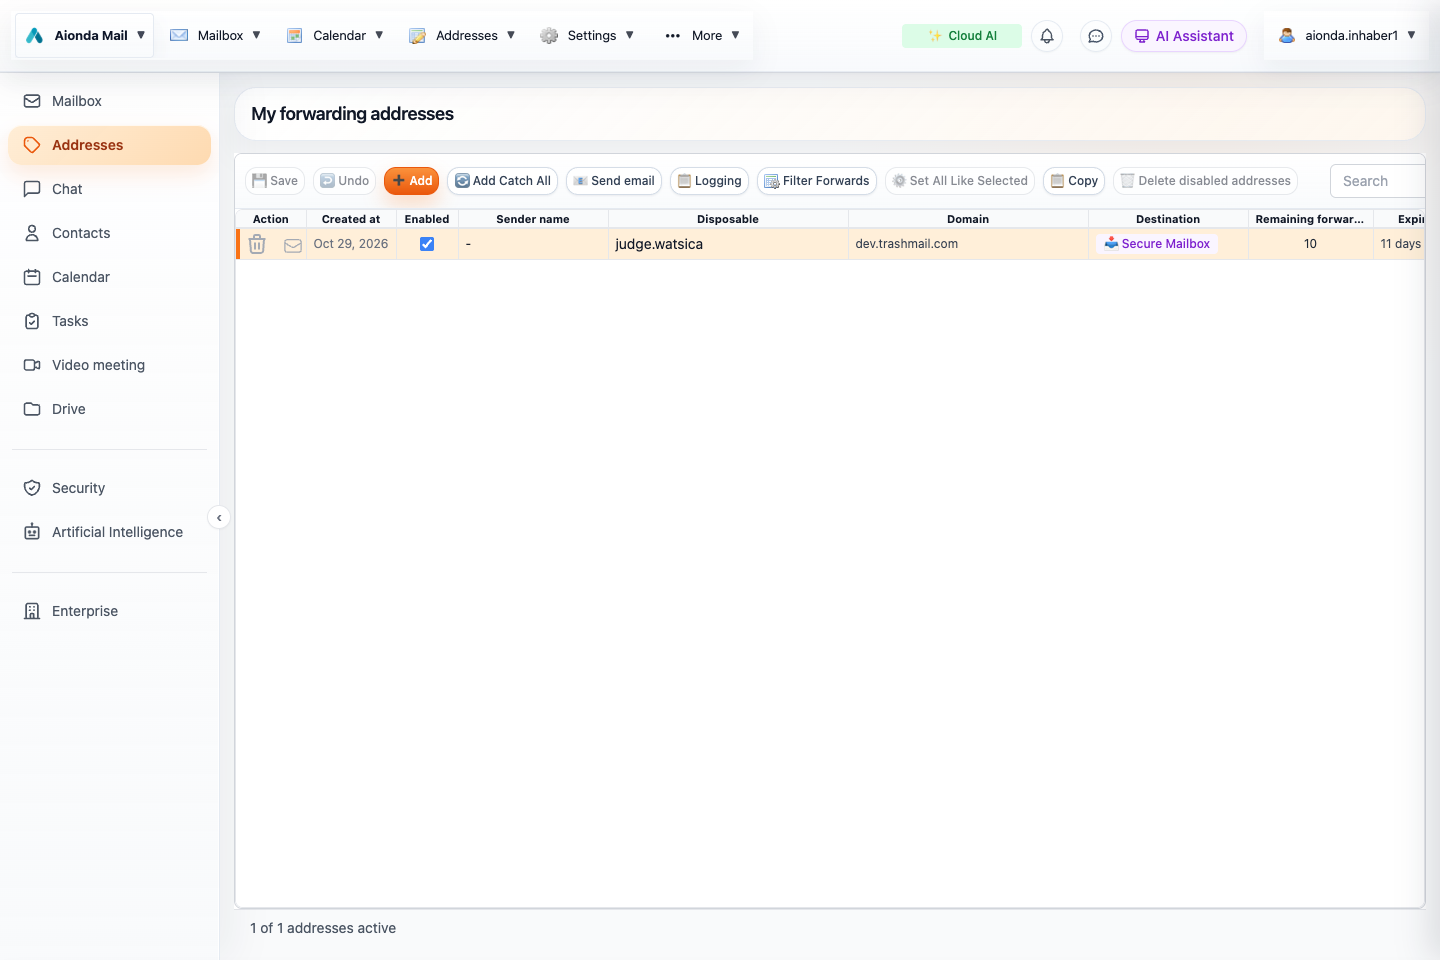
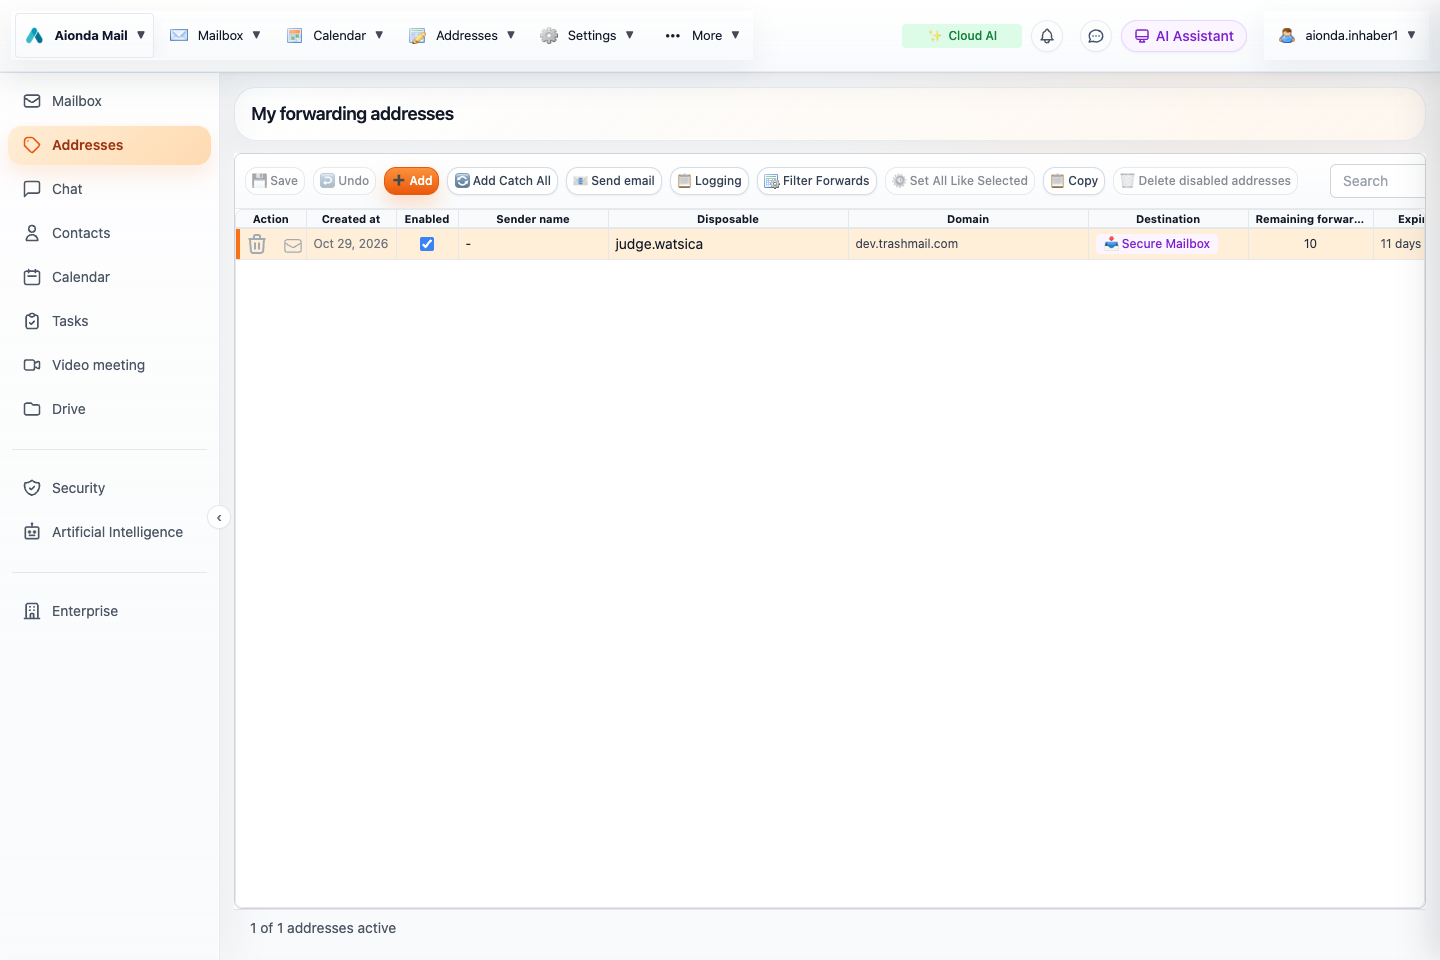
Add an alias and save your changes.
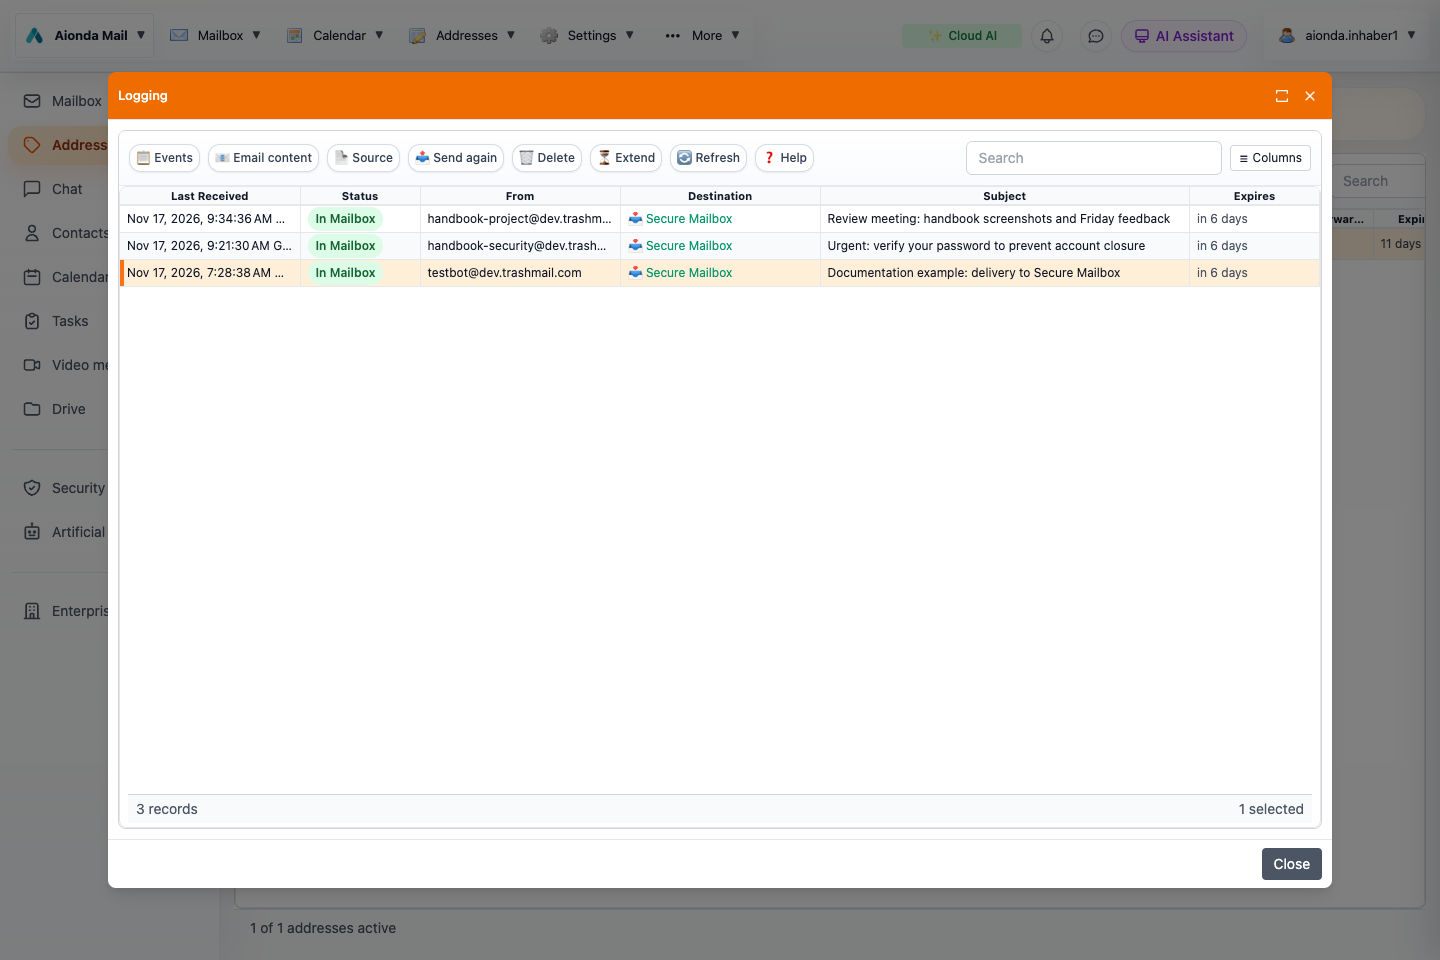
Select an address, then open Logging.
Check its destination and independent forwarding and expiry limits.
Select the screenshot to open the full-size image.
DEA means disposable email address: an additional address you can manage separately from your main address. “Disposable” does not mean one use only. See the glossary and the browser add-on guide.
What is an Aionda address?
A disposable email address (DEA) is a real receiving address, such as an alias you give to a shop, a project or a mailing list. It hides your underlying destination address from the sender. You can keep it permanently or give it a limited lifetime. A separate alias for each purpose makes unwanted mail easier to trace and stop.
The address is the entrance; its Destination decides where the message goes. Receiving into the Secure Mailbox and forwarding to another provider are different choices. They can also be combined.
Create and save an address
Open Addresses and choose Add.
Choose the address name and an available domain. Use a description to remember what you created it for.
Choose the destination: Secure Mailbox, a registered real email address, or the combination offered in the destination picker.
Review Enabled, Remaining forwards and Expire. A time limit and a forwarding limit are independent.
Choose Save. Unsaved grid changes are not a finished configuration.
Send a harmless test message, then select the address and open Logging to verify its actual delivery path.
Where incoming mail goes
SenderSends to your Aionda alias
↓
Aionda receives the messageAddress state, limits, filtering and applicable rules are checked
↓
Your configured destinationChoose one route, or both
↓
Secure MailboxEncrypt for your mailbox → store → unlock and read in Aionda
↓
Forwarding destinationSend to your registered external address → read at that provider
↓
Logging explains the outcomeInspect receipt, processing, destination and delivery status. Logging is a separate setting with its own retention period.
This diagram shows delivery choices, not a guarantee that every sender used end-to-end encryption. With ordinary SMTP mail, Aionda receives readable content before encrypting the stored mailbox copy. If the sender encrypted the message with your PGP public key, its protected content already arrives encrypted. A copy forwarded to another provider is subject to that provider’s storage and access rules.
Choose the right destination
Choice
Typical use
What to check
Secure Mailbox only
Read and organize mail in Aionda Web, macOS or iOS.
Mailbox activated and unlock methods available.
External address
Keep using an existing inbox at another provider.
The destination is registered and verified; check its spam folder if delivery is accepted but the mail is missing.
Secure Mailbox and forwarding
Keep a mailbox copy and deliver another copy externally.
Both destinations are selected. Organizing one copy does not automatically move or delete the other.
Add and verify a real destination through Settings → Add Real Email. A fail-over address, where configured, is a fallback for delivery problems; it is not the same as always delivering two copies.
Understand the address list
Control or column
How to use it
Enabled
Temporarily stop the address without treating it as a permanent business identity.
Disposable and Domain
Together form the email address you give to others.
Destination
Review every recipient of incoming mail, including the Secure Mailbox.
Remaining forwards and Expire
Check both limits before using the address for long-term correspondence or account recovery.
Description and Website
Record the purpose or service associated with the alias.
Last Received and Forwarding errors
Identify recently used aliases and investigate delivery problems.
Columns, Search and Filter Forwards
Expose additional fields and narrow the list. A hidden column does not mean the setting is absent.
Logging: follow a message from receipt to delivery
Select an address row, then choose Logging. Select a message and open Events for the sequence of processing steps. The summary distinguishes an encrypted mailbox delivery from external forwarding, queued attempts and errors. A destination server accepting a message does not prove that it placed the message in its Inbox.
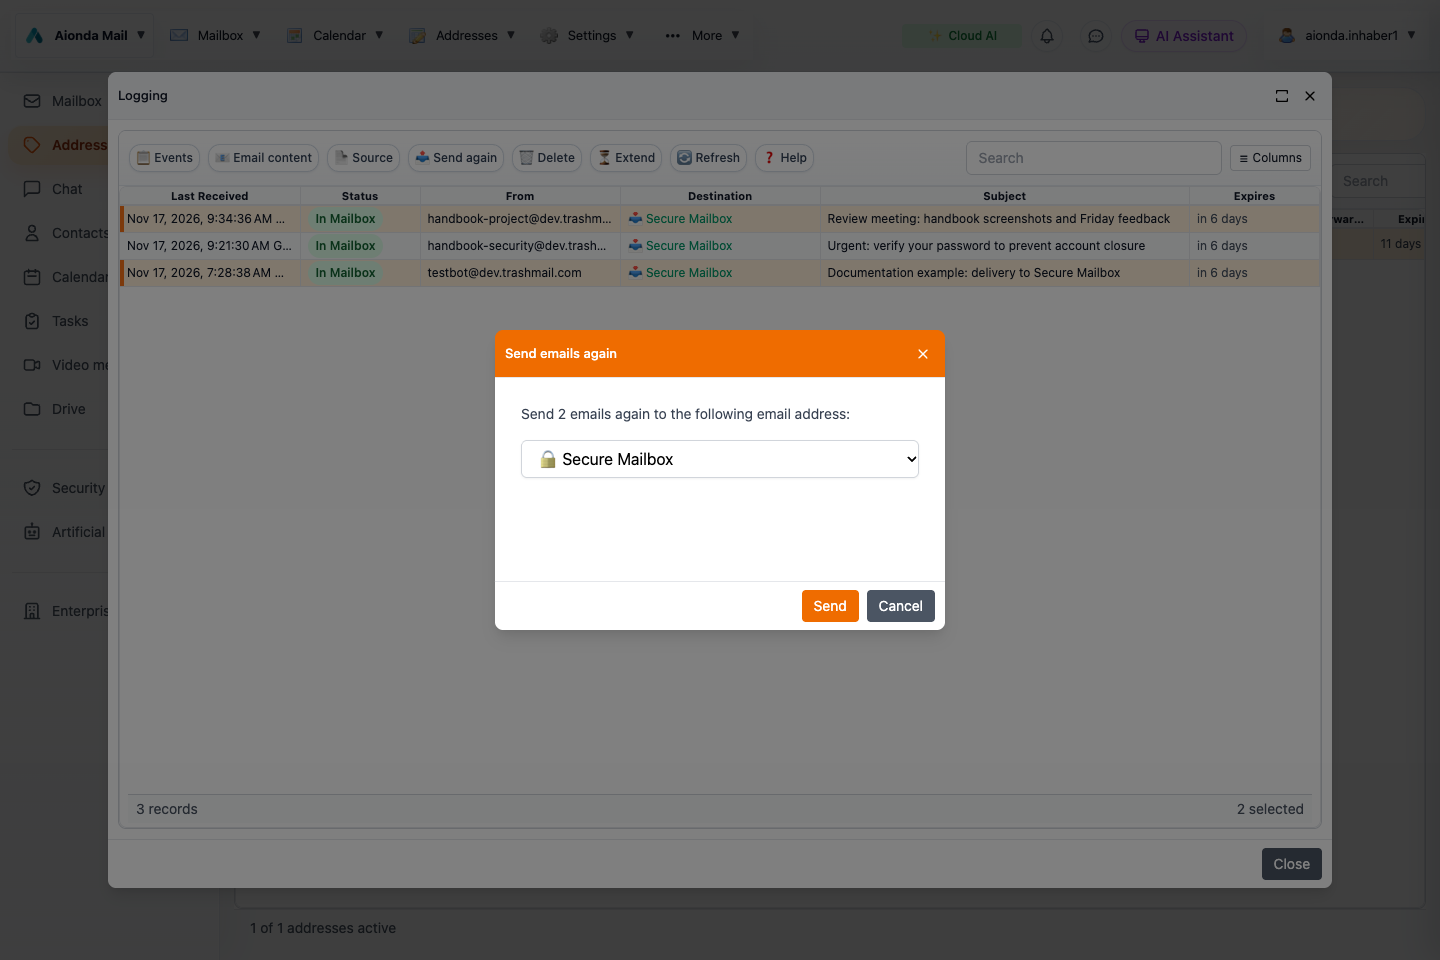
Email content and Source can show retained original mail where logging and retained data are available. Send again can deliver a retained message again, or store it in the unlocked Secure Mailbox. Extend changes the log’s retention; it does not extend the alias’s lifetime. See the dedicated Logging chapter for each action, statuses and privacy implications.
Disable, extend or delete an alias
Use the Enabled control for a temporary stop, edit expiry or forwarding limits when the address should remain usable, and save the change. Deletion or expiry can prevent future password-reset and verification messages from arriving. It does not erase messages already delivered or copied elsewhere. Before deleting an alias, replace it at any services that still use it.
Catch-all addresses and your own domains
Add Catch All supports the catch-all workflow offered by your account: incoming names can be handled without creating every alias manually. Review that scope carefully because a catch-all can also attract unwanted traffic. Manage custom domains under Settings and complete the DNS setup shown there. Domain ownership alone does not route mail; the receiving records must point to the intended service.
Replying and PGP
When composing, check the From alias. Reply masking and header rewriting are forwarding options; they are not encryption. For eligible Secure-Mailbox-only aliases, Aionda manages PGP keys and publishes public keys through WKD so compatible senders can discover them. Read PGP email before relying on end-to-end protection for external correspondence.
Your standard company address
The company directory publishes one eligible DEA, not every alias or a private account address. You or the owner can choose it on the contact card. If no choice exists, the service prefers an eligible non-expiring address and otherwise uses its fallback order. Deleting or disabling the chosen address can select a replacement; if none is eligible, no usable address remains. Choose a stable non-expiring address for a published business identity.
Everyday use · Chapter 8
Logging: delivery history and retained email
Find out what happened to a message, inspect its processing events and recover retained mail before it expires.
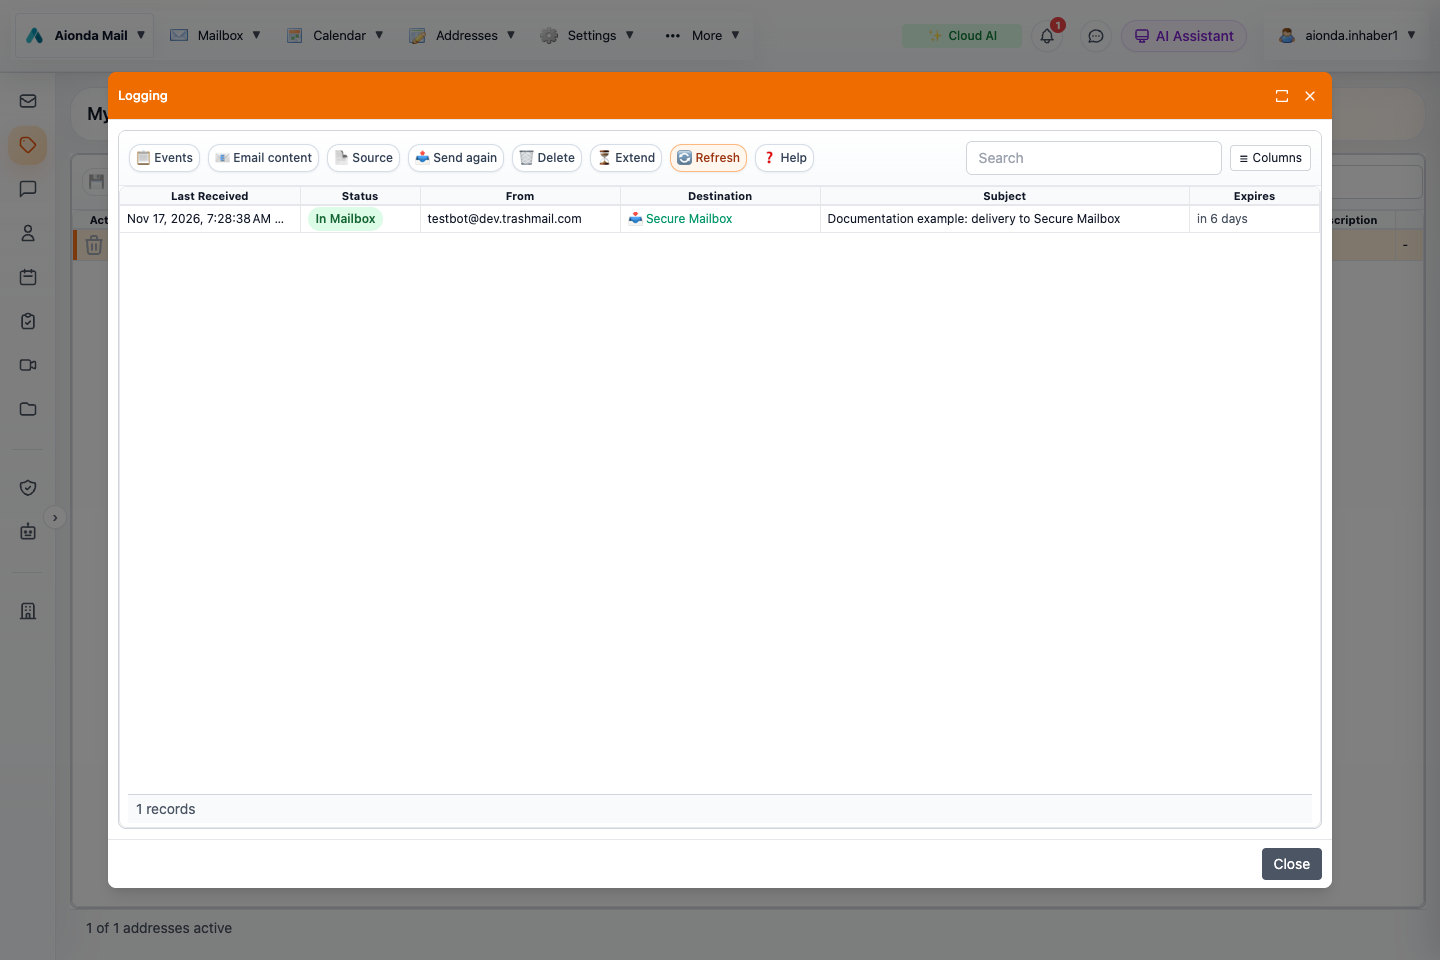
Open Events, Email content or Source for the selected message.
Review status and destination.
Check expiry before extending retention or recovering a message.
Select the screenshot to open the full-size image.
Open the right log
Open Addresses and select the alias that received the message.
Choose Logging. Check the time, sender and subject; use Search when there are many entries.
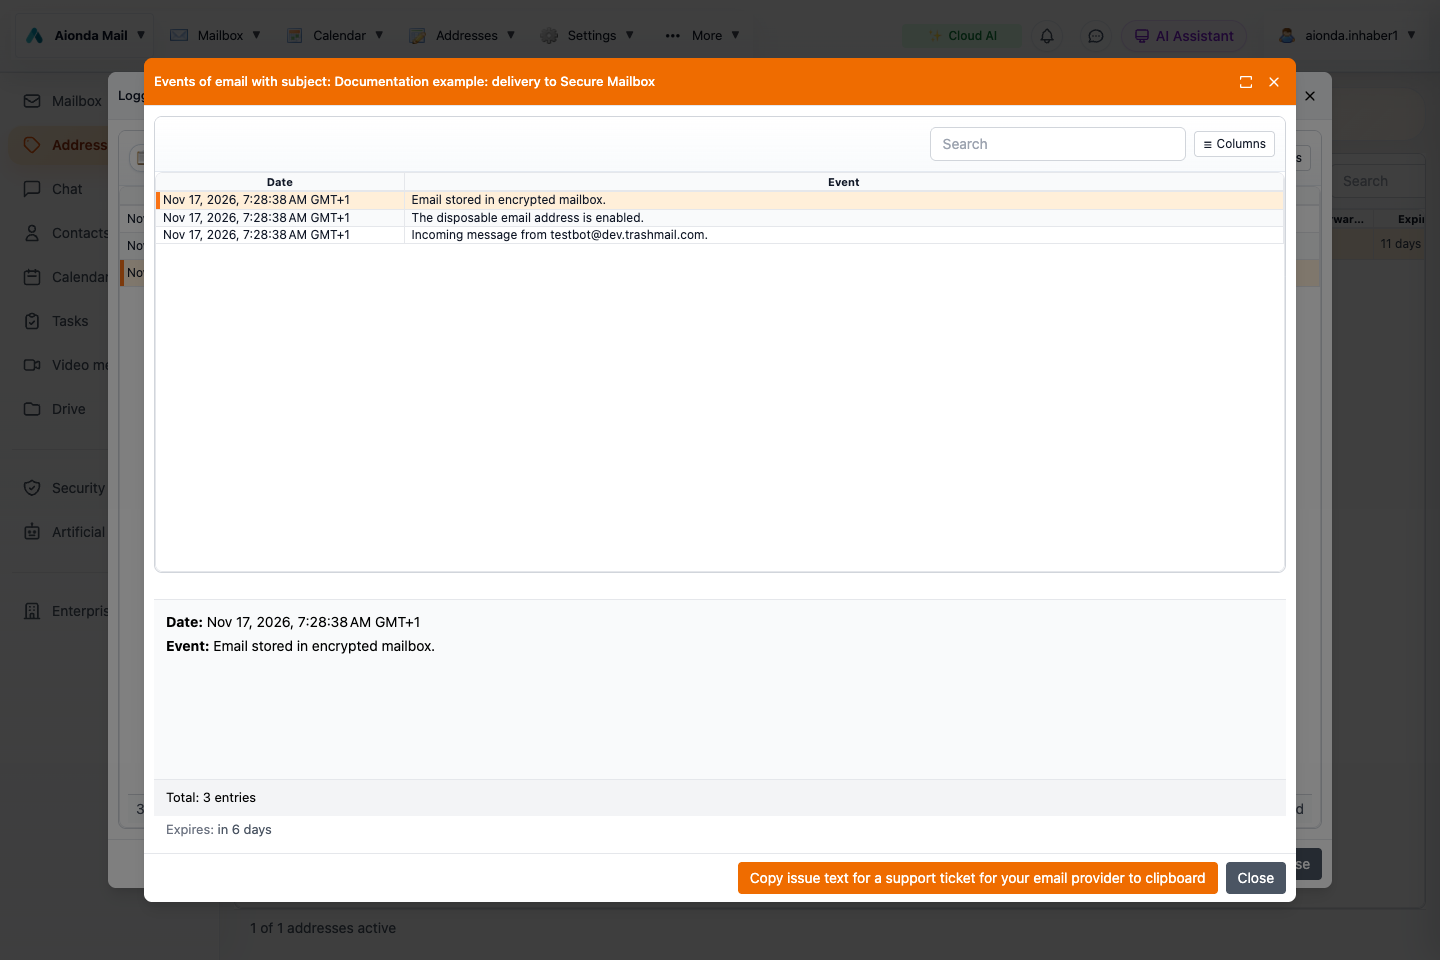
Select the relevant message and choose Events.
Read the individual receipt, processing and delivery events, not just the summary status.
The log answers “what happened to this delivery?” It is different from the current folder of a message in your mailbox, and different from the long-term enterprise archive.
Enable logging deliberately
The email processor includes Log email requests. In the Web menu, open More → Email processor to inspect this option. Enabling it affects new processing; it does not recreate content from messages that were never retained.
Logging can retain the complete original message, not just technical events. This separate server-side copy supports viewing and resending. For ordinary unencrypted incoming mail, do not treat that retained original as zero-knowledge vault content. PGP-protected content remains encrypted in its original message form. Choose logging and retention according to the confidentiality of your correspondence.
Read the status correctly
Status
Meaning and next step
In Mailbox
A copy was stored in the Secure Mailbox. Open the mailbox and check its current folder.
Forwarded
The destination server accepted the mail. If it is not visible, check that provider’s spam, rules and mailbox.
Queue or delayed
A delivery is pending or a temporary rejection requires retrying. Read the server response before sending another copy.
Waiting for confirmation
A configured sender confirmation step has not yet completed.
Fail-over
A fallback destination was used. Inspect which destination received the message.
Error or rejected
Read Events for the actual rejection or failure, such as a recipient issue, address limit or destination refusal.
Inspect Events, Email content and Source
Events provides timestamps and the processing history. It can explain whether the alias was enabled, which rule or filter intervened and whether delivery succeeded. The events dialog includes a support-text copy action; inspect that text for personal details before sharing it.
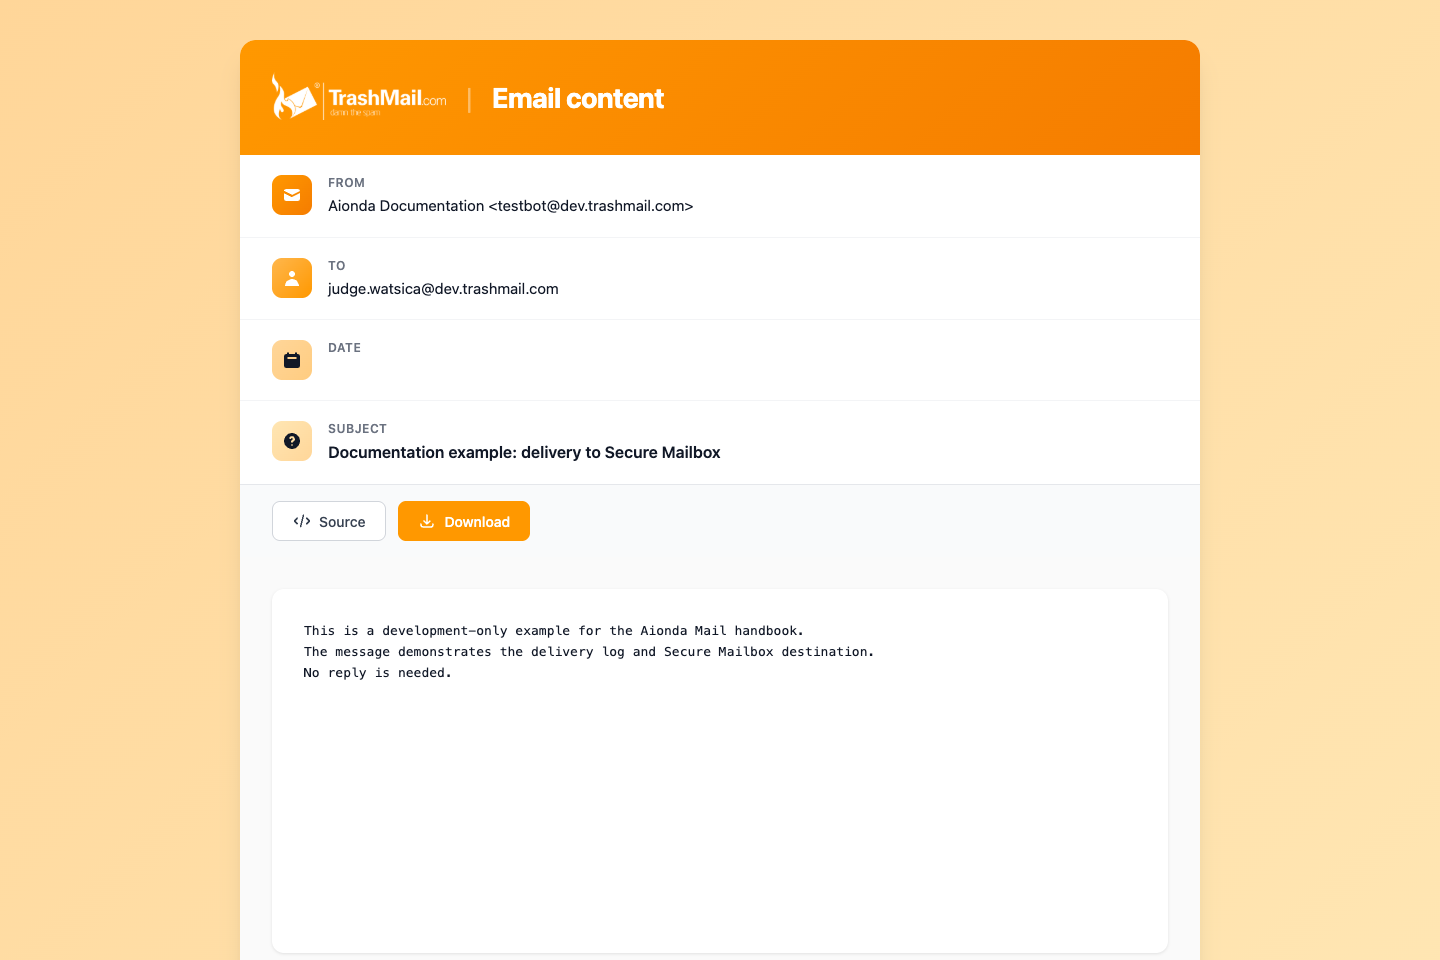
Email content opens the retained message when available. Source helps inspect the original mail, including headers and MIME structure. These actions depend on retained data; an entry or error notification is not a promise that full content will remain available forever.
Retention: save the evidence you need
Inspect the Expires column. The standard log retention is seven days; the displayed deadline is authoritative for that entry. Select messages and choose Extend to use the offered 7-, 14- or 30-day extension. Extending a log is separate from extending the receiving address. Expired records are eligible for cleanup, so do not wait until after the deadline to preserve important evidence.
Resend one or multiple messages
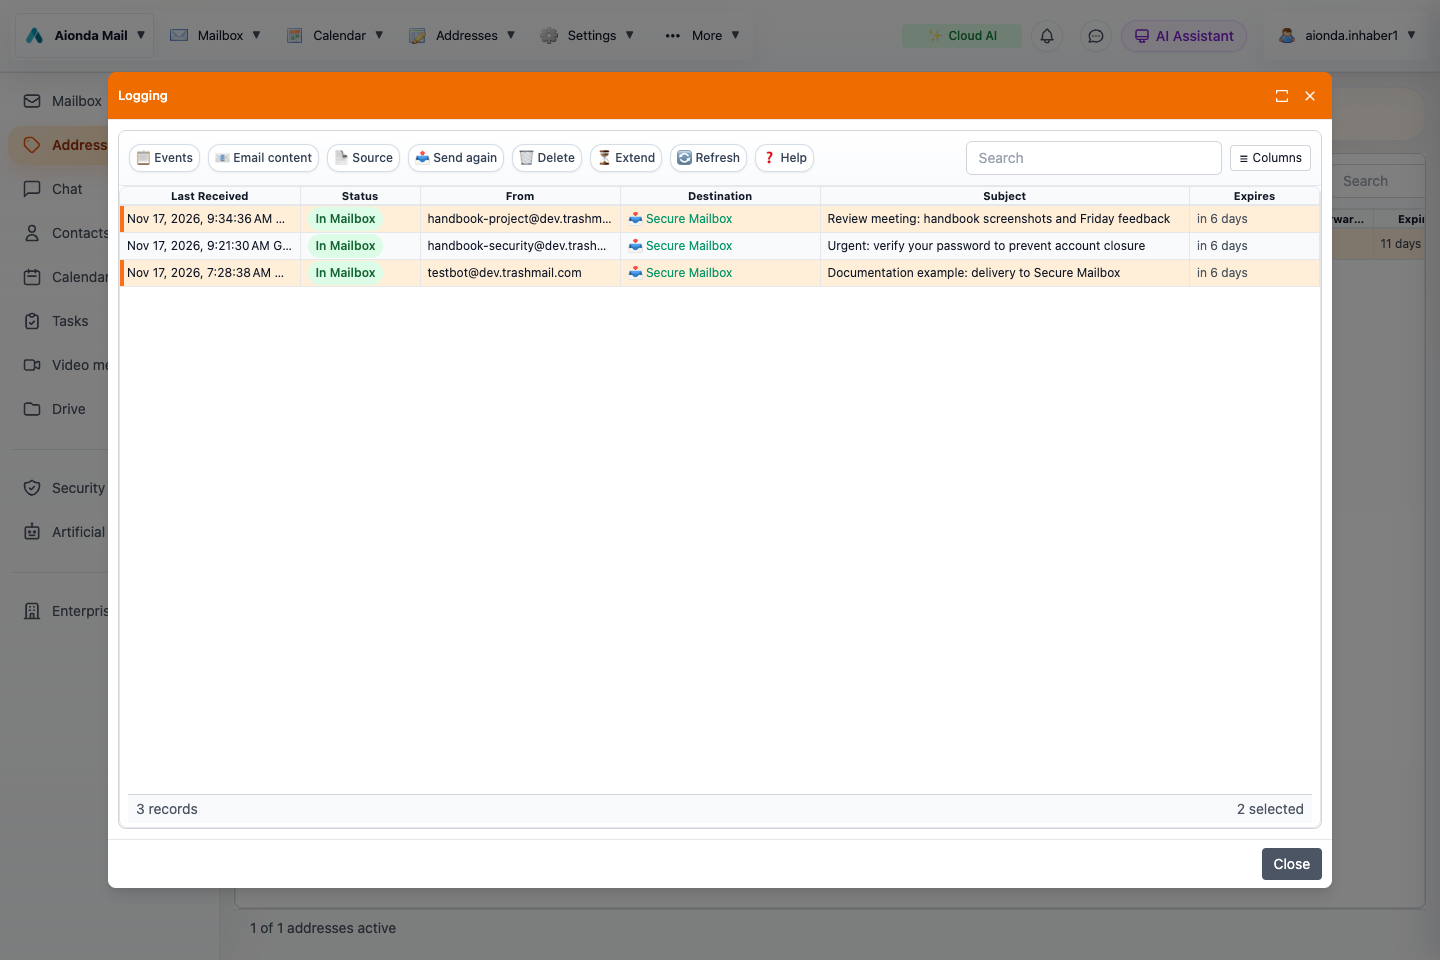
To recover several messages together, hold Ctrl on Windows/Linux or Command (⌘) on Mac while selecting their rows. Check the selected count, then use Send again once for the whole selection. For reading without resending, select one message and choose Email content. See the illustrated recovery walkthrough.
Resend or store in the Secure Mailbox
Correct the original delivery problem and select the retained message.
Choose Send again.
Review the destination. Choose a registered real email address to send another copy, or Secure Mailbox when offered after unlocking to store it there.
Confirm the action and inspect the new result.
Resending can create a duplicate and is a real delivery action. Do not use it repeatedly while a previous attempt is still queued. Saving in the Secure Mailbox creates a separately retained mailbox copy; it does not turn the log itself into an enterprise archive.
Example diagnosis
A shop says it sent an invoice, but your external Inbox is empty. Find the alias, open Logging and inspect Events. If the external server accepted it, check that provider’s folders. If it returned a temporary error, examine the queue state. If the selected destination was Secure Mailbox, read it in Aionda instead. This avoids changing an alias or sending duplicates before identifying the actual route.
Everyday use · Chapter 9
Personal contacts and the company directory
One place to find your own contacts and the colleagues you are allowed to see.
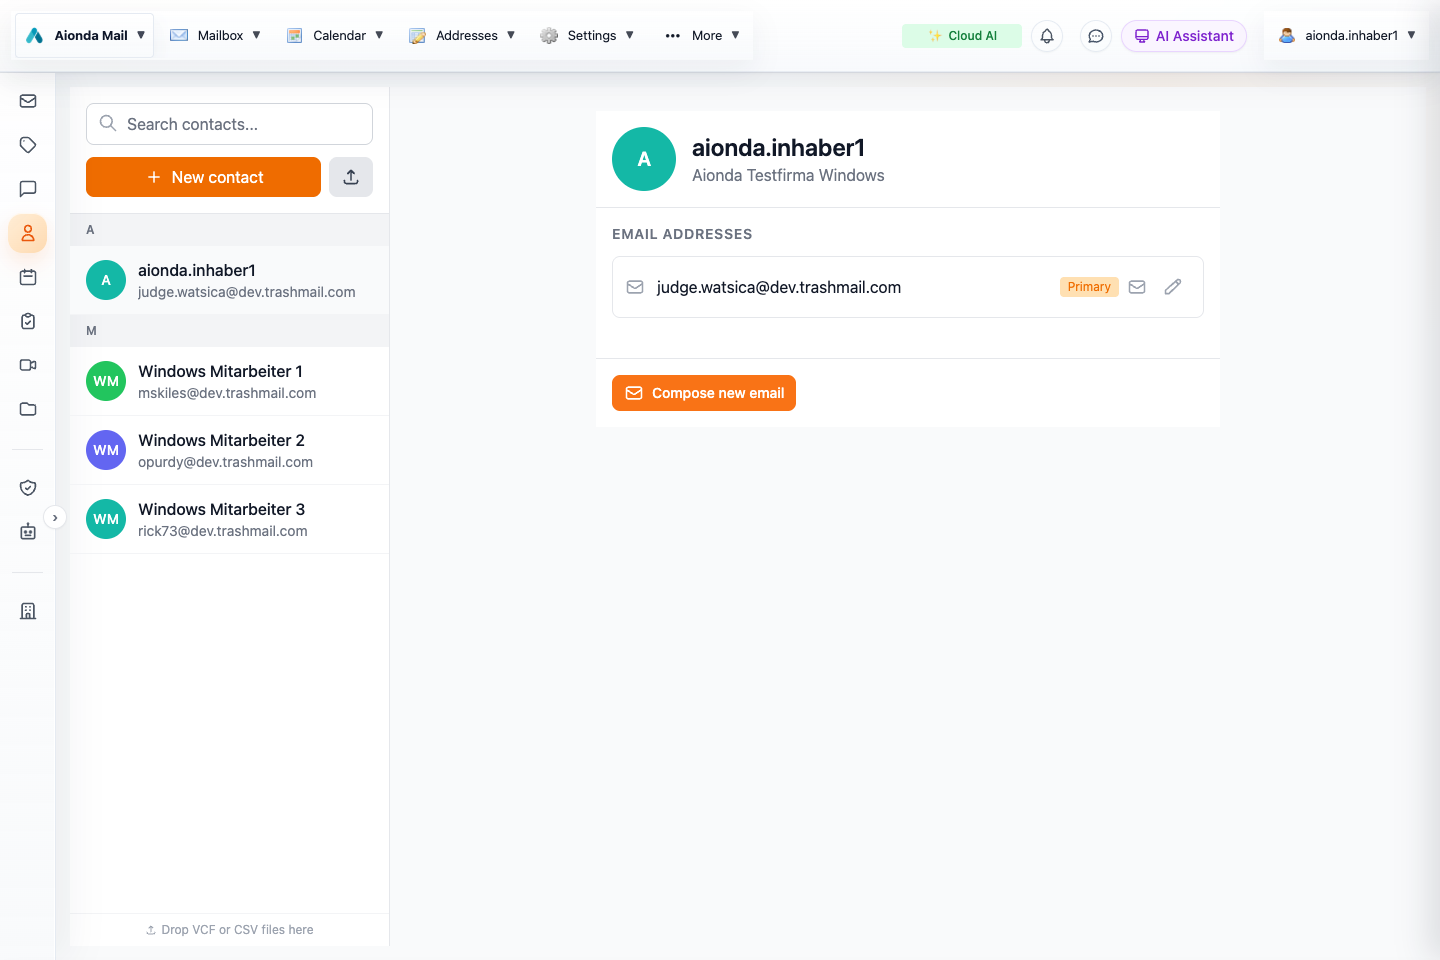
Select a directory entry.
Review the contact card and its published email address.
Select the screenshot to open the full-size image.
Two kinds of contact
Personal contacts belong to your encrypted address book. Create them with New contact or import supported VCF/CSV files. Review imported names and addresses before saving; an import can contain duplicates or outdated details.
Company contacts are supplied by the organization. They appear automatically according to your membership and visibility permissions. They are not editable copies in every employee’s personal address book. Ordinary colleagues see directory records as read-only; the owner manages company profile information.
Choose the published address
Open Contacts and select your own directory entry, or an employee entry you are authorized to manage.
Use the edit action beside Email addresses.
Choose the standard DEA from the eligible addresses and save.
Check the address now displayed on the contact card.
An employee can choose their own standard address; the owner can manage it too. If no first and last name are stored, the username is displayed. Address autocomplete uses eligible directory contacts alongside personal contacts. Check the chosen address before sending to similarly named people.
Privacy boundaries
Directory visibility does not automatically share the contents of personal contacts, mailboxes, files or calendars. A personal contact you created is not removed merely because a company visibility group changes. Publishing personal contacts to an entire visibility group is not part of this first directory version.
Everyday use · Chapter 10
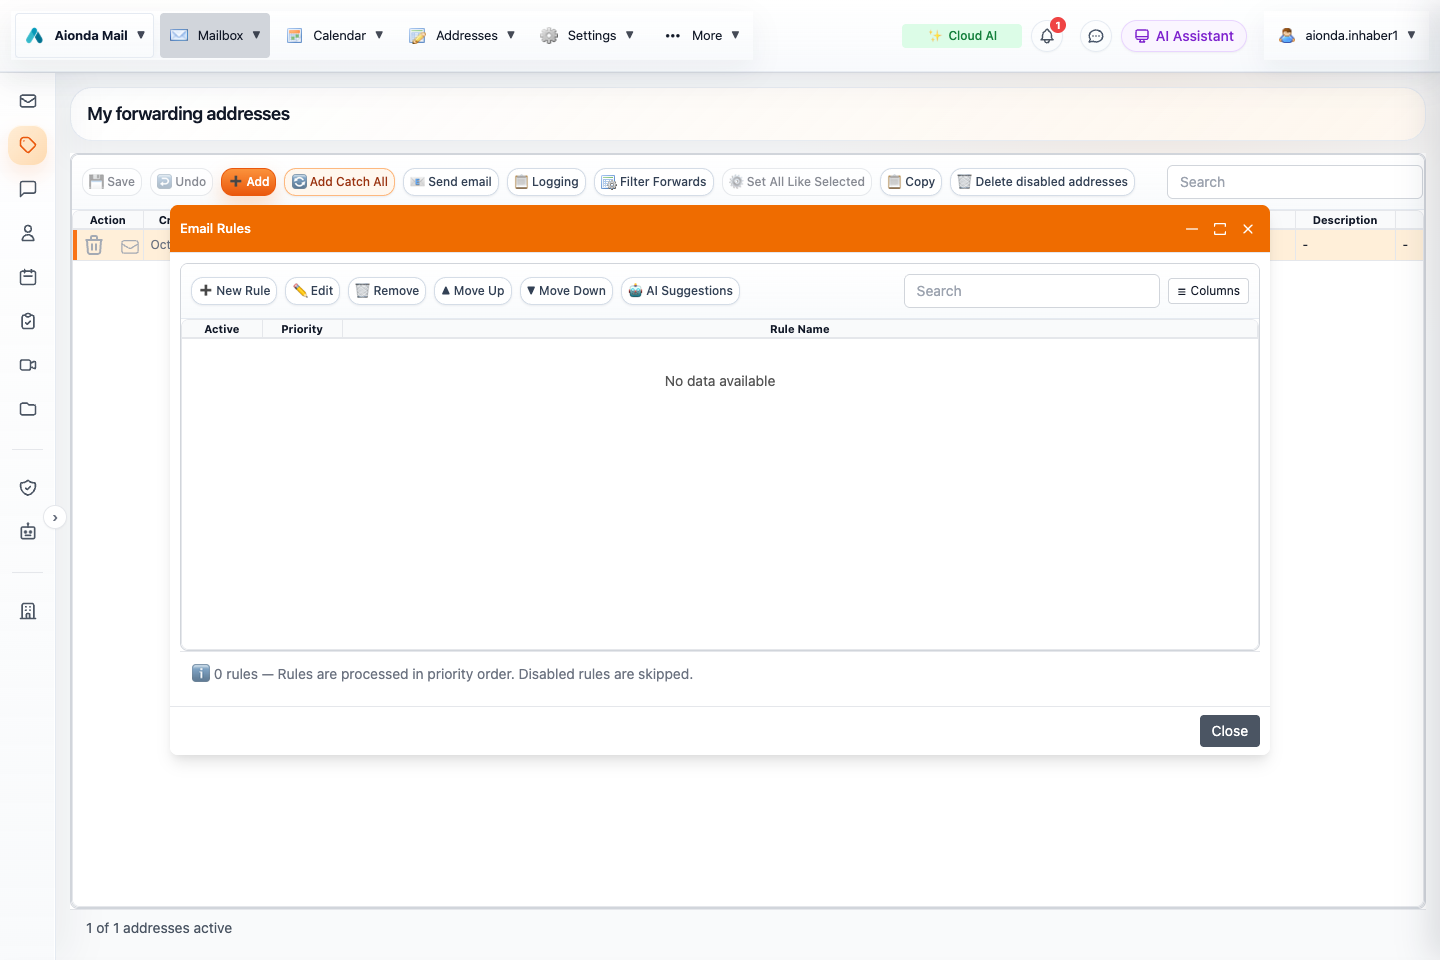
Rules and the email processor
Make repeatable decisions explicit and keep exceptions easy to audit.
Create a rule or edit a selected rule.
Adjust processing priority.
Ask AI for a rule suggestion, then review it.
Select the screenshot to open the full-size image.
Create a rule
Open Rules from the Mailbox menu.
Give the rule a descriptive name and choose whether all or any conditions must match.
Select a field such as sender, recipient or subject, then a comparison and value.
Choose an action such as moving to a folder or marking as read. Use only the actions offered for that processing path.
Save and test with a message that should match and one that should not.
For example, match an exact newsletter sender and move new messages into Newsletters. A broad “contains” condition can match more senders than intended. Check rule ordering and overlapping conditions when the result is unexpected.
Sender exceptions are rules
Not spam creates a sender-trust rule in the ordinary rules collection. Keep it visible and editable there rather than maintaining a separate, hidden whitelist. Removing the rule removes that exception for future classification; it does not delete old mail.
Email processor
The email processor controls incoming and forwarding behavior, including filtering and header rewriting. It is separate from the low-priority client AI queue. Server rules cannot freely inspect content that exists only encrypted in a user’s mailbox; supported conditions depend on the processing stage.
AI assistance
Describe a rule in natural language if the AI rule assistant is available. Inspect the generated conditions, destination and actions before saving. Test the narrowest useful condition before applying destructive or broad rules.
Everyday use · Chapter 11
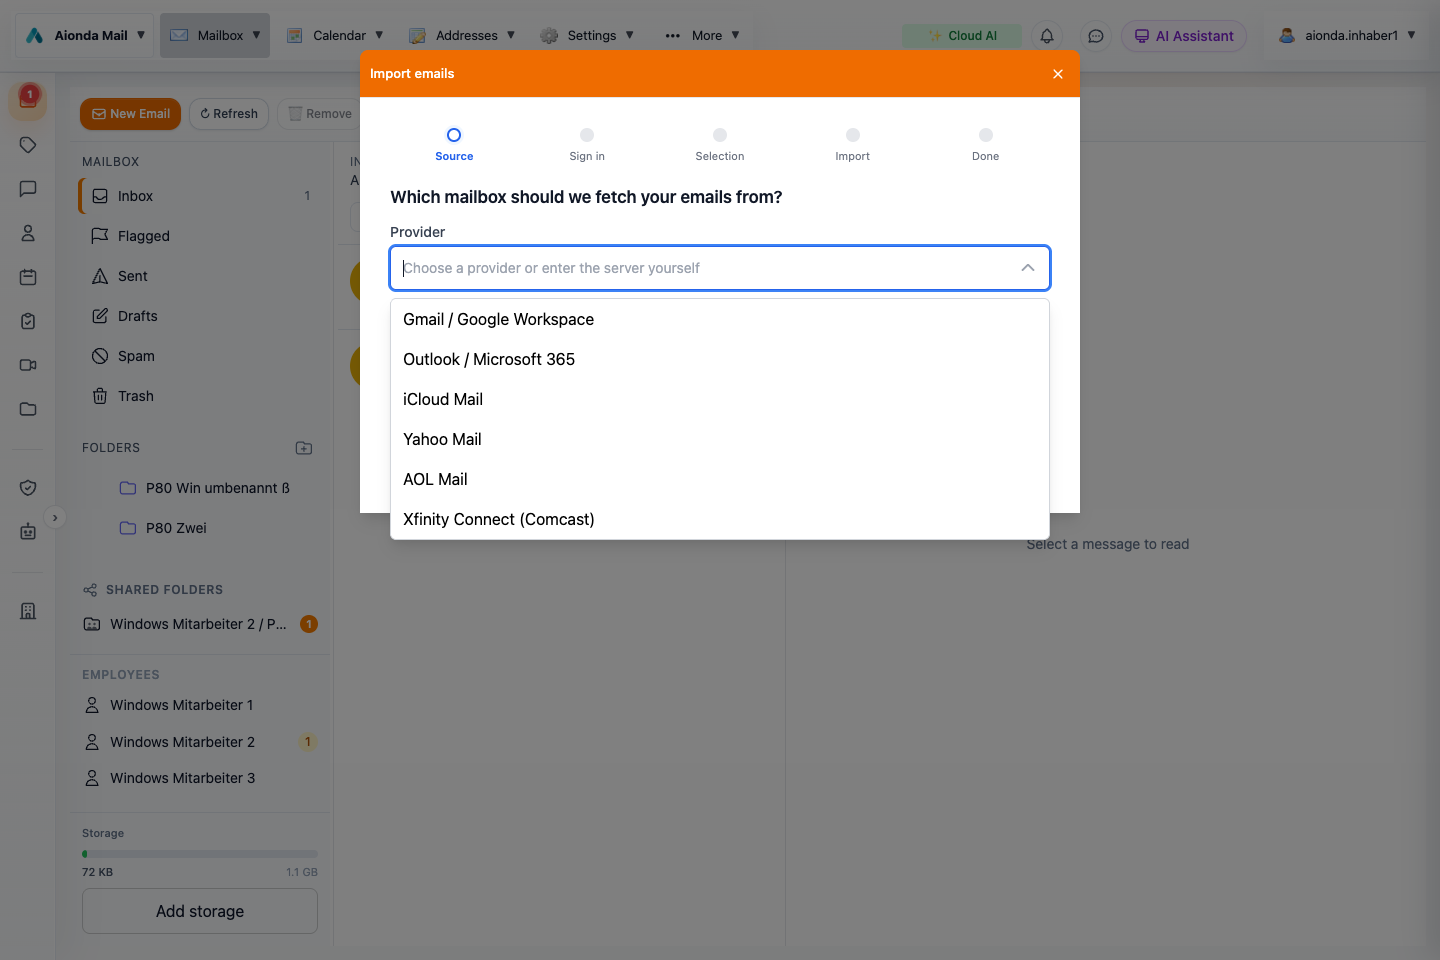
Import, export and browser integration
Move data deliberately and verify that the destination contains what you expected.
Follow Source, Sign in, Selection, Import and Done.
Search or choose a provider. The menu shown here is the English provider selection; other languages show regional presets.
Select the screenshot to open the full-size image.
Import mail from another account
Open Mailbox → Import emails. Choose the source provider, sign in, select the folders or messages offered by the wizard, and follow the import progress. Keep access to your original mailbox until you have checked the imported folders, messages and attachments.
Supported provider presets
The following providers are configured in the Web import catalog. The visible dropdown varies with the interface language; a provider absent from your regional list can be entered through Other provider (IMAP) using its current server settings. Googlemail is also recognized as a Gmail alias. A preset does not override the source provider’s account restrictions, administrator policies or current service availability.
Source system
Preparation or sign-in
AOL Mail
Use an app password.
Arsys
Use the mailbox credentials and settings supplied by the provider.
AT&T Mail
Use an app password.
Bbox Mail (Bouygues Telecom)
Use the mailbox credentials and settings supplied by the provider.
BOL Mail
Use the mailbox credentials and settings supplied by the provider.
BT Email
Use the mailbox credentials and settings supplied by the provider.
Correo Movistar
Use the separate email password.
Cox Email
Use an app password.
DreamHost
Use the mailbox credentials and settings supplied by the provider.
EarthLink
Use the mailbox credentials and settings supplied by the provider.
Fastmail
Use an app password.
Free
Use the mailbox credentials and settings supplied by the provider.
freenet
Enable IMAP or third-party access with the provider.
Gandi Mail
Use the mailbox credentials and settings supplied by the provider.
Gmail / Google Workspace
Use an app password.
GMX
Enable IMAP or third-party access with the provider.
GMX.com
Enable IMAP or third-party access with the provider.
GMX.es
Enable IMAP or third-party access with the provider.
GMX.fr
Enable IMAP or third-party access with the provider.
GoDaddy Professional Email
Use the mailbox credentials and settings supplied by the provider.
Hostinger Email
Use the mailbox credentials and settings supplied by the provider.
iCloud Mail
Use an app password.
iG Mail
Enable IMAP or third-party access with the provider.
IONOS
Use the mailbox credentials and settings supplied by the provider.
IONOS / 1&1
Use the mailbox credentials and settings supplied by the provider.
IONOS España
Use the mailbox credentials and settings supplied by the provider.
IONOS France
Use the mailbox credentials and settings supplied by the provider.
KingHost
Use the mailbox credentials and settings supplied by the provider.
laposte.net
Use the mailbox credentials and settings supplied by the provider.
Locaweb
Use the mailbox credentials and settings supplied by the provider.
Mail Orange
Enable IMAP or third-party access with the provider.
mail.com
Enable IMAP or third-party access with the provider. The preset requires a paid mailbox plan.
mailbox.org
Use the mailbox credentials and settings supplied by the provider.
Mailo
Use the mailbox credentials and settings supplied by the provider.
Namecheap Private Email
Use the mailbox credentials and settings supplied by the provider.
Outlook / Microsoft 365
Authorize access with Microsoft sign-in (Microsoft Graph).
OVHcloud MX Plan
Use the mailbox credentials and settings supplied by the provider.
Portugalmail
Use the mailbox credentials and settings supplied by the provider.
Posteo
Use the mailbox credentials and settings supplied by the provider.
R7 Mail
Use the mailbox credentials and settings supplied by the provider.
SAPO Mail
Use the mailbox credentials and settings supplied by the provider. The preset requires a paid mailbox plan.
SFR Mail
Use the mailbox credentials and settings supplied by the provider.
Sky Yahoo Mail
Use an app password.
Spectrum Email
Use the mailbox credentials and settings supplied by the provider.
STRATO
Use the mailbox credentials and settings supplied by the provider.
T-Online
Use the separate email password.
Terra Mail
Use the mailbox credentials and settings supplied by the provider.
UOL Host
Use the mailbox credentials and settings supplied by the provider.
UOL Mail
Use the mailbox credentials and settings supplied by the provider.
Vodafone / Arcor
Use the mailbox credentials and settings supplied by the provider.
WEB.DE
Enable IMAP or third-party access with the provider.
Xfinity Connect (Comcast)
Enable IMAP or third-party access with the provider.
Yahoo Mail
Use an app password.
Zoho Mail
Enable IMAP or third-party access with the provider.
Microsoft, Google and Apple accounts
Outlook.com, Hotmail and Microsoft 365 use Microsoft authorization. Work or school tenants may require administrator approval. Gmail / Google Workspace and iCloud use their guided account setup; app passwords must be available for the source account. Follow the instructions displayed by the wizard.
Other providers and company servers
Choose Other provider (IMAP) for an IMAP-enabled mailbox, including a company server or self-hosted system. Enter the server hostname, port, secure connection settings and mailbox credentials. The importer supports TLS on port 993 or STARTTLS on port 143. Ask your administrator if IMAP access is disabled. A self-hosted Exchange mailbox needs an enabled compatible IMAP service; Microsoft cloud accounts should use Microsoft sign-in.
Thunderbird and Apple Mail are applications rather than source mail servers: import from the account they connect to. The current Web mail-import wizard does not offer direct PST, OST or MBOX file upload. EML download is an export feature, not a promise that EML files can be uploaded through this wizard.
Contacts, calendars and address lists
Contacts: import vCard (.vcf or .vcard) or supported CSV files from the Contacts workspace. Check field mapping and duplicates with a small sample first.
Calendar: import an iCalendar file (.ics; the picker also accepts .ical, .ifb and .icalendar). Verify the imported events and target calendar.
Disposable addresses: use the address CSV import with the compatible Aionda export structure. This imports address records, not email messages.
Export and portability
Use the relevant workspace’s export or download action. Check the resulting file format and open it in an appropriate reader. A PDF is useful for reading but is not automatically a complete machine-readable export with attachments and metadata. An archive forensic export is evidence about integrity, not necessarily a full mailbox backup.
Browser extension
The browser extension can help create and insert disposable addresses in forms. Use the installed extension’s account settings and review the chosen lifetime before submitting a form. An alias that expires too soon can prevent later password-reset messages from reaching you.
Before changing systems
Check address continuity, exported content, folder structure and recovery methods on the new device. Keep access to the old environment until you have confirmed that important records and authentication methods work in the new one.
Collaboration · Chapter 12
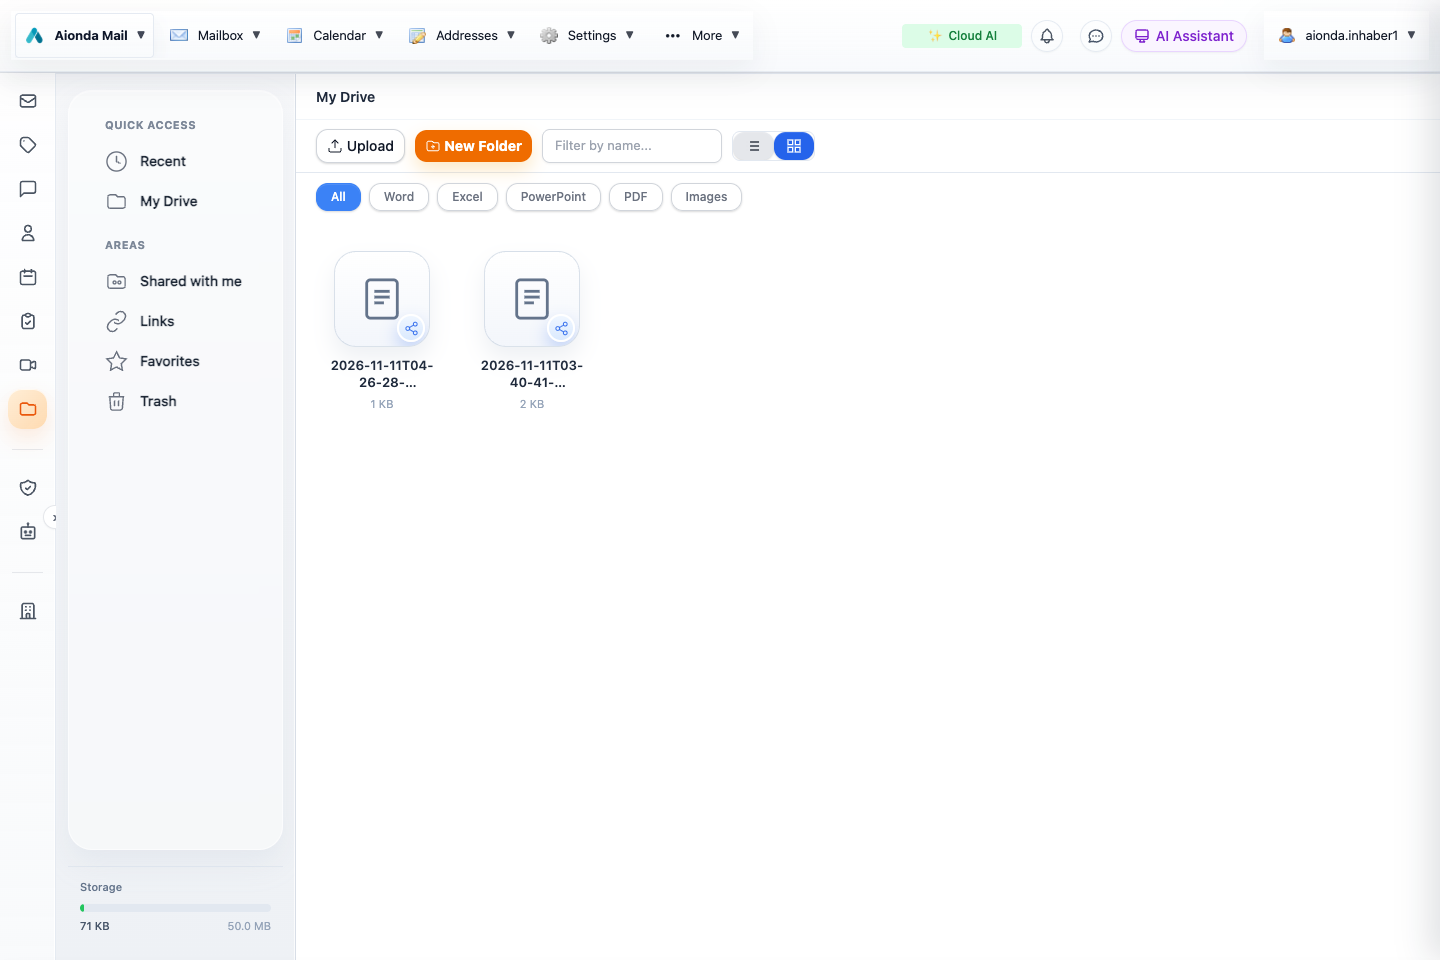
Drive and file sharing
Store files in encrypted storage and grant access deliberately.
Upload files or create a folder.
Switch between your files, incoming shares and links.
Select the screenshot to open the full-size image.
Upload and organize
Unlock your mailbox and open Drive.
Choose Upload or drop files into the workspace.
Create folders for projects and use search or favorites to find frequent items.
Preview or download a file to confirm that the upload completed correctly.
Drive encrypts file content in the client before upload. File keys enable sharing without publishing the rest of your storage. Mail and Drive storage contribute to the quota shown in your account; deleting a local original does not increase the server quota.
Share with an Aionda user
Open the item’s sharing action, choose an eligible recipient and select the permission level. Read access allows viewing or downloading. Full access permits additional changes offered by that share, such as uploading or renaming. Review Shared with me for items received from others. Visibility groups restrict eligible company recipients but do not themselves grant file access.
Share with an external link
Where link sharing is offered, create a link and review its access options, including password or expiry when available. Send the link only to the intended recipient. Anyone who obtains the required link and credentials may be able to use it. Revoke links when access is no longer needed.
Change or revoke access
Review the item’s sharing settings and remove obsolete recipients or links. Revocation stops subsequent authorized access through the service; it cannot recall copies already downloaded. Moving a file to Trash is different from permanently removing it. Confirm the selected item and ownership before permanent deletion.
Collaboration · Chapter 13
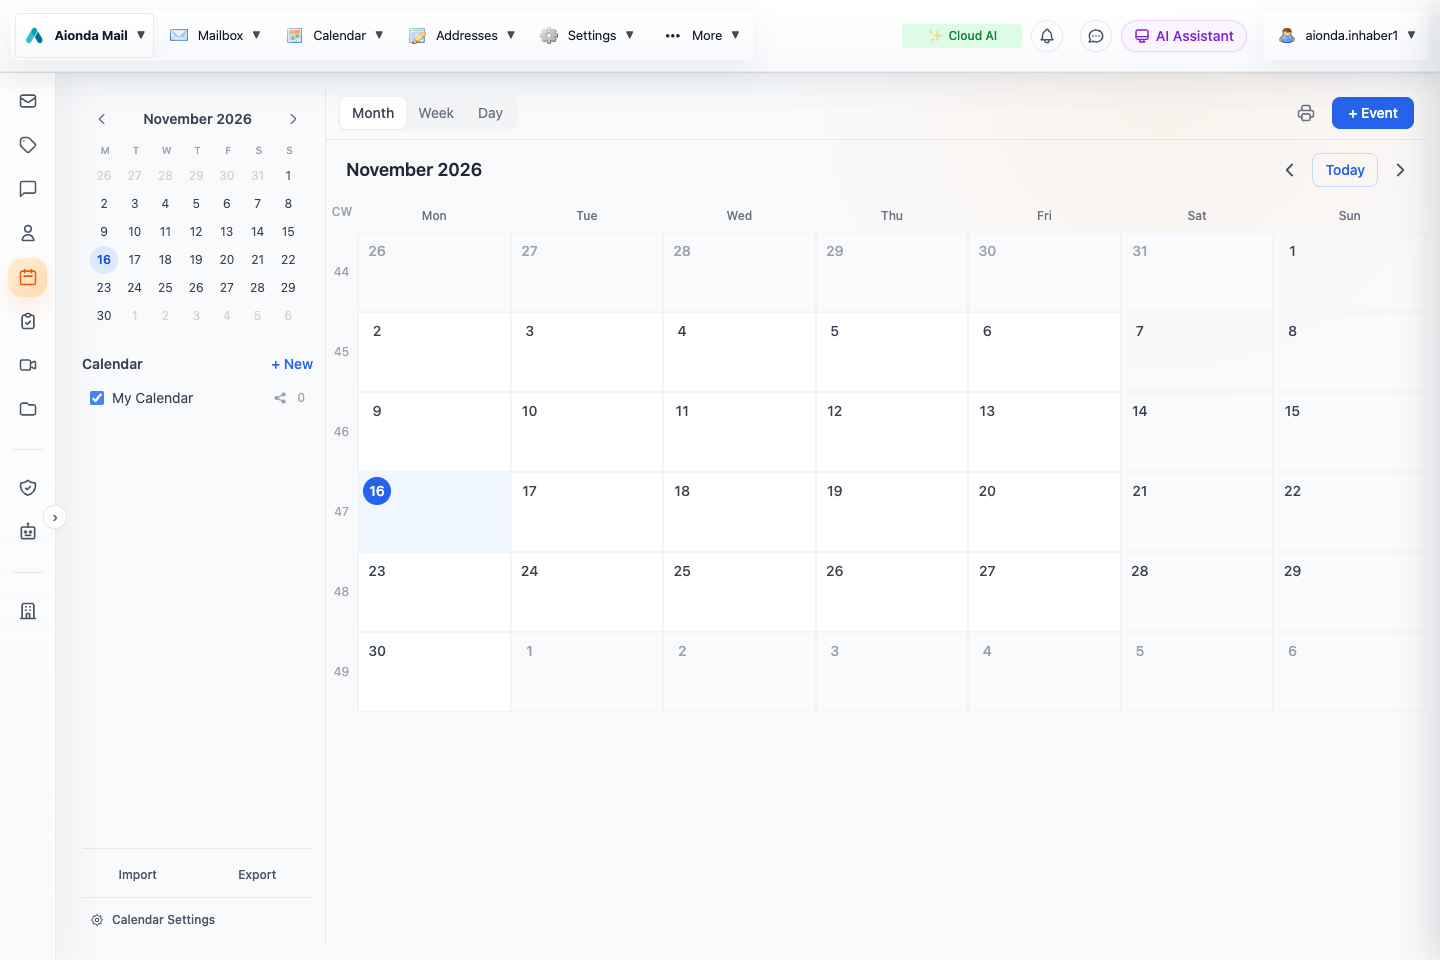
Calendar and invitations
Find a shared meeting time with the Scheduling Assistant, plan appointments and manage invitations.
Choose the calendar view.
Select a day or appointment in the calendar workspace.
Select the screenshot to open the full-size image.
Create an event
Open Calendar and choose the date or New event.
Enter a title, start and end time, and the correct calendar.
Check the time zone, all-day setting and recurrence if applicable.
Add participants and review the details before saving or sending invitations.
A recurring event represents a series. When editing, pay attention to whether the action affects one occurrence or the series. Browser locale can change the appearance of dates even when the application language is English.
Find a time together: Scheduling Assistant
Compare participants’ free and busy times side by side before sending an invitation. Instead of exchanging messages about possible times, look for an opening across the rows in one visual timeline. This is especially useful for team meetings and project planning.
Where to open it
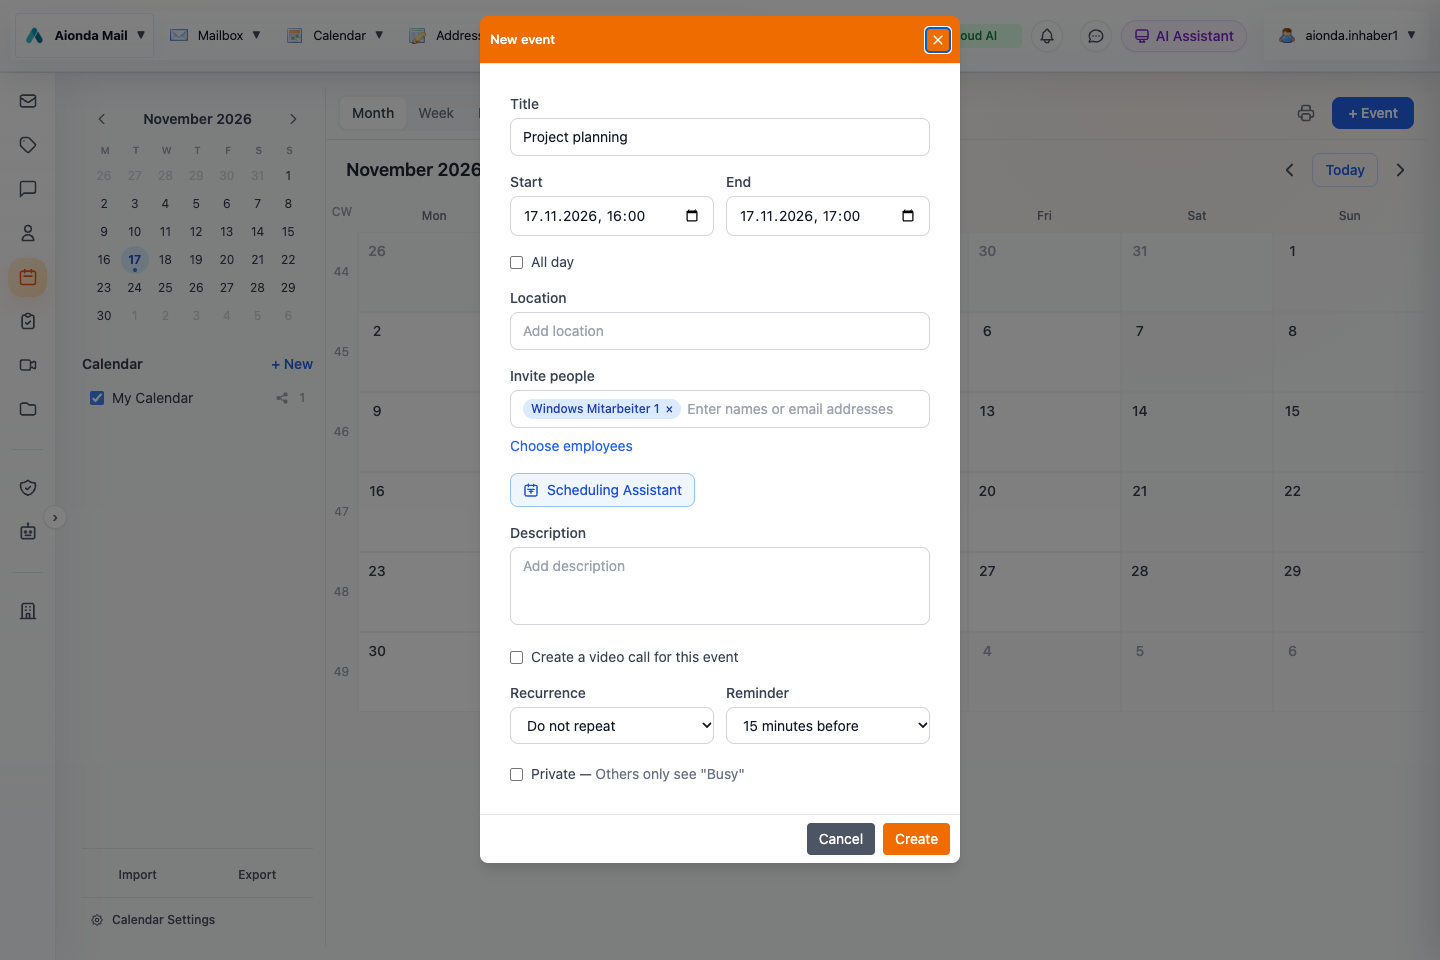
Open Calendar in the sidebar and select + Event, or open an existing appointment.
Enter the event title and its proposed start and end time.
Under Invite people, add a participant. Choose employees lets you select visible colleagues from your company.
Once a participant has been added, select Scheduling Assistant below the participant field.
Add participants with Invite people or Choose employees.
Open Scheduling Assistant.
Review the event before creating it; the example invitation has not been sent.
Select the screenshot to open the full-size image.
Read the availability grid
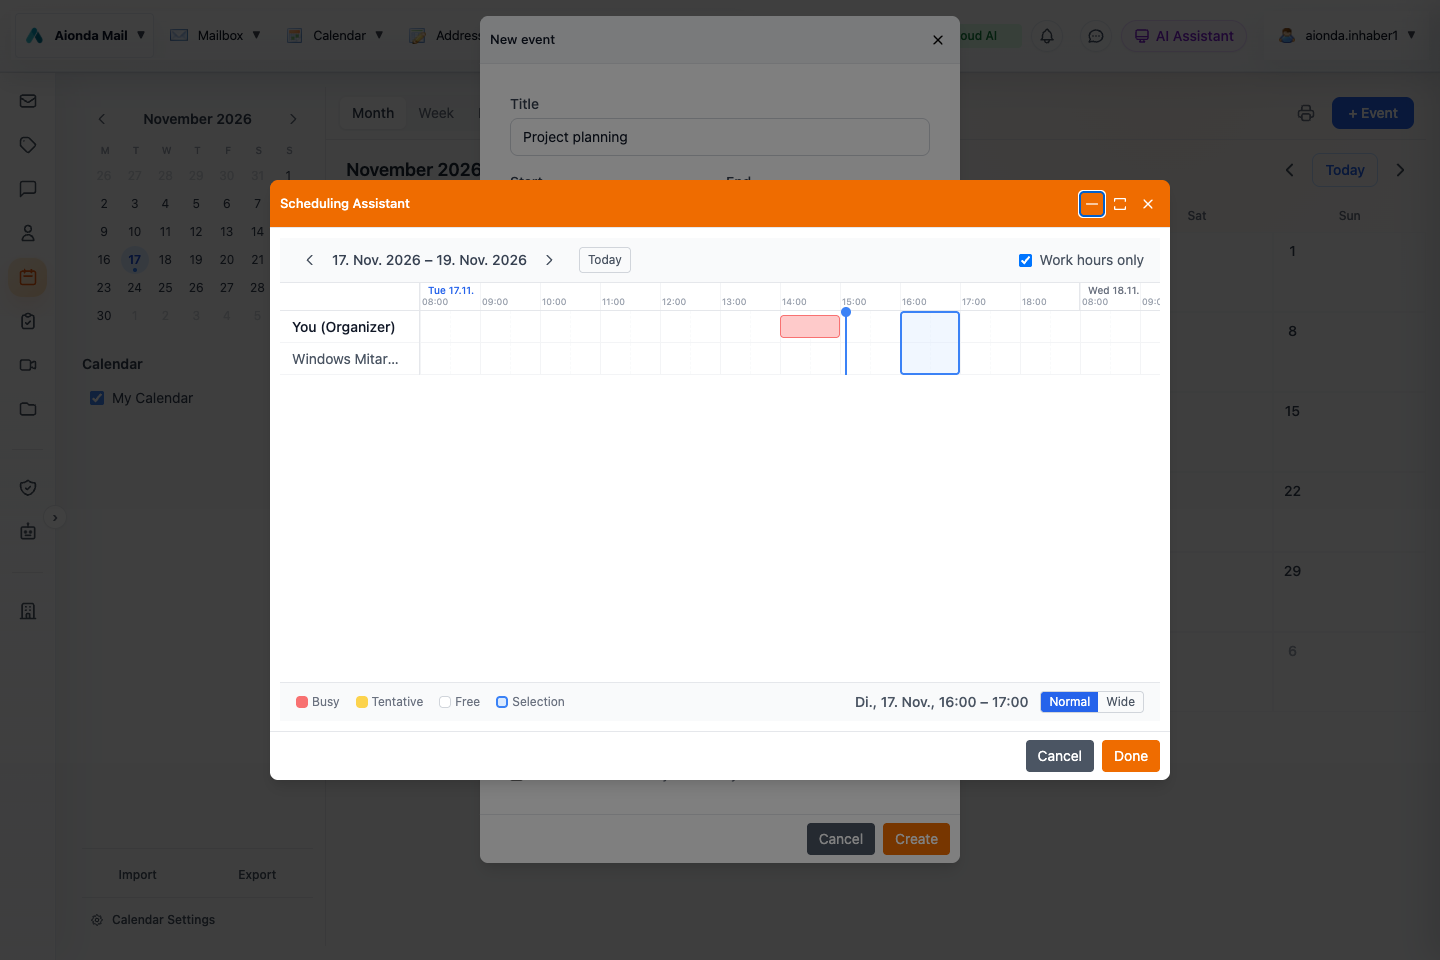
The organizer appears first, followed by the selected participants. The example below uses a test colleague and a real test appointment: the organizer is busy from 14:00 to 15:00, while the proposed meeting is selected from 16:00 to 17:00.
Navigate the date range and change the work-hours view.
Compare the participant rows: red marks the organizer’s test appointment.
The blue outline shows the proposed meeting time.
Review the selected time and choose Done to return it to the event form.
Select the screenshot to open the full-size image.
Busy (red): a reported occupied time block. Avoid placing the meeting over it.
Tentative (amber): a provisional commitment that may still conflict with your meeting.
Free: no occupied block was reported for that time, provided availability loaded successfully.
Selection (blue outline): the proposed meeting time across the participant rows.
Choose and apply a time
Use the previous/next day arrows or Today to choose the date range. Scroll horizontally to see the other days.
Use Work hours only to narrow the displayed hours. Normal and Wide change the horizontal scale.
Click a suitable time in the grid and check the selected interval shown below it.
Select Done to apply the start and end time to the event form.
Review the duration, participants and remaining details, then create or save the event. Done alone does not send an invitation.
Availability and privacy
The assistant requests free/busy blocks, not the titles, descriptions or locations of another person’s appointments. Access depends on the person’s availability-sharing setting and your permitted relationship, such as company visibility or a calendar share. It does not grant access to a colleague’s full calendar.
Availability unknown is not the same as free. If a person cannot be resolved, access is unavailable or a request fails, confirm the time with that person. Adding an external email address does not automatically connect to their Google or Microsoft calendar. The grid is a planning aid: check recurring commitments and time zones when confirming the final appointment.
Invitations and shared calendars
Accept, decline or tentatively respond to invitations as appropriate. External recipients receive ordinary calendar invitations through email. Share calendars explicitly with eligible users and the appropriate permission; being visible in the directory does not automatically reveal all calendar details.
AI scheduling
The assistant can retrieve events and prepare new ones through supported tools. Check dates, time zones and participants in the resulting event, especially when the request uses phrases such as “next Friday”. Use an exact date when ambiguity would matter.
Collaboration · Chapter 14
Tasks and flagged email
Turn follow-up work into a list that you can review independently of the mailbox.
My Day, Important, Planned and Flagged email are different views.
Enter a task and optional due date.
Select the screenshot to open the full-size image.
Capture and organize
Open Tasks and enter a task title. Add a due date, importance or recurrence when needed. Create lists for separate projects. My Day is a focused daily view; Planned and Important help you find work across lists.
Create a task in the intended list.
Add a clear action and a useful due date.
Mark it complete when done; reopen it if further work is required.
Flagged email
Flag a message in Mailbox to make it available in the flagged-email task view. Opening the task takes you back to the associated mail. Flagged email across the account can differ from a filter on one folder. Counts should describe the actual matching set rather than only the rows currently loaded on screen.
Ask the assistant
The AI task tools support listing, creating, updating, completing, reopening and deleting tasks, as well as working with task lists. Check the selected list and due date after an AI action. A deleted task is not the same as a completed task.
Collaboration · Chapter 15
Chat and conversations
Discuss work with eligible contacts and keep meeting invitations under control.
Find conversations or start a new chat.
Read messages, attachments and read status.
Write a message and attach a file. This existing test conversation contains German message text.
Select the screenshot to open the full-size image.
Start a conversation
Open Chat from the sidebar.
Choose Start chat. Search for a person and, if available, use the visibility-group filter.
Select the intended recipient and start the conversation.
Write your message in the composer and use the attachment control if you want to share a file. Check the recipient before sending.
Search for the recipient by name.
Filter by visibility group.
Select the intended person; Start becomes available after selecting a recipient.
Select the screenshot to open the full-size image.
Visibility groups affect which company colleagues can be discovered and selected. An existing conversation is not erased by a later membership change. Personal contacts and resource permissions have separate rules.
Read and respond
The conversation displays messages and attachments. Use Quote to respond with context. The read status shown for a message helps distinguish a message that has been sent from one that has been read. Open the attachment only if you trust its source.
People and AI employees
Check whether the recipient is a person or an AI employee. An AI employee produces generated answers that may need verification. A familiar name or avatar does not make an answer authoritative.
Move to a call
The video-call control appears in the conversation header. For meeting creation, browser permissions and call controls, see Video meetings.
Keep permissions separate
A conversation does not automatically grant access to a mailbox, shared drive or archive. Share the resource explicitly. Do not send recovery words, passwords or MCP credentials in chat.
Collaboration · Chapter 16
Video meetings
Create a meeting, invite the intended participants and control camera, microphone and screen sharing.
Create a new meeting.
Enable PIN protection before creating it when needed.
Active meetings appear here so you can join or end them.
Select the screenshot to open the full-size image.
Create and invite
Open Video meeting in the sidebar.
If needed, select Protect with PIN before choosing Create new video meeting.
Use the invitation controls shown for the created meeting. Share the meeting link only with the intended participants, including guests without an Aionda Mail account.
Join the meeting and respond to the browser’s microphone and camera permission prompts.
Treat the full invitation as confidential. Do not publish it in a screenshot or public documentation. If you use a PIN, give it to the participants through an appropriate channel.
During the meeting
Use the microphone button to mute or unmute, the camera button to turn your video off or on, and Share screen to choose a screen or window in the browser’s own picker. Check that the selected content contains no private messages or unrelated documents. Use Leave call to leave your call session. The meeting owner can end an active meeting from the meeting list.
If camera or microphone does not work
Check the site’s browser permissions and the operating system’s privacy settings. Another application may already be using the device. A denied permission can prevent the call from starting even when the meeting link is valid. Allow the required device access and retry.
What this illustration shows
The screenshot shows the real Web meeting creation screen before an invitation has been generated. It does not show a connected multi-person call or demonstrate successful remote audio, video or screen sharing.
Business · Chapter 17
Set up and manage a company
Give people and AI employees the access they need, with clear ownership and oversight.
Open Employees.
Invite a colleague.
Review membership and roles.
Select the screenshot to open the full-size image.
Company administration
Open Enterprise to see company settings, the employee roster, AI Employees and Archive. The owner manages the organization and employee profiles. Roles such as administrator, compliance officer, manager and employee represent different responsibilities; choose the least access needed for the job.
Review the company name and owner profile.
Invite employees using Invite Employee.
Check the resulting membership and role after the invitation is accepted.
Review each employee’s published contact address and visibility membership.
Configure archive and AI access separately from ordinary directory membership.
Names and directory identities
Store a first and last name for a readable directory. If these are absent, the username is used. Human employees and AI employees have distinct identities. Do not classify people automatically by surname: a family member can also be a genuine employee with different access needs.
Owner access and key deposit
Enterprise mailbox access can use deposited key material for authorized owner access. Review deposit status before assuming a mailbox can be opened. Access is recorded with a reason in the audit trail. The technical ability to open a mailbox does not decide whether doing so is legally appropriate for a particular employment or private-use arrangement.
Offboarding
Before removing a member, review their shared resources, responsibilities, aliases and records that must remain available. Retained archive records and exported copies are separate from the employee’s current directory visibility. Test access from the affected role after changes.
Business · Chapter 18
Visibility groups: Company and Private
Control who can discover whom without confusing visibility with access to content.
Edit group names and memberships.
Company members and their assigned groups.
Private members are listed separately. The test company uses the names Firma (Company) and Privat (Private).
Select the screenshot to open the full-size image.
How groups work
When the company enables visibility groups, company-directory and recipient discovery use shared membership. For example, people in Private can see one another, while colleagues who belong only to Company do not discover those private members through the company directory. The owner retains an administrative view across the organization.
Membership is explicit. A surname, family relationship or job title does not decide the group. A person who works in the business and participates privately can belong to more than one group. A human member must retain a group; an AI employee belongs to exactly one.
Example
Member
Membership
Directory scope
Owner
Company and Private
Administrative view
Office colleague
Company
Company colleagues
Private member
Private
Private members
Private AI assistant
Private
Authorized private context
This is a conceptual example, not a screenshot or a statement about actual employee memberships.
Administration and client availability
In the Web app, open Enterprise → Employees → Visibility groups as the owner. The macOS app offers the equivalent group administration. Enable groups deliberately and review the initial memberships. Choose Edit to add or rename groups and select human and AI memberships. Review the preview before saving; Cancel discards the changes. In Chat, members of multiple groups can filter people by group. Other native clients may not yet offer the same administration screen.
AI employees already in use cannot simply be moved to another group in this first version. Create a separate AI identity for the new scope instead of carrying existing context across that boundary. Group deletion is not offered in the initial administration flow.
Edit memberships step by step
Open Enterprise, select Employees and find Visibility groups. Choose Edit.
Use the group name field to rename a group. Select the people who should belong to it. A person may belong to several groups.
Review AI employees separately. Their group assignment is a distinct choice; the absence of AI employees in this test company does not mean that groups apply only to people.
To add a group, enter its name and choose Add group.
Choose Preview visibility. Check the people each member will be able to discover, then Save. Cancel leaves the saved memberships unchanged.
Rename a group.
Select human members.
Preview the visibility before saving; Cancel discards your edits.
Select the screenshot to open the full-size image.
Check the result before saving
The preview shows the resulting visibility for each person. Check members who belong to several groups as well as members who should remain private. The owner remains able to administer the entire organization.
Add a named group when needed.
Inspect the resulting visibility for each member.
Save only after checking the preview.
Select the screenshot to open the full-size image.
What groups do not do
Groups do not grant file or mailbox access by themselves. They do not erase existing chat history, personal contacts or previously downloaded copies, and they do not hide members from authorized owner administration. Grant and revoke resource shares separately.
Business · Chapter 19
Business archive, integrity and GoBD
Preserve business records and understand exactly what the archive’s hash chain proves.
Open Archive.
Read the integrity status.
Verify the chain and inspect the audit log.
Select the screenshot to open the full-size image.
Operate the archive
Open Enterprise → Archive with an authorized account and unlock the required keys.
Check that archiving is enabled for the intended organization and review retention settings. Draft archiving is a separate option.
Use direction filters and search to locate a record.
Run Verify chain and inspect the reported result.
Review the audit log and export the available forensic evidence when needed.
Archive records are separate from ordinary Inbox organization. Moving an email to another mailbox folder does not mean that the archived business record has been removed. Retention and any legal hold must be handled through the archive workflow, not through ordinary mailbox cleanup.
What “blockchain” means here
The implemented archive maintains a company hash chain using SHA3-256. Each block links to the previous hash and includes the record’s hash, timestamp and metadata. Verification checks the internal continuity and integrity of that chain. The implementation reviewed for this edition does not establish publication to a public blockchain or independent consensus.
This makes the chain useful as tamper-evidence relative to a trusted reference. It is not an absolute guarantee against a privileged party rebuilding an entire chain and replacing the reference. Keep independently retained exports or other trusted evidence as part of your organization’s verification process.
Exports and readable records
A forensic export describes chain evidence and verification data. Do not assume that it is a complete, readable export of every email and attachment. Check the export format, preserve the necessary decryption capability and test that the business records can actually be retrieved and read for the required period.
GoBD responsibilities
GoBD concerns the overall recordkeeping process, including completeness, traceability, retention, accessibility and procedural documentation. A hash chain alone does not certify a company’s compliance. Define the applicable record categories, retention periods, authorized access and verification procedures with the responsible advisers. The software’s default retention value is not individual tax advice.
Primary reference: German Federal Ministry of Finance: GoBD, including its published amendments. This handbook explains product behavior; it is not a compliance certificate.
Security · Chapter 20
Spam and phishing protection
Two layers protect your mailbox: deterministic server-side checks and client-side AI detection of spam and, especially, phishing.
The email is now in Spam after client-side AI detected phishing.
The warning explains the detected phishing signals.
Not spam restores a legitimate false positive and creates a sender-trust rule. This screenshot uses a controlled phishing test message; do not trust a real message that requests passwords or recovery words.
Select the screenshot to open the full-size image.
Layer 1: deterministic checks on the server
During incoming delivery, the server applies rule-based and technical checks, including the server-side spam filter and sender-authentication signals. This stage is deterministic; it is not the client’s AI content analysis. Messages identified as spam or phishing can be delivered directly into Spam, subject to the applicable sender-trust and security checks.
Layer 2: AI phishing detection in the client
After the email has arrived, the client uses AI to detect phishing as well as spam. Once the mailbox is unlocked and AI is enabled, the client analyzes the readable message content and available technical evidence. It looks for attempts to steal passwords, recovery words, money or other sensitive information, impersonation, suspicious links and pressure to act urgently.
This second layer can detect a phishing attempt that was not identified during server-side delivery. If the AI classifies an Inbox message as phishing or spam, it is automatically moved from Inbox to Spam unless an applicable trusted-sender exception prevents the move. A merely suspicious result can instead offer a manual Move to spam action.
“Client-side AI” describes where this analysis is initiated and applied. Depending on your AI settings, inference uses local AI or the configured cloud AI service; it does not mean that every model always runs on your device. See AI settings and privacy.
Why a message disappears from Inbox
The email is moved, not silently deleted. The interface briefly explains the automatic move with visual feedback. Open Spam to inspect the message, the warning and its reasons.
Automatic background scanning and automatic moves apply only to Inbox. Messages you have placed in another folder are not swept into Spam by this workflow. Messages already in Spam are not repeatedly moved there.
Recover a false positive with Not spam
Open the Spam folder and inspect the email, sender and warning reasons.
If you have independently established that the message is legitimate, choose Not spam.
The email moves back to Inbox.
A rule marks that exact sender email address as trusted for future messages. It is stored alongside your normal email rules, where you can review, disable or remove it. It does not automatically trust every address at the same domain.
Trusted sender does not mean verified sender
Sender names and email addresses can be forged.
A trust rule is your preference for future routing, not proof that a message really came from that person. Existing spam and phishing warnings remain visible after you choose Not spam, including when the email is back in Inbox. The rule does not erase the security assessment.
Read the warning even for familiar senders. Malware detection and failed sender-authentication checks can still override the trust exception. Confirm unusual requests through an independent contact channel, and never provide passwords or recovery words in response to an email.
The controlled test message has returned to Inbox.
The phishing warning remains visible despite the sender-trust rule.
Move to spam lets you reverse the exception. Not spam was used here only to demonstrate the behavior with a safe documentation fixture.
Select the screenshot to open the full-size image.
Remove a trust exception
Manage the sender’s rule in Rules. Where offered in the warning banner, Move to spam moves the message back to Spam and removes the sender-trust exception. Use this if you trusted the sender by mistake.
Background work and priority
While the app is active and the mailbox is unlocked, queued Inbox analysis runs at lower priority. Opening a message gives its analysis priority over waiting background work. AI analysis is not guaranteed to continue while an iPhone or iPad app is suspended or closed. Neither detection layer guarantees that every malicious message will be found.
Security · Chapter 21
Security basics: passkeys and post-quantum encryption
Understand who can read your data, how you unlock it and why the security of an email depends on its entire route.
Review the configured password, recovery and passkey methods.
Check the passkey’s mailbox capability and manage your authenticators.
Select the screenshot to open the full-size image.
Start with three different questions
Who may sign in? Authentication checks access to the account. Who can unlock stored content? Encryption keys protect the mailbox and workspace. Was the message protected before it reached Aionda? That depends on the sender and the delivery route. A secure account does not make every ordinary Internet email end-to-end encrypted.
Public and private keys, in plain language
A public key lets someone prepare an encrypted message for you. Your corresponding private key opens it. Publishing the public key is expected; protecting the private key is essential. Aionda encrypts private mailbox key material under a master key that is reconstructed on your device when you unlock the mailbox.
How a passkey helps
A passkey is a cryptographic sign-in credential approved through your device or authenticator, often with a fingerprint, face recognition or a device PIN. You do not type a reusable password into the site for the passkey operation. Whether a passkey can also unlock the mailbox depends on support for the required WebAuthn PRF capability.
PRF supplies key-derived material for protecting one part of the vault unlock secret. A passkey that works for sign-in is therefore not automatically sufficient for mailbox unlocking. Review its mailbox status in Security. Biometrics approve the local authenticator operation; Aionda does not need a copy of your fingerprint or face.
Two out of three unlock factors
The vault master key uses a two-of-three sharing scheme. One share is protected through your password, one through a compatible passkey and one through your recovery information. Two different available shares reconstruct the key; this is not the same as merely having two passkeys.
Available factors
Typical purpose
Password + compatible passkey
Normal vault unlock.
Password + recovery information
Recover access when a passkey is unavailable.
Compatible passkey + recovery information
Recover or change access when the password is unavailable, through the supported recovery flow.
Keep recovery words offline and never send them to support. Confirm another usable recovery path before removing a credential. A device’s ability to sign in is not proof that it can reconstruct the mailbox keys.
What “post-quantum” protects
An attacker could collect encrypted traffic today and try to decrypt it later with a powerful quantum computer. Aionda’s mailbox key encapsulation combines X25519, a classical method, with ML-KEM-1024, a post-quantum method. Message content is protected with AES-256-GCM. In everyday terms, the hybrid construction protects the key needed to open the encrypted mailbox copy.
This protection is about the implemented encryption path. It does not make a compromised device safe, hide all delivery metadata, or automatically upgrade an external provider, a traditional PGP key or the sender’s original connection. The PQ indicator describes the mailbox protection; inspect the other security information to understand the whole route.
Read the security indicators
Protection
What it tells you
TLS transport
A connection between systems was encrypted. The participating mail servers can still process ordinary mail.
Vault / PQ encryption
The stored mailbox copy uses Aionda’s encrypted mailbox scheme. This alone does not say that the sender encrypted the original.
PGP encryption
The sender encrypted protected message content for the recipient before delivery. See the PGP chapter.
Signature
A signature can support authenticity and integrity relative to a trusted key. Signing is different from keeping content confidential.
The boundaries of end-to-end protection
Drive uploads and supported encrypted workspace records are encrypted on the client. Ordinary external SMTP mail can arrive readable and is then encrypted for mailbox storage. For external end-to-end email, use a compatible content-encryption mechanism such as PGP at the sender and recipient.
Explicit shares give recipients access to the selected data. Enterprise key deposit can authorize organizational access. Cloud AI receives the readable context sent for processing, and an external MCP assistant receives its tool results. Optional email logging can retain a separate original message. Review these boundaries instead of interpreting “encrypted mailbox” as “no other copy or authorized reader exists”.
Keep access recoverable
Open Security and review password, recovery and passkey status.
Add a compatible second authenticator when appropriate and verify that the required unlock workflow works.
Keep recovery information securely offline, separate from the device.
Inspect key-renewal prompts and their sharing implications before proceeding.
Lock or sign out on shared devices. Report unexpected key changes through a separate trusted channel.
Background standards
For the underlying standards, see NIST FIPS 203: ML-KEM and the W3C Web Authentication specification. These describe cryptographic and authentication building blocks; the product-specific boundaries above explain how they apply to Aionda Mail.
Understand sender checks and transport security
Encryption protects content; authentication checks the use of a sender domain. Neither guarantees that a message is honest. The mailbox’s security badge opens the encryption diagram. SPF, DKIM and DMARC are separate mail-authentication concepts, not extra arrows in that diagram.
Check
What it means
If missing or failing
SPF Sender Policy Framework
Checks whether the sending server’s IP is authorized by the envelope-sender domain (or HELO identity). This is not necessarily the address displayed in From.
None / no SPF: no applicable policy/result was available; this is not the same as fail. Fail: the server is not authorized by that policy. Forwarding and configuration problems can also cause failure. Softfail and neutral are less definitive outcomes.
DKIM DomainKeys Identified Mail
A domain signs selected headers and message content. A valid signature supports the integrity of the signed material and the signing domain’s responsibility.
None: there is no signature to validate. Fail: the signature could not be validated, for example after content changes or because of a key/configuration problem. A pass does not identify the human author or prove that the content is safe.
DMARC Domain-based Message Authentication, Reporting, and Conformance
Relates the visible From domain to a passing, aligned SPF or DKIM result. The domain can publish a handling preference: none, quarantine or reject.
Missing: no usable DMARC policy/result. Fail: the required aligned authentication was not established. Receivers consider their own policies too. A pass does not protect against a lookalike domain, deceptive display name or compromised sender account.
TLS Transport Layer Security
Encrypts a connection between systems. SMTP delivery can involve several separate connections; ordinary participating mail servers still process the message.
No TLS on a delivery hop: content may have crossed that hop without transport encryption, exposing it to interception there. It does not prove that interception happened. Unknown: insufficient evidence; absence of evidence is not proof that TLS was absent.
A familiar sender with missing SPF: do not automatically call it phishing. Check the full address, the request and the other available results.
A payment request with authentication failures: verify it using a known phone number or a separate trusted channel. Do not use contact details supplied only by the suspicious message.
No TLS: mailbox encryption still protects the stored copy, but cannot retroactively protect the earlier delivery hop. Use sender-to-recipient content encryption such as PGP when required.
Everything passes but the request looks wrong: remain cautious. Attackers can authenticate their own domains; a real account can be compromised. AI phishing detection analyzes different signals and can still warn.
Authentication-Results and Received are technical email headers that can record checks and delivery hops. Only results added by a trusted receiving system should be relied on; arbitrary sender-supplied header text is not proof. If you need help interpreting a particular message, use the available delivery/security information and ask support rather than changing your domain’s DNS at random.
Security · Chapter 22
PGP: encrypted email with external correspondents
Protect message content before it reaches a mail server, and distinguish encryption from signing and post-quantum mailbox storage.
Find the PGP key for your Secure Mailbox address.
Check validity and open Details.
Generate missing keys only for eligible addresses.
Select the screenshot to open the full-size image.
What PGP adds
OpenPGP encrypts content for a recipient’s public key so that the corresponding private key is needed to read it. If the sender encrypts before sending, the protected body and attachments can cross mail servers as ciphertext. This is different from encrypting an ordinary message only after it arrives in the Secure Mailbox.
A signature serves another purpose: it helps verify integrity and the signing key. A signed but unencrypted email remains readable. Trust in the key’s owner must still be established; a familiar display name alone is not enough.
Your address keys
Open Security and scroll to PGP Keys.
Locate the Secure-Mailbox-only alias you want to use. Check its Key ID and Valid Until date.
Open Details to inspect the public-key information. Share public information, never private key material.
If an eligible alias has no key, use the offered Generate missing workflow after unlocking.
Public keys for eligible aliases are published through WKD (Web Key Directory), allowing compatible senders to discover them. Automatic key management is designed for eligible Secure-Mailbox-only addresses; an alias that also forwards externally is a different delivery arrangement. Verify the destination and available key before promising a correspondent that you can decrypt their mail.
Send an encrypted message
Select the intended From address and enter every To, Cc and Bcc recipient.
Allow key discovery, or use an appropriate recipient public key stored with the contact. The Web composer can look up keys through WKD and the supported key service.
Inspect the PGP state. All recipients need usable keys for an encrypted send; a key for only one recipient is not sufficient.
Check fingerprints with the recipient through another trusted channel when identity matters.
Confirm that encryption is enabled, review attachments and send. Resolve a missing, expired or revoked key instead of assuming that the message remained encrypted.
The composer encrypts the supported body and attachments in the client using PGP/MIME. Delivery metadata, such as routing addresses, is still needed by mail systems. Do not assume that the ordinary Subject header is hidden.
Read, renew and preserve keys
Unlock the mailbox to use the protected private keys needed for decryption. If an old message cannot be opened, check whether the matching historical key is available. Rotating a key for new mail does not make an old message readable with the new key alone. Avoid deleting key material needed by existing correspondence.
PGP and post-quantum are not interchangeable
The PGP key generation reviewed for this Web version uses classical Ed25519/X25519 keys. Aionda’s mailbox storage separately uses hybrid X25519 + ML-KEM-1024 key encapsulation. Therefore a PQ badge on the stored mailbox copy must not be read as proof that the external PGP exchange itself used a post-quantum algorithm.
A practical check
Exchange a harmless test message with your correspondent, inspect the encryption and signature information, and confirm that both sides can read the reply. Repeat the check after changing addresses or keys. For messages received without PGP, the Security information can still explain the transport and encrypted-storage protection that did apply.
AI and integrations · Chapter 23
Choose how AI processes your data
Local text processing, cloud processing and external assistants have different data boundaries.
Enable automatic comments on opened emails if you want reading assistance.
Choose Aionda Cloud AI (recommended), Local AI or Off.
Review where readable content is processed.
Select the screenshot to open the full-size image.
Select a mode
Open Artificial Intelligence and review the available mode before enabling features. Cloud AI processes the supplied readable context on Aionda’s AI infrastructure. Local AI runs supported text inference on the device using a downloaded model and compatible browser hardware. Off disables the corresponding AI assistance.
Mode or capability
Where to pay attention
Local text AI
Model download, device memory and supported browser GPU capabilities.
Cloud AI
Readable prompts and selected context are sent for server processing.
Speech, image or PDF analysis
These features can use separate cloud endpoints; local text mode is not a blanket offline guarantee.
External MCP assistant
The connected assistant receives the content returned by its authorized tools.
Our recommendation: Cloud AI
You can switch to Local AI (in your browser) in Artificial Intelligence → AI mode. Local text AI uses WebLLM and a downloaded model on compatible browser hardware.
Aionda recommends Cloud AI because its own AI infrastructure offers substantially greater processing capability than the browser-based WebLLM option. Choose Cloud AI for the strongest available assistance, especially for demanding requests. Local AI remains an option when you prefer supported text processing on your device and accept its hardware requirements and limitations. This is a product recommendation, not a fixed speed or accuracy guarantee for every request.
Aionda-owned AI infrastructure in Germany
Aionda’s cloud AI runs on infrastructure owned by Aionda and located in Germany. In this setting, “cloud” means processing on Aionda’s own AI infrastructure in Germany.
Cloud AI still requires the selected prompts and readable context to be processed on that infrastructure. This differs from local AI processing on your device. The infrastructure statement applies to Aionda’s cloud AI, not to external assistants you connect through MCP.
Control context
The assistant can comment on the currently opened message when that option is enabled. Turn it off if you prefer to initiate analysis yourself. Check the AI indicator and settings rather than assuming that the persona name, such as Nova or Orion, determines the processing location.
Limits and verification
Models can misunderstand intent, invent facts or misread documents. Confirm recipients, amounts, dates and requested actions before relying on output. Text inside emails, web pages and attachments is untrusted source material, not an authorization to perform unrelated actions.
A personal local-AI selection does not automatically change how a server-run AI employee or an external MCP application operates. Configure those separately.
AI and integrations · Chapter 24
AI assistance throughout the workspace
Use AI for drafts, triage, research and structured actions, then review the result.
Quick actions for the open email.
Review the message summary.
Enter a request with the intended context.
Select the screenshot to open the full-size image.
AI can summarize a message, explain it, suggest replies, translate foreign-language text, recommend a folder and identify spam or phishing signals. Automatic reading comments and queued Inbox analysis depend on your settings and an active unlocked client. Folder recommendations do not give the assistant permission to sweep every folder for spam.
Writing
Use the composer’s AI actions to draft text, improve wording, adjust tone, translate or prepare a signature. Where inline completion is offered, accept the suggestion only when it fits. Smart replies are starting points, not evidence that the assistant understood every attachment or prior agreement.
Workspace tools
Area
Supported kinds of assistance
Email
Search, read, list folders, compose or reply, send the open email, discard a draft and delete selected mail.
Contacts
Find contacts, prepare a new contact and save an open form.
Calendar
Retrieve events and create appointments.
Tasks
Create, update, complete, reopen or delete tasks and manage lists.
Drive
List files, read supported content and analyze images.
Addresses
Inspect, create, update, enable or disable aliases, inspect delivery logs and diagnose delivery.
Rules
List, create, edit, enable, disable or delete mail rules.
Research and help
Search the web, fetch a page, inspect DNS or mail-domain configuration, read help and contact support.
Meetings
List available video meetings.
Available tools depend on the assistant, context, permissions and client version. Review action confirmations where shown. Do not assume every tool call is draft-only: sending, deleting or changing a rule can modify real data.
Attachments and voice
Image and PDF analysis can extract useful information, but the analyzed portion may be limited; the Web PDF analysis path reviewed here processes at most the first five pages. Check the original document when completeness matters. Voice input may use a separate speech service. Review which content is being sent before using these capabilities with confidential material.
Good requests
Prefer “Draft a reply confirming Tuesday at 10:00; do not send” over an ambiguous “handle this”. For a rule, specify an exact sender and destination. For research, ask for sources and verify claims against the original source.
AI and integrations · Chapter 25
Work with the AI sidebar
Read emails with contextual AI comments, ask follow-up questions and turn a request into a reviewed draft or an explicit action.
Read the current email.
The opened AI sidebar comments on the message.
The message reference keeps follow-up questions tied to the right email.
Select the screenshot to open the full-size image.
Open the assistant beside an email
Open a message, then choose AI Assistant in the top bar. The sidebar displays the selected assistant persona, Nova or Orion, alongside the message. On narrower layouts, the app gives the reading pane and assistant more space and offers a return to the mail list. Fullscreen expands the assistant when you want to concentrate on the conversation.
The “Regarding” reference identifies the email used as context. Check it when switching messages. Quick actions such as Explain, Summarize and Reply offer convenient starting points; you can also type a specific request.
Let AI comment on opened emails
Open Artificial Intelligence, or use AI settings in the sidebar.
Enable Automatically comment on opened emails.
Keep the assistant visible and open an email. After a short pause, it can comment on the content and suggest a next step.
Move to another email to receive context for that message. Turn the option off when you prefer to ask manually.
Enable automatic comments while reading.
Choose Cloud AI, Local AI or Off.
Read the processing information.
Select the screenshot to open the full-size image.
Automatic comments are read-only: they do not send messages, create appointments or perform tool actions. The app avoids interrupting an active request or text you are already typing. A hidden browser tab or closed assistant does not continuously comment on every incoming email. The commentary feature is separate from background spam/phishing checks.
Example: understand the next step
The test email asks for screenshot feedback by Friday and mentions a Thursday meeting. The assistant comments on those details while the original message remains visible. You can follow up with: “List the deadline and what I should prepare.” Always compare the answer with the email; a statement from the sender is not independently verified evidence.
Example: create a follow-up task
Ask: “Create a task called Review handbook screenshots, due 20 November 2026.” The task tool can create the task directly. Confirm the title and due date in the result and in Tasks; requesting a task is different from merely discussing one.
The original email remains available for reference.
An explicit task request and the assistant’s result.
Continue with a follow-up request.
Select the screenshot to open the full-size image.
Example: inspect your mailbox
Ask: “List my mailbox folders and their message counts.” The assistant retrieves folder information instead of guessing. You can follow up with a request to list a specific folder or search for a subject.
Keep the email visible beside the assistant.
The assistant reports mailbox folders after a tool request.
Ask a more specific follow-up.
Select the screenshot to open the full-size image.
Drafts, forms and confirmations
“Draft a reply” opens the composer for review; it does not send. Contact, calendar and rule preparation can open editors that you still need to review and save. Sending and destructive actions have their own confirmation behavior. Some reversible actions, such as creating a task or toggling a rule, take effect directly. The complete tool reference distinguishes these cases.
Images, voice and privacy
The attachment/photo control supplies an image to the assistant where supported. Voice input lets you dictate a request when browser permissions and the feature are available. Review the recognized text before relying on it. These capabilities can use separate cloud processing; local text mode is not a promise that every feature is offline.
Only provide the context needed for the request. The setting for automatic comments explicitly allows readable email content to be processed while the assistant is visible. Cloud AI uses Aionda-owned infrastructure in Germany; external MCP assistants have their own processing boundaries.
AI and integrations · Chapter 26
AI chat: complete tool reference
What the in-app Web assistant can read, prepare or change, with the exact tool names and example requests.
Ask a concrete question in the AI sidebar.
Read the result and compare it with the application. The reference below lists all current tools; this screenshot illustrates a folder-list request.
Select the screenshot to open the full-size image.
Ask in ordinary language
You do not need to type a tool name. Describe what you want; the assistant selects a tool when it needs account information or an application action. This reference names all 48 tools in the current Web assistant catalog, including enable_tools. Additional groups are activated when needed, not all sent to the model at once.
The examples below are suggested requests, not a claim that all 48 actions were executed for these screenshots. Availability depends on your account, permissions, unlocked data, selected AI mode and the feature in question. This catalog describes the in-app Web assistant, not the tool catalog of an external MCP client.
Understand the result
A prepared draft or editor is not a sent email or saved record. Check the actual application state and any confirmation dialog. Some tools immediately make reversible changes, while others ask for confirmation or leave a form open. Do not interpret a conversational suggestion as proof that an action succeeded.
Mail and drafts
Tool and effect
Example request
search_emails Find messages by subject, sender, recipient, body or attachment terms.
“Find emails about the handbook review.”
read_email Read a found email’s text; long content can be truncated.
“Read the review meeting email and list its deadlines.”
list_emails List recent messages in a named folder.
“Show the latest messages in Inbox.”
list_folders List mailbox folders and message/unread counts.
“Which mailbox folders do I have?”
reply_to_email Open a reply draft with recipient, subject, proposed reply and quoted original; does not send.
“Draft a polite reply confirming that I will review the screenshots.”
compose_email Open a new, pre-filled email draft; does not send.
“Draft an email to my project team asking for feedback by Friday.”
send_open_email Send the open composer only after the confirmation dialog is accepted.
“Send the draft that is open now.”
discard_open_email Close and discard the open draft without sending.
“Discard this draft.”
delete_email Move a selected or identified email to Trash after confirmation.
“Move this test message to Trash.”
Contacts and forms
Tool and effect
Example request
list_contacts Find address-book contacts by name, email or company.
“Find the contact for my project colleague.”
create_contact Open a pre-filled contact form for review; does not save it automatically.
“Prepare a contact using the details in this email.”
save_open_form Save the open contact or rule form after an explicit follow-up instruction. Forwarding and auto-reply rules require another confirmation.
“Yes, save the contact I have just reviewed.”
Calendar and meetings
Tool and effect
Example request
get_calendar_events Read calendar events in a specified date/time range.
“What is on my calendar tomorrow?”
create_calendar_event Open a pre-filled event dialog for you to review and save.
“Prepare the review meeting from this email in my calendar.”
list_video_meetings List active meeting rooms and available room information; does not start a call.
“Show my active video meetings.”
Tasks
Tool and effect
Example request
list_tasks List tasks using filters such as My Day, Important, Planned, Completed or a named list.
“Show my planned tasks for the review.”
create_task Create a task with optional notes, due date, reminder, importance, My Day and checklist; takes effect directly.
“Create a task called Review handbook screenshots, due 20 November 2026.”
update_task Change a task’s fields or list; a supplied checklist replaces the previous checklist.
“Move the review task’s due date to 23 November 2026.”
complete_task Mark an identified task completed.
“Mark Review handbook screenshots as completed.”
reopen_task Reopen a completed task.
“Reopen Review handbook screenshots.”
delete_task Permanently delete an identified task after confirmation.
“Delete the test task I just created.”
list_task_lists List task lists and counts, including smart-list counts.
“Which task lists do I have?”
create_task_list Create a named task list directly.
“Create a task list called Handbook review.”
Addresses and delivery
Tool and effect
Example request
list_deas List disposable addresses, status, remaining forwards and expiry.
“Show my disposable email addresses.”
get_dea_details Read the settings of one address, including destination, expiry and challenge-response.
“Show the settings of my project address.”
create_dea Create a disposable address directly using the supplied settings.
“Create a disposable address for project newsletters.”
update_dea Change supported address settings after confirmation.
“Change the description of my project address.”
set_dea_enabled Enable or disable an address after confirmation.
“Disable my old newsletter address.”
delete_dea Permanently delete an address after confirmation.
“Delete the disposable address I no longer use.”
diagnose_delivery Investigate missing delivery using accepted messages, rejected attempts, destination replies and quota findings.
“Why did the latest email to my project address not arrive?”
get_dea_log Read logged incoming messages and delivery outcomes for one address.
“Show the delivery log for my project address.”
get_dea_log_events Read the detailed event timeline for a specific logged message.
“Show the delivery events for that failed message.”
read_logged_email Read retained content of a logged email when available.
“Read the retained message from that log entry.”
Rules
Tool and effect
Example request
list_rules List current rules with conditions and actions.
“Show my email rules.”
create_rule Open a pre-filled rule editor for review and saving; does not create the rule automatically.
“Prepare a rule to move mail from this newsletter sender to Spam.”
edit_rule Open an existing rule for review and editing.
“Open my newsletter rule for editing.”
toggle_rule Enable or disable an existing rule directly.
“Disable my newsletter rule.”
delete_rule Permanently delete an existing rule after confirmation.
“Delete my obsolete newsletter rule.”
Drive and images
Tool and effect
Example request
list_drive_files List or search own Drive files, optionally in a named folder.
“Find handbook files in my Drive.”
read_drive_file Read supported text files from your own Drive; current limits apply.
“Read review-notes.txt from my Drive and summarize it.”
analyze_image Analyze a supported image in your own Drive using vision AI.
“Describe the screenshot review.png in my Drive.”
Web and domain checks
Tool and effect
Example request
web_search Search the web and return titles, links and snippets.
“Search for the official documentation for DMARC.”
fetch_url Retrieve the readable text of a public HTTP/HTTPS page.
“Read the official page from the search results.”
dns_lookup Look up DNS record types such as A, AAAA, MX, TXT, CNAME, NS, PTR, SOA and CAA.
“Look up the MX records for my domain.”
check_mail_domain Check domain mail configuration, including MX, SPF, DMARC, DKIM, MTA-STS and blocklist findings.
“Check the email configuration of my domain.”
Help and tool availability
Tool and effect
Example request
read_help Read a topic from the built-in product help.
“How do I import emails from my previous provider?”
contact_support Prepare a support email containing your message and the AI conversation transcript; you review and send it.
“Prepare a support request about this problem.”
enable_tools Activate an additional tool group for the current AI conversation. The assistant handles this when needed; it grants no new account permissions.
“Use the task tools to help organize my review.”
Boundaries to keep in mind
Mailbox search and reads return bounded results or excerpts. Ask for a narrower search or another message when details are missing; a short result is not proof that no other mail exists.
Drive text reading currently handles supported text files from your own Drive, with a 1 MB file-size limit and up to 8,000 characters returned. It is not a general reader for every PDF, office document or shared file.
Image analysis and attachment analysis are distinct from plain text file reading. Check the actual supported input.
Web search, page retrieval and DNS checks make external requests. Do not include confidential email content or secrets in a public search query.
Rules apply to new incoming mail; preparing a rule is not a bulk operation on existing messages.
contact_support prepares an email with the conversation transcript. Review and remove sensitive content before sending it.
enable_tools activates a tool group within the conversation; it does not grant extra account permissions.
Treat an AI employee as an assigned business identity with a defined scope, not as an unrestricted assistant.
Open AI Employees in Enterprise.
Create a scoped AI identity when setting up a new responsibility.
Select the screenshot to open the full-size image.
Set up a distinct identity
Open Enterprise → AI Employees to manage AI identities. Give each a clear name and purpose, supply the instructions and knowledge needed for that role, and review its permissions before use. A support assistant and a private assistant should not share an identity simply because they use the same model.
Visibility and knowledge
Each AI employee belongs to one visibility group in the initial group model. Company discovery and allowed interactions are constrained by that scope. Grant resource access explicitly; a role description written in natural language is not a substitute for permission checks.
Provide only the documents and mailbox access required for the role. Instructions or requests inside received email are untrusted input. An AI employee should not interpret a message asking for secrets as authorization to reveal them.
Review operation
Start with a narrow, non-destructive task. Inspect the output and available run information before expanding the scope. Verify recipients and external communications, especially for financial, legal or customer commitments. Correct the instructions or permissions when a recurring mistake appears.
Changing responsibility
Do not move an already-used AI employee between private and company groups in the initial release. Create a new scoped identity for the new responsibility. Review old shares and retained context independently; changing a display name does not remove previous access or history.
AI and integrations · Chapter 28
Connect an external assistant with MCP
Start in the Web app: click your username at the top right, then choose MCP access. This chapter shows how to reach that window and connect a compatible external assistant.
Where to click: from the homepage to MCP access
Open the Aionda Mail homepage and sign in to your account. If you are already signed in, choose Back to mailbox.
In the Web app, click your username at the top right to open the account menu, as shown in the first screenshot.
Choose MCP access, directly below Personal Access Tokens. It is in your account menu, not in the Artificial Intelligence sidebar section.
The MCP access window opens. Choose Connect to begin the connection setup.
Click your username at the top right of the Web app.
Choose MCP access in the account menu.
Select the screenshot to open the full-size image.
If already signed in, choose Back to mailbox to open the Web app.
Select the screenshot to open the full-size image.
Your account menu is at the top right.
Review existing keys or choose Connect. This test account has no key; no credentials are displayed.
Select the screenshot to open the full-size image.
What the connection does
The Aionda Mail MCP client runs as a local bridge for an assistant host that supports stdio MCP servers. It authenticates to Aionda, decrypts supported content locally and returns tool results to that assistant. The external assistant and its provider can therefore receive readable content. Local decryption does not mean that returned content stays away from the assistant provider.
In Aionda Mail, open your account menu → MCP access → Connect, as shown above. Obtain your API key and vault key.
Install a supported Node.js LTS release from nodejs.org. The examples launch the Aionda client using npx, which comes with npm. In Terminal, check node --version and npx --version.
Keep both keys private. Enter them only in the assistant’s local MCP configuration, never in a conversation. Replace the example values below with your own credentials.
The API key authorizes access; the vault key lets the local bridge decrypt supported content. Use STDIO for these examples: the desktop assistant starts the bridge on your computer. Merely entering the Aionda website or server URL in a remote-connector form does not configure this local decryption workflow.
Example 1: OpenAI ChatGPT Desktop
Open the ChatGPT desktop application, then Settings. Search settings for MCP and select MCPs — Plugins. In the version shown, the path is Plugins → MCPs → Add → Add MCP server. Other versions may show a separate MCP servers settings page.
Set Name to aionda-mail, choose STDIO, and enter npx in Command to launch.
Add two separate Arguments: -y and @aiondadotcom/mail-mcp-client.
Under Environment variables, add the three name/value pairs shown below. Leave environment-variable passthrough and the working directory empty unless your local installation requires them.
Choose Save. If the server does not appear immediately, use the restart/reconnect control offered by your version or restart the desktop app after saving your work.
Open a new conversation and check that aionda-mail is available in the MCP/tool controls. Start with the read-only example below.
Open the MCPs tab and add an MCP server.
Choose STDIO and launch npx with two separate arguments.
Add your API key, vault key and endpoint; only placeholders are shown here. The example was not saved.
Select the screenshot to open the full-size image.
Environment variable
Value
AIONDA_API_KEY
Your Aionda MCP API key
AIONDA_VAULT_KEY
Your Aionda vault key
AIONDA_ENDPOINT
https://mail.aionda.com
The screenshot shows an unsaved example, not a live connection. It uses placeholders and exposes no credentials or conversations. The local-server setup is documented in OpenAI’s MCP guide; menu names and availability can vary by desktop version and organization policy.
Example 2: Anthropic Claude Desktop
Open Claude Desktop and sign in. On macOS, open Claude → Settings in the system menu bar.
Find the local MCP settings. Depending on the version, use Developer → Edit Config or Desktop app → Extensions → Local MCP servers. This is the local desktop configuration, not the remote connector URL form.
Open claude_desktop_config.json. On macOS it is in ~/Library/Application Support/Claude/; on Windows it is in %APPDATA%\Claude\.
Add the following aionda-mail entry under mcpServers. Preserve any existing servers. If the file already has a mcpServers object, merge the new entry into it rather than replacing the entire file.
Replace both placeholder keys, save valid JSON, then fully quit and reopen Claude Desktop after saving your work.
In a new conversation, open the + menu and inspect Connectors or the available tools. Enable aionda-mail if required, and try the read-only request below.
Real example: ask ChatGPT to create a welcome draft
This example shows a real MCP action and the resulting draft opened in the native Aionda Mail app. The assistant researched weather for Stuttgart, Germany, wrote a neutral English welcome message and saved an encrypted draft. It did not send the email.
In a new ChatGPT conversation, make your Aionda Mail MCP connection available and enter the prompt below. In this demonstration the connection is named aionda-mail-prod; replace that name with the name you chose during setup, such as aionda-mail.
Create an English welcome email for a public Aionda Mail handbook demo. Research the current weather in Stuttgart, Germany, and cite the source and date in the email. Use a neutral greeting, no personal details, and subject: Welcome to Aionda Mail - Stuttgart weather. Save it as an encrypted draft using aionda-mail-prod. Leave recipients empty. Never send it. Do not read existing emails. If weather or draft creation fails, report that instead of guessing.
The assistant needs a separate weather or web-research capability for the weather lookup; MCP access to Aionda Mail alone is not a weather service. Review the requested operations: creating a draft is a write, while sending is a separate action. Never approve a send operation for this example.
Ask for a welcome draft, with no recipients and no sending.
The activity shows use of the Aionda Mail integration.
ChatGPT reports the saved draft; verify it in Aionda Mail next.
Select the screenshot to open the full-size image.
Wait for ChatGPT to finish the MCP action and report that the draft was saved.
Open Aionda Mail → Drafts and select Welcome to Aionda Mail - Stuttgart weather. Refresh the folder if necessary.
Open the draft for editing and check the subject, body and empty recipient fields. In the macOS app, double-click the draft to open its composer.
Review the weather source and timestamp. The weather shown in this screenshot is a dated demonstration from 17 November 2026, not a live forecast for the day you read this guide.
The recipient field is empty; the example subject identifies the new draft.
The message includes a dated Stuttgart weather report and its source. Sender name and address are blurred for privacy; the draft was not sent.
Select the screenshot to open the full-size image.
The native app opened and displayed the saved draft, providing a check beyond the assistant’s success message. The screenshot shows the example message only; the sender identity has been blurred for privacy. The existing desktop installations use German controls: Entwürfe means Drafts, An means To, and Betreff means Subject. The prompt and message are English. No message was sent.
First test: read without changing anything
Use Aionda Mail to list my mailbox folders. Do not send, move, delete or modify anything.
Review any tool permission request and allow only the operation you intend. A successful connection returns your actual folders through an Aionda tool call; an assistant merely describing a hypothetical folder list is not proof of a connection. The welcome-draft example above demonstrates a completed draft operation; a capability summary by itself does not prove that mailbox operations work.
If no tools appear, check that Node.js and npx are available to the desktop application, that both keys belong to the intended account, and that the endpoint is correct. If your desktop app cannot find npx, use the full path reported by command -v npx on macOS or where npx on Windows, following your host’s process-launch requirements. Read the host’s MCP logs without sharing secret values. A remote-only connector cannot launch this local STDIO client.
Tools and data changes
Inspect the tool list returned by your installed version. The integration supports mailbox work and related workspace operations; availability depends on permissions and version. Supported reads decrypt locally. Encrypted drafts and supported workspace writes are prepared client-side. Sending ordinary SMTP mail necessarily delivers readable message content to the sending path and ultimately the recipient.
Revoke and troubleshoot
Revoke an unused or exposed API key in MCP access and remove the stored credentials from the host. Revocation stops new authorized use; it does not erase content already returned or saved elsewhere. If access fails, check the endpoint, credential pair, host logs and runtime. Never include secret values when asking for support.
Reference · Chapter 29
Troubleshooting
An email did not arrive after you entered an address on a website? Follow the whole path: website form → Addresses → select the address → Logging → select the message → Events.
Paste the complete disposable address into the website’s email field. This real Mozilla newsletter form is shown as an unsubmitted example; no subscription was made.
Select the screenshot to open the full-size image.
1. Start with the address you gave the website
You have copied an Aionda disposable email address (DEA) and pasted it into an online form: for example, a shop registration, newsletter subscription or password-reset request. Paste with Ctrl+V on Windows or Command+V on Mac. Check the complete address, including the domain after @, and remove accidental spaces.
In normal use, finish the website’s required fields and submit the form. Pasting an address alone does not request an email. Check whether the website confirms submission or shows an error. If it promises an email and that email does not appear, use the steps below.
About this example: the screenshot shows the Mozilla newsletter form without submitting it. The address is a Dev test address, not an address for readers to reuse. The later log screenshots show a separate test email delivered to that same address; they do not show a Mozilla delivery or a failure by Mozilla.
2. Check where the message should arrive
A disposable address can deliver to your Aionda Secure Mailbox, forward to an external email address, or use the configured combination. Check the intended mailbox, including Spam. If you use filters, clear them while searching. Allow for the sending website’s stated delay before requesting another copy.
3. Return to Aionda and click Addresses
Sign in to Aionda Mail. If you are on the homepage, choose Back to mailbox. In the Web app, click Addresses in the left navigation. If the navigation shows icons only, expand it with the small arrow at its edge; Addresses uses the tag-shaped icon.
Click Addresses in the left navigation. The address table opens on the right.
Select the screenshot to open the full-size image.
4. Select the exact address, then click Logging
Find the address you pasted into the form. The table splits it into Disposable (the name before @) and Domain (the part after @). In this example those are judge.watsica and dev.trashmail.com. You can use Search if your list is long.
Click the row’s date or another non-editing area to select it. The selected row is highlighted.
Check the Destination. This example delivers to Secure Mailbox. Also check that the address is enabled and has not expired or exhausted its forwarding allowance.
Click Logging in the toolbar above the table. Select the address first if Logging is inactive.
The checkmark in Enabled controls whether the address works; it is not a row-selection checkbox. Do not toggle it just to select the address.
Select the matching address row; check both Disposable and Domain.
Check the destination.
Click Logging above the table.
Select the screenshot to open the full-size image.
5. Find the expected email and open Events
The Logging window shows retained messages for the selected address. Match the Last Received time, From sender and Subject with what you are expecting. The sender may be the website’s mail service rather than the website’s own name.
Select the relevant message row.
Read its Status and Destination.
Click Events at the top left of the Logging window.
Select the matching email by time, sender and subject.
Read Status and Destination.
Click Events.
Select the screenshot to open the full-size image.
6. Read the individual delivery events
The Events window shows what happened to this particular message. Read the timestamps and event text. Click an event to see its details in the lower panel. In the example, Aionda recorded an incoming message, confirmed the disposable address was enabled, and stored the email in the encrypted mailbox.
Read the individual events and select one.
Read its details in the lower panel. This example confirms storage in the encrypted mailbox.
Select the screenshot to open the full-size image.
What you find
What to do next
Email stored in encrypted mailbox / In Mailbox
Open the Aionda mailbox. Check Inbox, Spam and any folders targeted by your rules. The delivery log records storage, not the message’s current folder.
Forwarded or a successful delivery response from the destination server
Check the external destination shown in the log, including that provider’s Spam folder and rules. Acceptance by its server does not guarantee placement in its Inbox.
Queued, deferred or a temporary refusal
Read the server response. Delivery may be retried; avoid repeatedly requesting or resending the same message while it is pending.
Rejected, bounced or another error
Read the specific event and destination response. Check address validity, limits and the destination before deciding how to correct the problem.
Waiting for confirmation
Check the configured sender-confirmation step. Delivery may be waiting for that step to finish.
7. If there is no matching log entry
First check that you selected the exact address used in the website form. Clear the log Search field and choose Refresh. Check the time and whether the address was active when the website tried to send.
A missing entry does not by itself prove that the website never sent the email: logging settings, retention expiry or rejection before a retained record exists can also leave no matching entry. See Logging: delivery history and retained email for the logging setting and retention limits. Enabling logging now cannot recreate old records.
If there is still no evidence of delivery, check the website’s confirmation page and contact its support with the destination address and approximate request time. If an event shows a destination-provider error, inspect the event details; the support-text copy button can help prepare a report. Review copied text for private information before sharing it. The copy button itself does not send a support request.
Recover an email that is missing from your Inbox
If an email has disappeared from your Inbox, you can still read or recover it from Logging while its original content is retained. Logging must have been enabled when the message was processed; switching it on later cannot recreate a missing original. First check Spam, Trash and folders used by your rules.
Read it online without sending another copy
Open Addresses, select the receiving address and choose Logging.
Select one message and click Email content.
The retained message opens in a separate browser window or tab. You can read it there without resending it. If your browser blocks the window, allow this popup for Aionda and try again.
Confirm the subject.
Read the retained message directly in the browser; no resend is needed.
Select the screenshot to open the full-size image.
Send one or several emails again
In Logging, click the message you want to recover.
For several messages, hold Ctrl on Windows/Linux or Command (⌘) on Mac while clicking additional rows. Check the highlighted rows and the selected count at the bottom right.
Click Send again. The dialog shows how many emails will be sent.
Choose the destination: a registered forwarding address, or Secure Mailbox if offered after unlocking your mailbox.
Check the count and destination, then choose Send once. For Secure Mailbox, this stores the retained messages there; for an external address, it sends another copy. Check the result in the chosen mailbox.
Check the selected count after Ctrl-click or Command-click.
Choose Send again for the selected messages.
Expires shows the remaining retention.
Extend adds retention time.
Select the screenshot to open the full-size image.
Confirm how many emails are selected.
Choose the destination.
Send applies the action; this example was cancelled.
Select the screenshot to open the full-size image.
These screenshots show two selected test messages and the confirmation dialog; no messages were resent for the screenshots. Resending can create duplicates. If a rule caused the original to move, inspect that rule as well.
How long is the original available?
The standard logging retention is 7 days, when logging is enabled. It is not 14 days by default. Check Expires for the actual remaining time of each entry. Before the deadline, select the entry or entries and choose Extend to add 7, 14 or 30 days.
Once the retained original has been removed, Logging can no longer display or resend it. Extending the log is separate from extending the disposable address’s lifetime, and does not make Logging a permanent archive. See Logging for settings and retention details.
More troubleshooting topics
A message disappeared after opening
Check Spam and the move notification. An Inbox message can be classified after decryption and moved automatically. Use Not spam only after inspecting the sender and message; it creates a sender exception.
Background AI seems inactive
Check that the app is active, the mailbox is unlocked and the affected message is in Inbox. A suspended mobile app does not offer unlimited background execution. Also check AI settings and connectivity.
A colleague is missing from Contacts
Check company membership and shared visibility groups. The owner’s administrative view can differ from an employee’s. A missing eligible standard address is different from a missing directory record. Personal contacts and directory records are separate.
An address changed unexpectedly
Check whether the previously selected DEA expired, was disabled or deleted. The standard-address fallback can select another eligible address. Choose a stable non-expiring address explicitly when publishing business details.
Another device shows old data
Reconnect and refresh. Confirm that both clients show the same account and folder. Do not repeatedly send or delete while a request’s outcome is unclear.
A button or dialog is unusable
Record the client version, window size, theme and exact steps. Include a screenshot without credentials or private correspondence. If a browser permission is involved, include whether it was allowed or denied.
English edition, 17 November 2026. Screenshots show the Web client on Dev with test records. Group administration is available in Web and macOS. Feature availability can differ between clients. Other languages follow after approval of the English content.