

Google Chrome
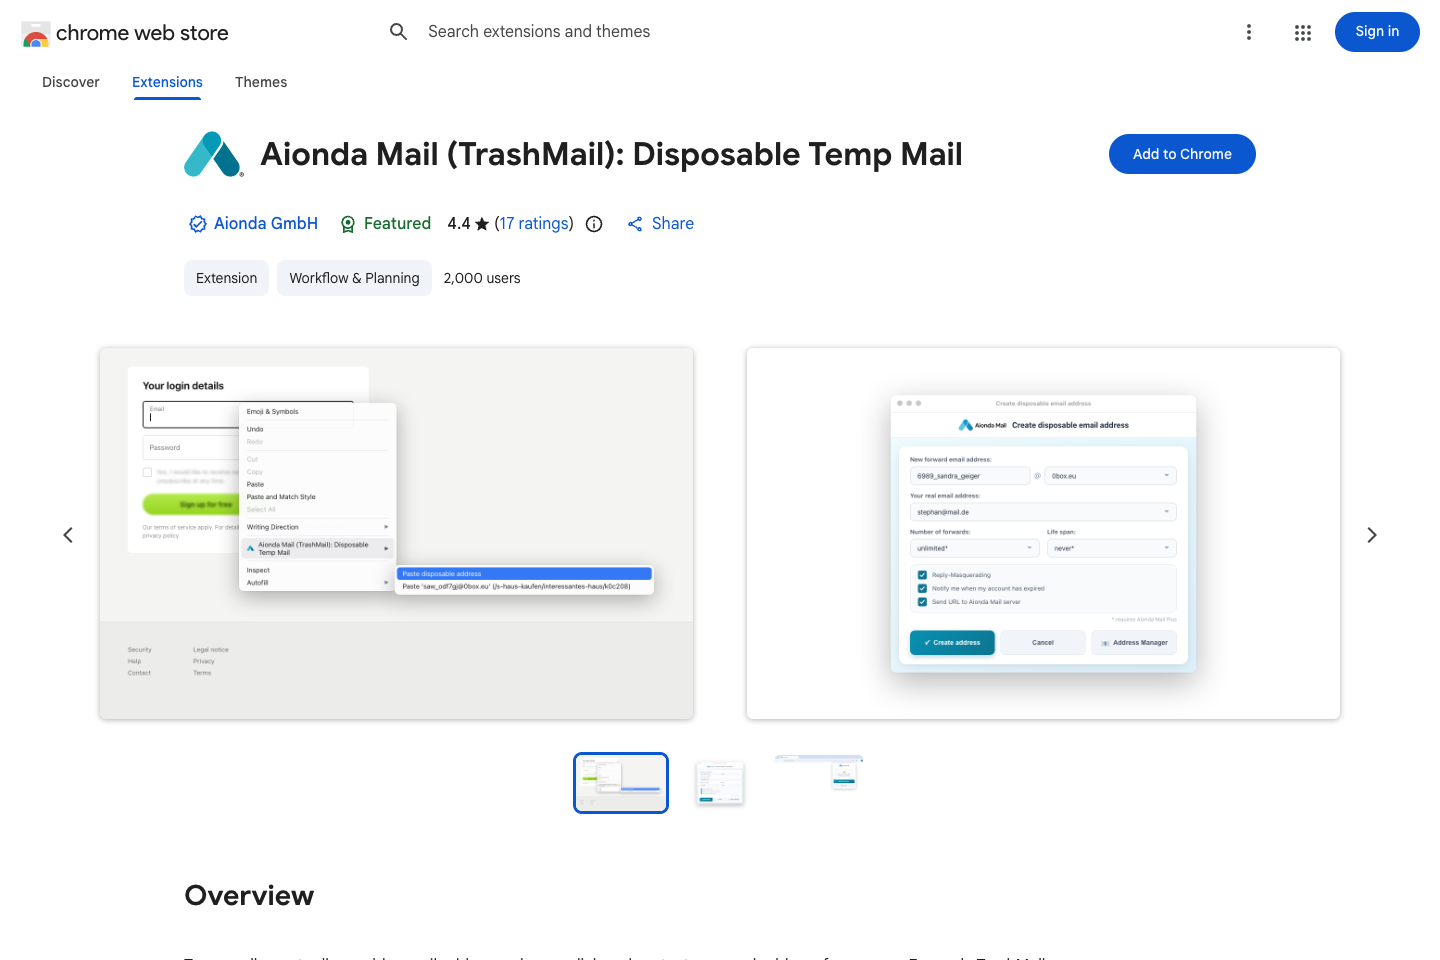
- Check the official product name and Aionda GmbH publisher.
- Use Add to Chrome to start installation.
Select the screenshot to open the full-size image.
What the add-on does
The Aionda Mail browser extension helps you create a disposable email address (DEA) while filling in a website’s form. Give that website its own address instead of your main address. Manage the address later in Aionda. The extension is a companion to the Web app, not a replacement for the full mailbox.
Install in Google Chrome
- Open the official Chrome Web Store listing: “Aionda Mail (TrashMail): Disposable Temp Mail”, published by Aionda GmbH.
- Choose Add to Chrome and review Chrome’s permissions dialog. Confirm installation if you want to grant those permissions.
- Open Chrome’s Extensions menu (the puzzle-piece icon) and pin Aionda Mail if you want its icon always visible.
- Open the add-on. Choose Settings and Sign in if you are not yet signed in.
The store name still mentions TrashMail, the former product name. This chapter shows the English development extension in Chrome; the published version may have small visual differences.
Create your Personal Access Token, step by step
A Personal Access Token (PAT) is a separate secret that lets the extension access your account without entering your account password in the extension. You need your username and a PAT for the setup described here. Being signed in to the website does not automatically sign you in to the extension.
1. Start on the Aionda Mail homepage
Open the Aionda Mail homepage. If you are signed out, sign in to your account first. If you are already signed in, choose Back to mailbox to open the Web app.
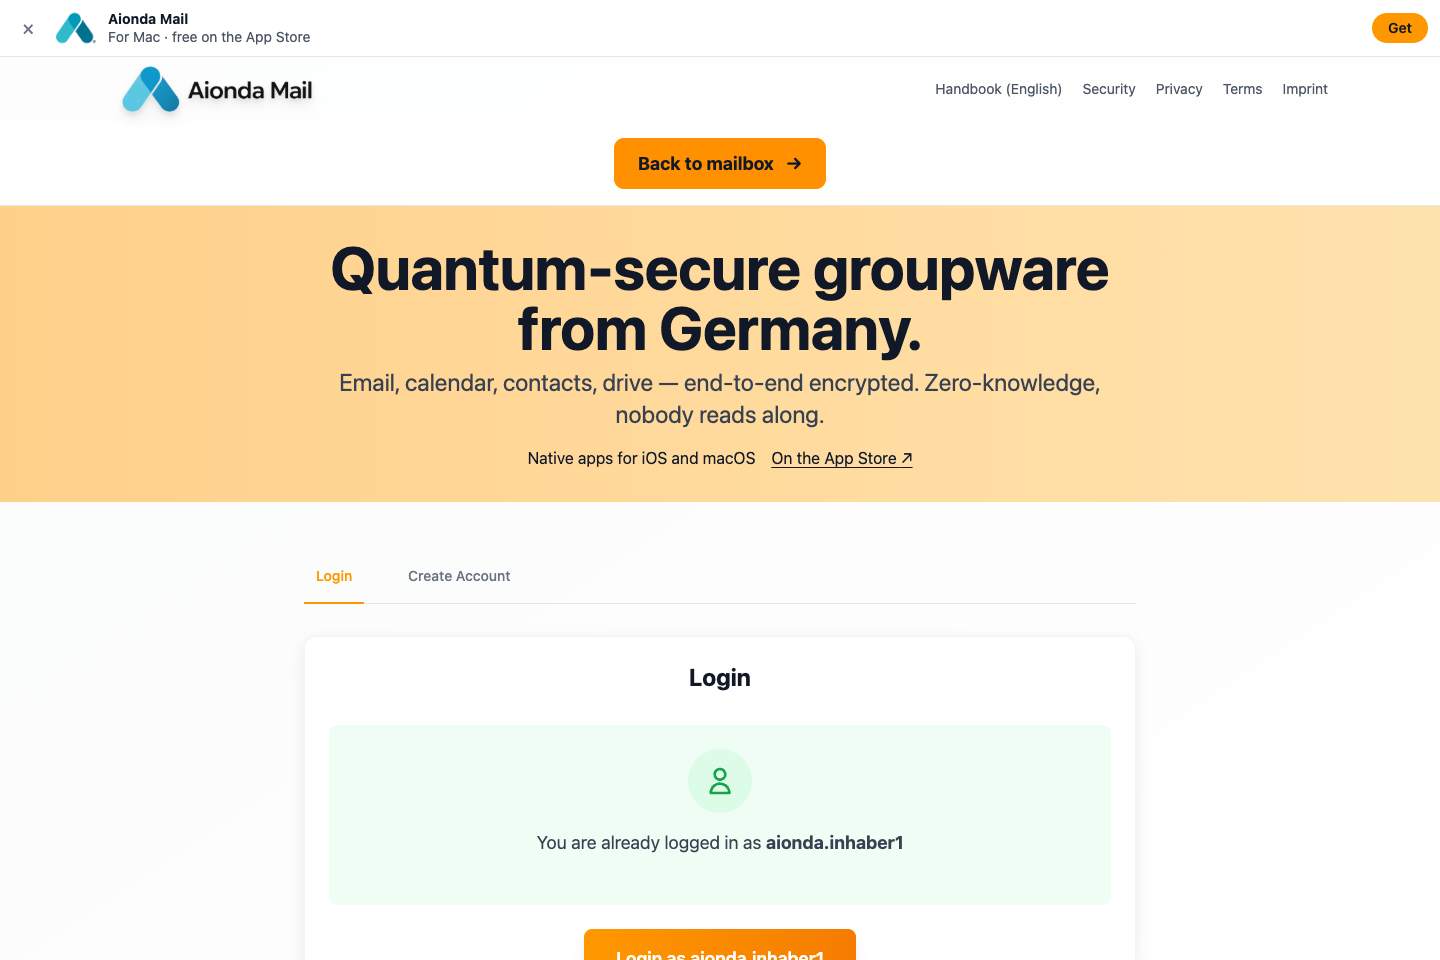
- When already signed in, choose Back to mailbox.
Select the screenshot to open the full-size image.
2. Open your account menu
In the Web app, click your username at the top right. Choose Personal Access Tokens. This is the account menu, not the Settings menu; the separate MCP access entry is for a different setup.
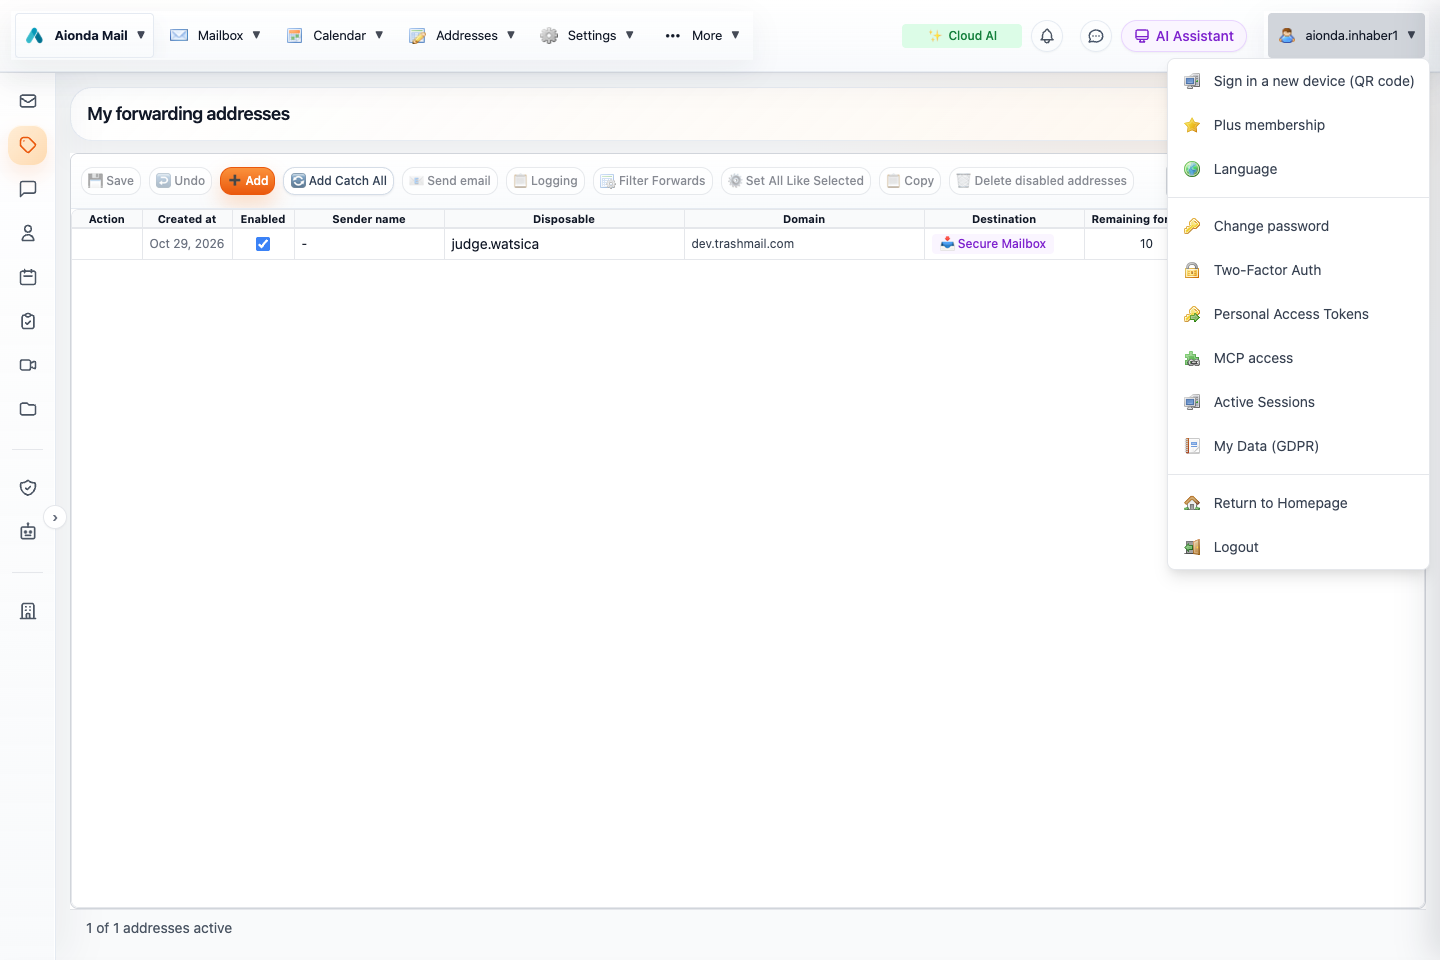
- Open your username menu.
- Choose Personal Access Tokens.
Select the screenshot to open the full-size image.
3. Add a token
The Personal Access Tokens window lists existing tokens. Click Add. You do not need the “Sign in a new device (QR code)” action for this Chrome setup.
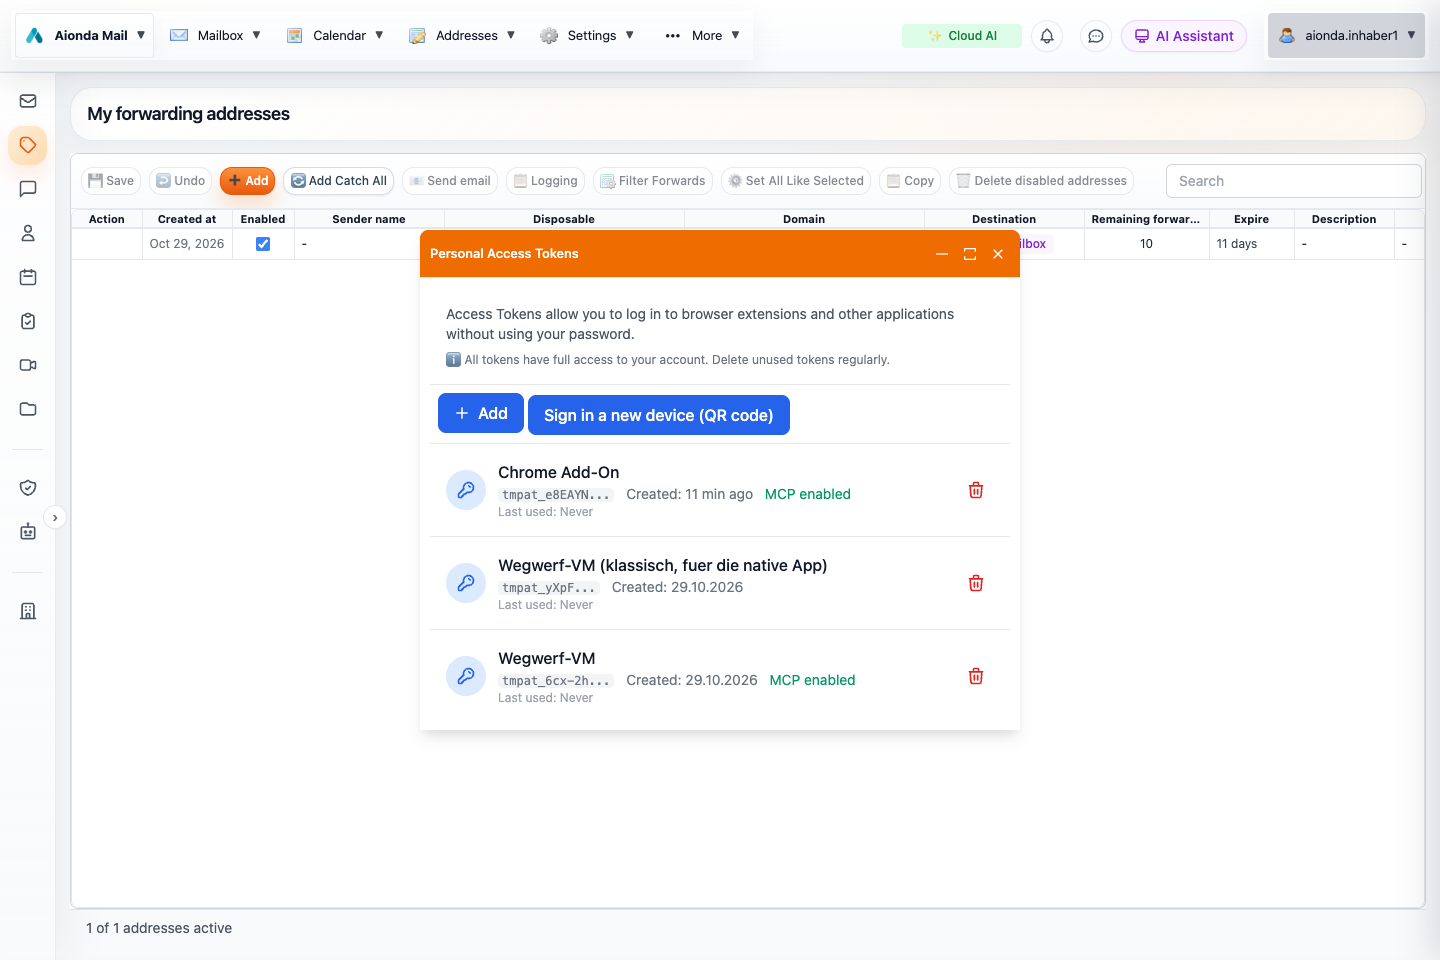
- Choose Add in the Personal Access Tokens window.
Select the screenshot to open the full-size image.
4. Give it a recognisable name and create it
Enter a name such as Chrome — my laptop. The name is only a label to help you identify the browser later. Choose Create new token.
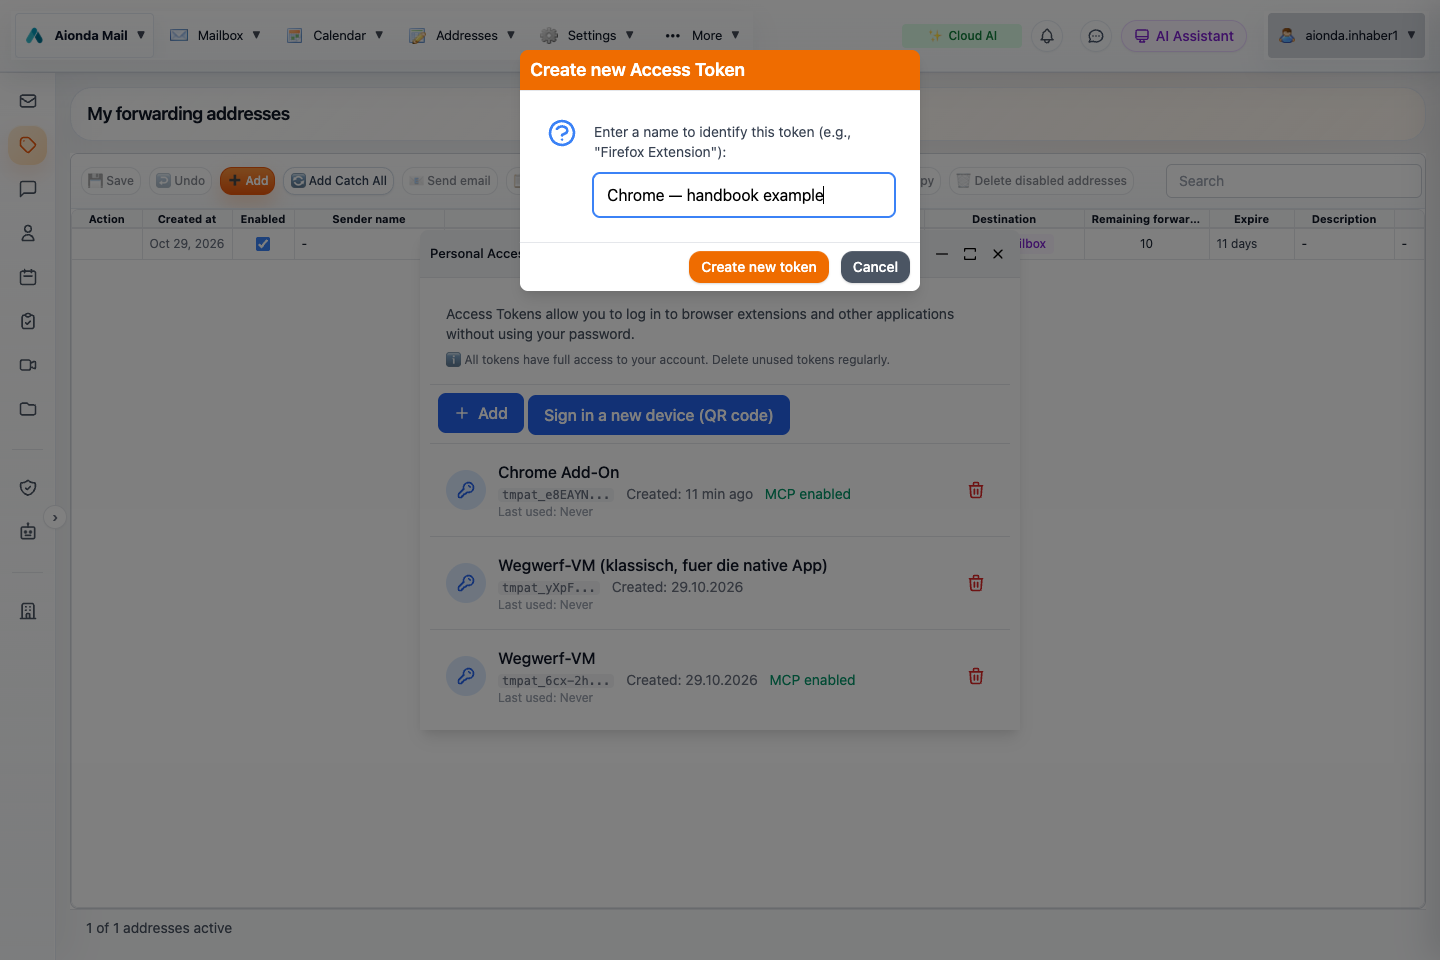
- Enter a recognisable name.
- Choose Create new token.
Select the screenshot to open the full-size image.
5. Copy the Personal Access Token before closing
The Access Token created dialog displays the secret once. Use Copy beside the Personal Access Token, beginning with tmpat_. Store it securely if you need to paste it later. The dialog also shows a separate MCP token beginning with tmmcp_; do not use that MCP token for the browser add-on.
After copying, choose Done. Your new token now appears in the list with its name and a shortened prefix, as shown below. The full secret is deliberately not shown in this handbook. If you close the dialog before copying it, create a new token: the list cannot show the full secret again.
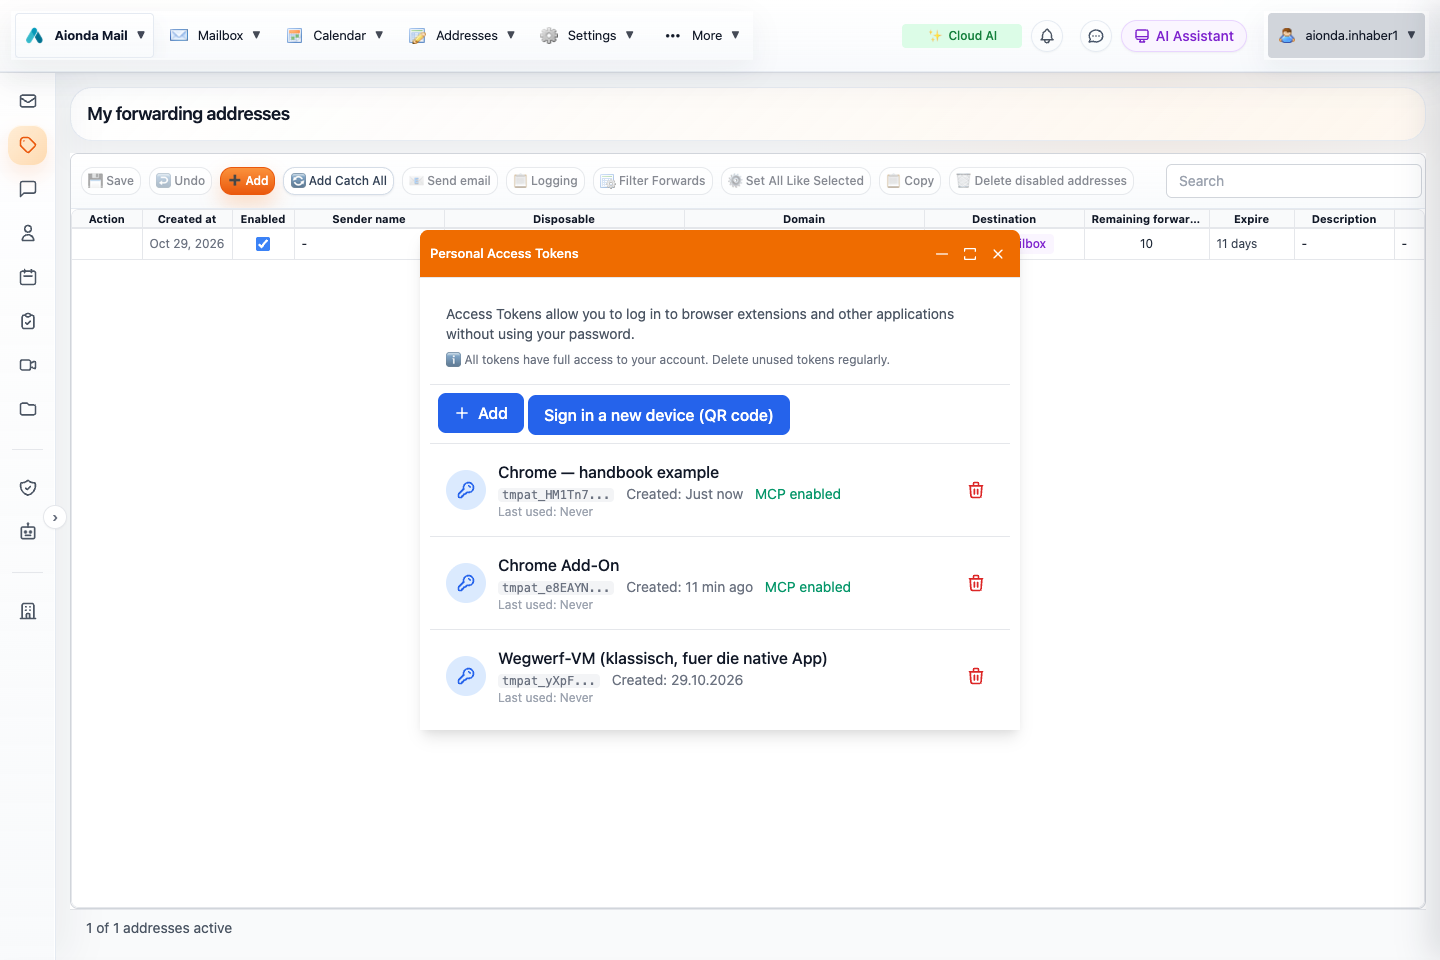
- The token appears under its chosen name after you copy the secret and choose Done. Only a shortened prefix is visible here.
Select the screenshot to open the full-size image.
6. Sign in to the Chrome add-on with the token
Open the extension, then Settings → Sign in if needed. Enter your Aionda username. Paste the copied PAT into Password / Personal Access Token, then choose Login. Complete any additional verification requested by the application.
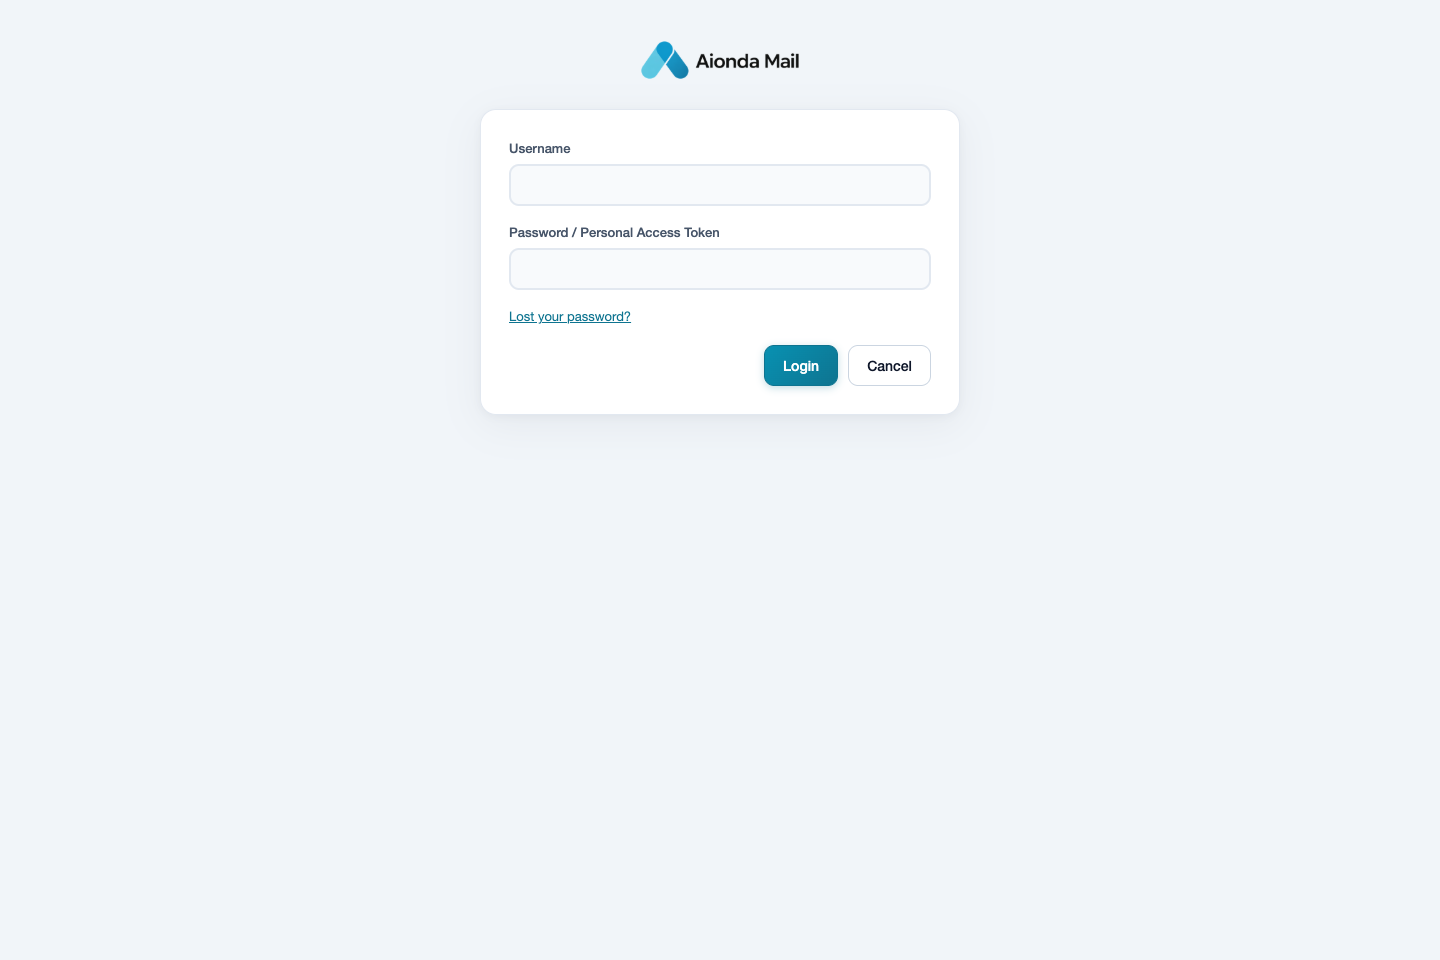
- Enter your account username.
- Paste your Personal Access Token into Password / Personal Access Token.
- Choose Login. No credentials are shown in this screenshot.
Select the screenshot to open the full-size image.
Tokens have full account access: treat them like a password. Use a separate token for each browser or device.
Choose useful defaults
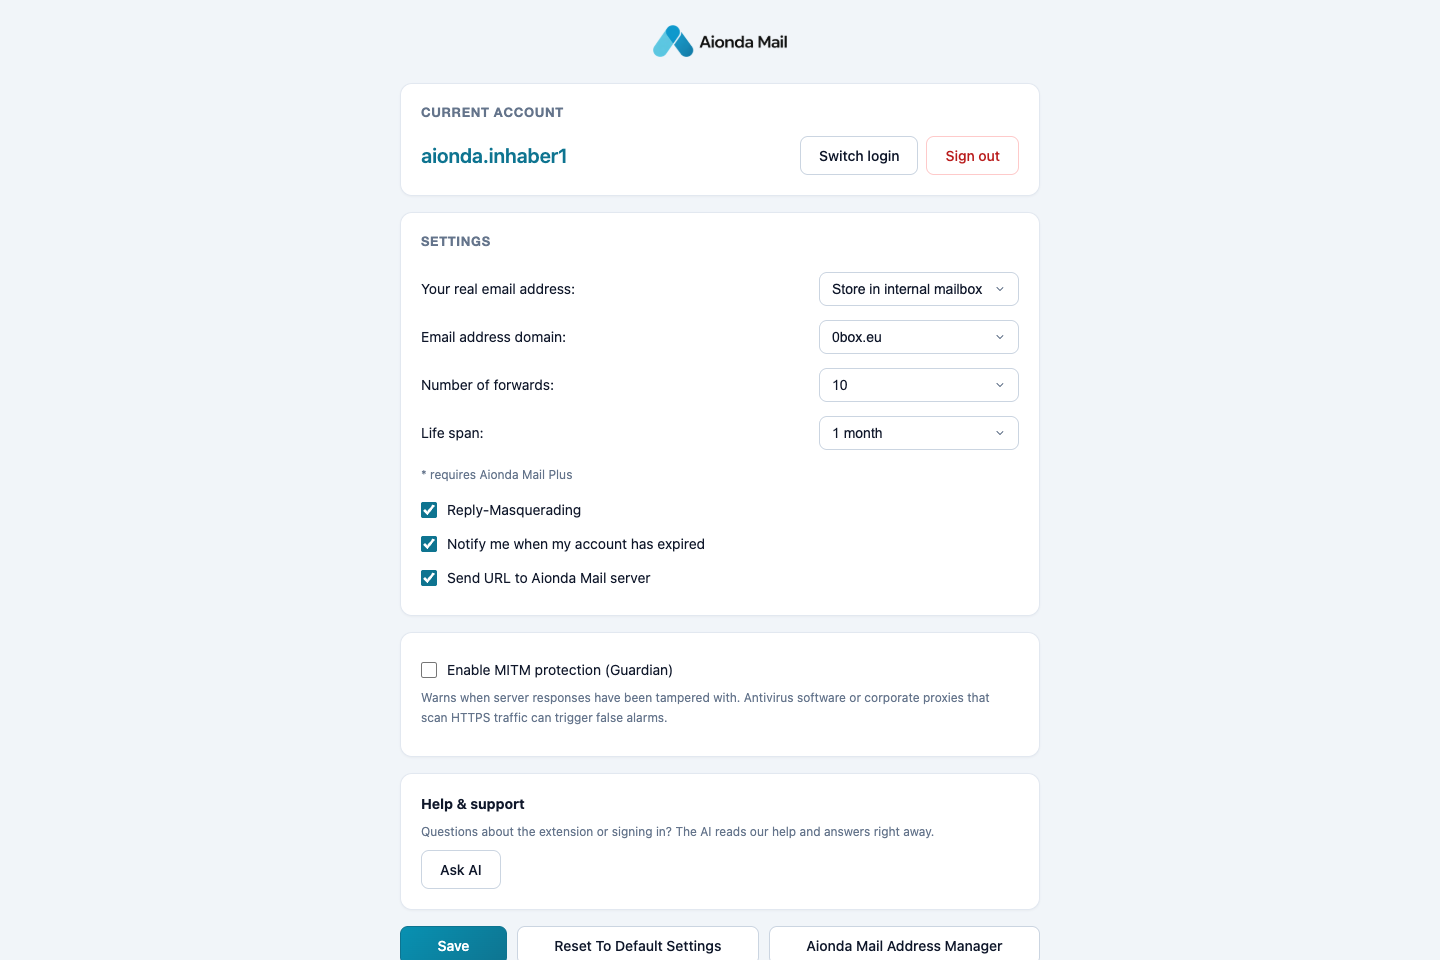
- Confirm the active account.
- Choose delivery, domain and default limits.
- Guardian has a separate setting from mailbox phishing detection. Save changes using the action at the bottom of the page.
Select the screenshot to open the full-size image.
- Your real email address: select the delivery destination. “Store in internal mailbox” means the Aionda mailbox rather than an external forwarding address.
- Email address domain: the part after @ for new addresses.
- Number of forwards and Life span: the default allowance and duration. Options marked with an asterisk require Plus. Check the actual values before creating an address.
- Reply-Masquerading: the reply-masking option for forwarded mail; see the address chapter before relying on it to hide your external address.
- Notify me when my account has expired: the expiration-notification option for the created address.
- Send URL to Aionda Mail server: whether to associate the website URL with the created address.
Choose Save after changing defaults. You can still choose different values in an individual address dialog.
Create and insert an address on a website
- Click the website’s email-address field.
- Right-click that field and choose Paste disposable address. Alternatively, open the extension icon and choose Address for this page.
- Review the proposed address name and domain, delivery destination, forwarding allowance and lifetime.
- Choose Create address. The extension creates the address and attempts to insert it into the focused field. Check the form before submitting it.
- If the site blocks insertion or the correct field is not focused, use the address shown by the extension and paste it into the field yourself.
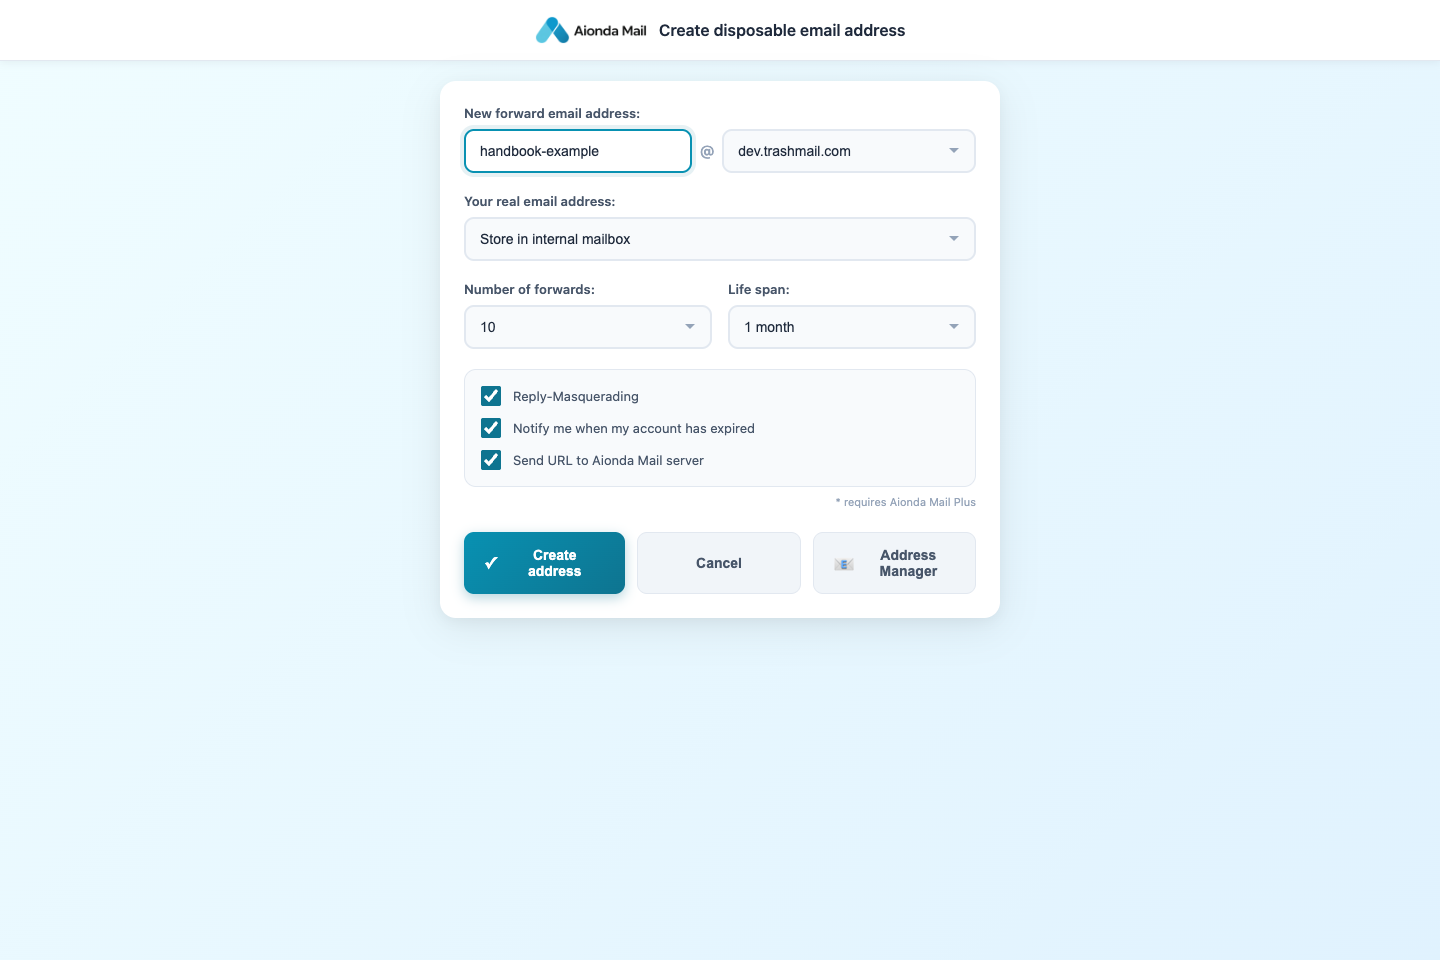
- Review the new address.
- Choose the destination and limits.
- Create address applies the action; Cancel leaves this example unsubmitted.
Select the screenshot to open the full-size image.
The screenshot is an unsubmitted Dev example. It uses a Dev domain; select an available public domain in your own account. Creating an address does not itself register you on the website: you still review and submit that website’s form.
Reuse and manage addresses
The context menu can offer previously used addresses for the current website. Reusing the same address is useful when returning to an existing account. Open Address Manager to inspect, disable, extend or remove an address. Before disabling an address used for sign-in or password resets, update the address at the other service if you still need access.
Guardian and permissions
Guardian is the add-on’s response-verification feature. Its setting is separate from AI phishing detection in the mailbox. A warning can also be caused by HTTPS inspection in antivirus software or a company proxy; read the warning rather than treating it as a spam verdict. The extension needs website access to insert addresses into forms. Chrome’s site-access restrictions may prevent it working on a page, and browser-internal or protected store pages may not permit insertion.
If something does not work
- Check Settings: the expected account should be shown. Use Switch login if needed.
- Check that Chrome permits the extension on the site and that the intended email field has focus.
- Check the address name, domain and account limits if creation is rejected.
- Use Address Manager or the Web app if a website prevents insertion.
Mozilla Firefox
Install the Firefox extension, connect it with a Personal Access Token, and create an address for a website.
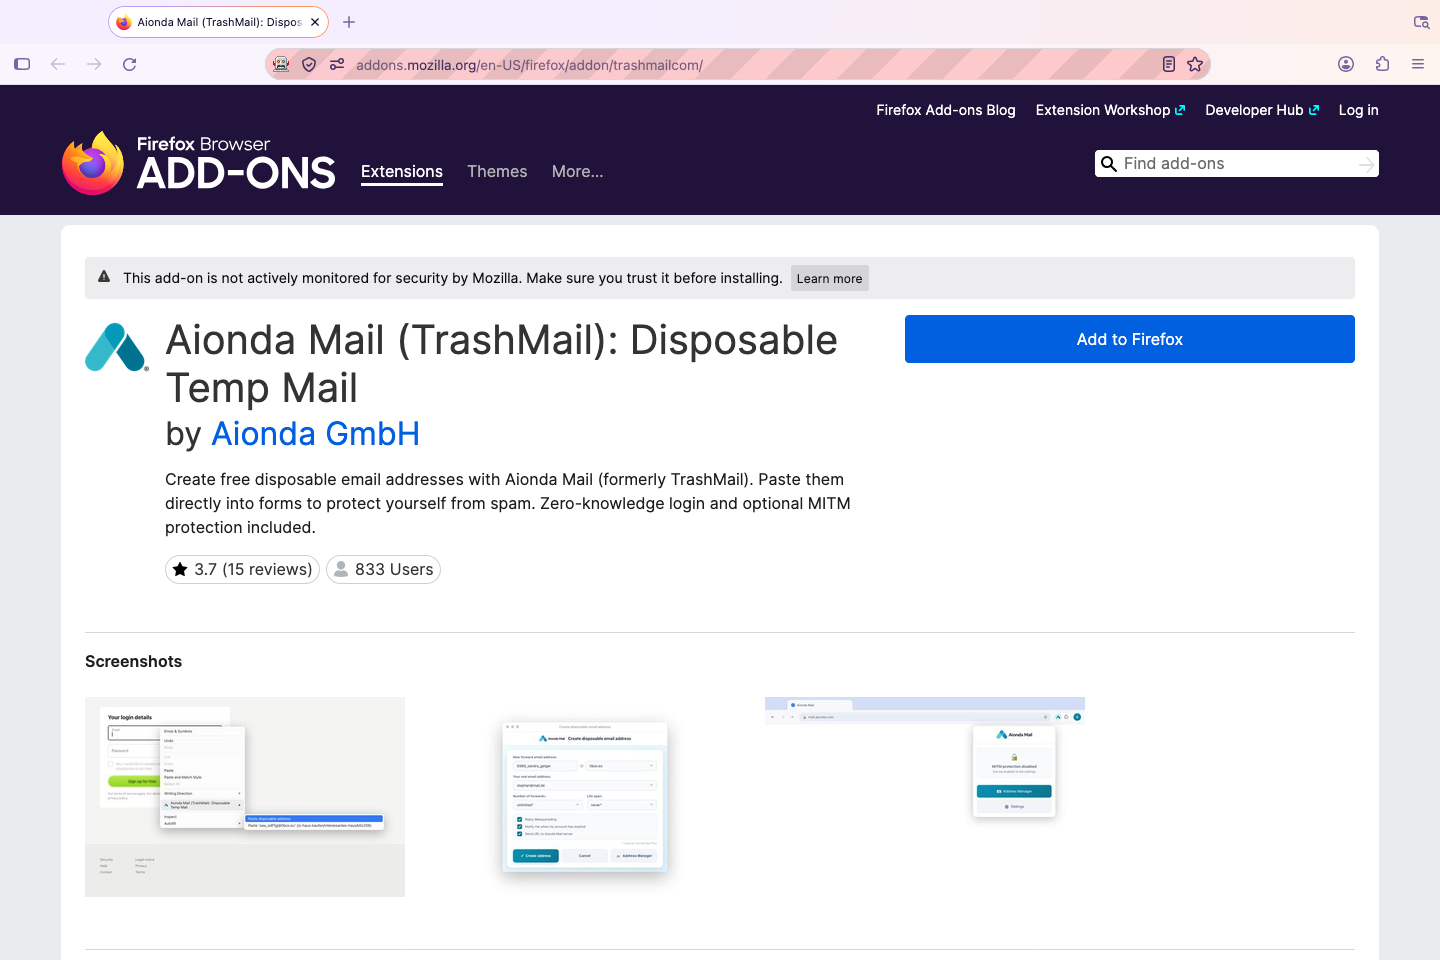
- Check the Aionda Mail extension and its publisher.
- Choose Add to Firefox on the official Mozilla listing.
Select the screenshot to open the full-size image.
1. Install the official Firefox extension
- In Firefox, open the official Mozilla Add-ons listing for Aionda Mail (TrashMail): Disposable Temp Mail.
- Choose Add to Firefox, review the requested permissions and confirm the installation.
- Open Firefox’s Extensions button (puzzle-piece icon). Open Aionda Mail. You can pin it to the toolbar through Firefox’s extension menu.
- Open the extension’s Settings, then choose Sign in.
The screenshots below show the published Firefox extension version 6.1.7 in an isolated test profile. The store name still includes TrashMail, the former product name. Firefox’s surrounding browser labels follow your browser language.
2. Create a Personal Access Token in Aionda
Being signed in to the website does not sign in the add-on. For this setup, use your Aionda username and a Personal Access Token (PAT).
- From the Aionda homepage, sign in or choose Back to mailbox.
- Open your username menu at the top right → Personal Access Tokens → Add.
- Enter a name such as Firefox — my laptop, then choose Create new token.
- Copy the Personal Access Token beginning with
tmpat_before closing the dialog. Do not use the separatetmmcp_token. - Choose Done. Keep the token private; the list does not reveal the full secret again.
See every step with screenshots, from the homepage to the new token → The token-creation screens are the same for Chrome, Firefox and Safari.
3. Connect the Firefox add-on
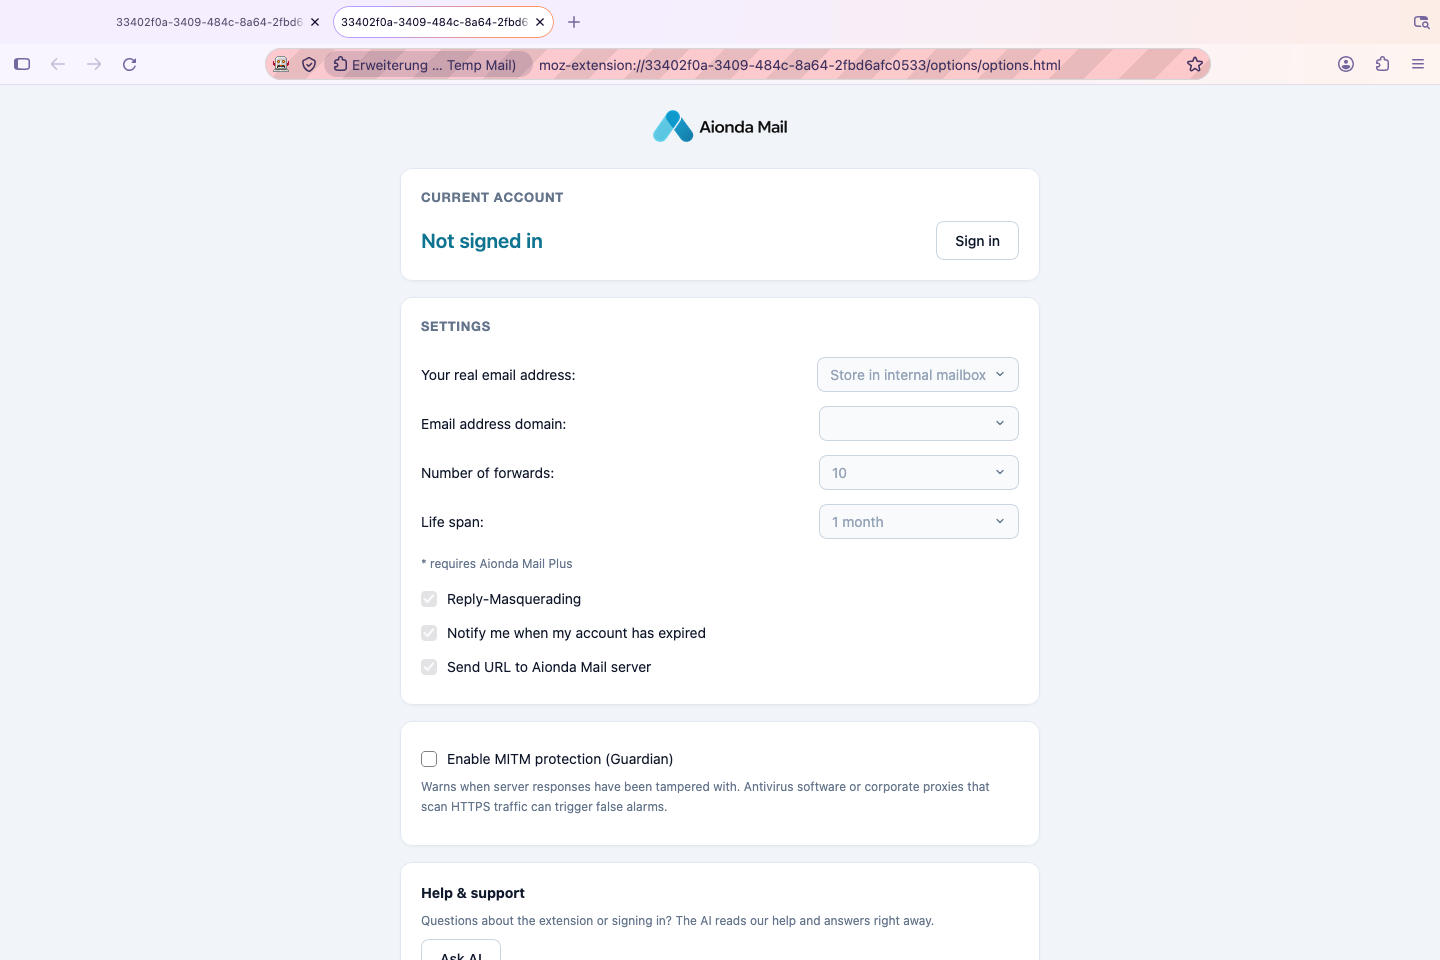
- Sign in from the account section.
- Defaults become available after connecting your account.
Select the screenshot to open the full-size image.
Choose Sign in. On the welcome screen, choose Enter your username and password; despite that welcome wording, the next screen explicitly accepts a Personal Access Token.
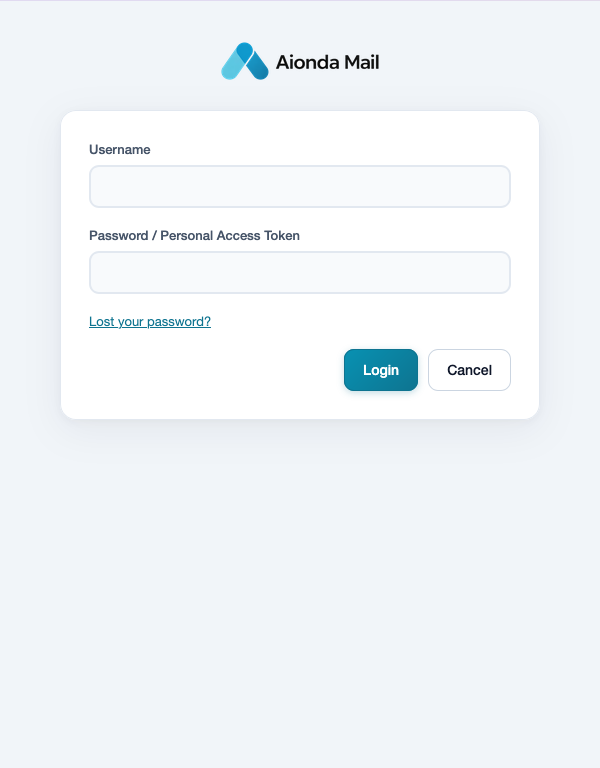
- Enter your username.
- Paste the Personal Access Token here.
- Choose Login.
Select the screenshot to open the full-size image.
- Enter your Aionda Username.
- Paste your PAT into Password / Personal Access Token.
- Choose Login and complete any additional verification requested.
- Return to Settings and check that the intended account is shown.
The screenshot leaves credentials empty. Use a separate token for this browser/device and treat it like a password.
4. Set your defaults
In Settings, choose the delivery destination under Your real email address. Store in internal mailbox delivers to Aionda’s Secure Mailbox. Choose a default domain, forwarding allowance and life span. Options marked with an asterisk require Plus. Review Reply-Masquerading, expiration notifications and whether the website URL is sent with address creation. Choose Save after changing defaults.
5. Create an address on a website
- Open the website’s form and click its email-address field.
- Right-click the field and choose Paste disposable address, or open the extension icon and choose Address for this page.
- Review the proposed address, domain, delivery destination, allowance and lifetime.
- Choose Create address. Check that the address has been inserted into the intended field.
- If insertion is blocked, copy the created address and paste it yourself. Review the website form before submitting it.
Creating the address does not submit the website’s form. Reuse an existing address for a website account when appropriate; manage its lifetime and delivery in Address Manager or the Aionda Web app.
If it does not work
- Check that the extension is enabled in Firefox’s Add-ons and Themes, and that its permissions allow it on this site.
- Private windows require separate permission. Firefox’s own internal pages and protected store pages may not allow insertion.
- Make sure the intended form field has focus and the account shown in Settings is correct.
- A Guardian response-verification warning is different from the mailbox’s AI phishing detection. Read the details; HTTPS inspection by company proxies or antivirus software can affect it.
Safari on Mac
Enable the extension included with Aionda Mail, connect your account with a Personal Access Token, and use an address in a website form.
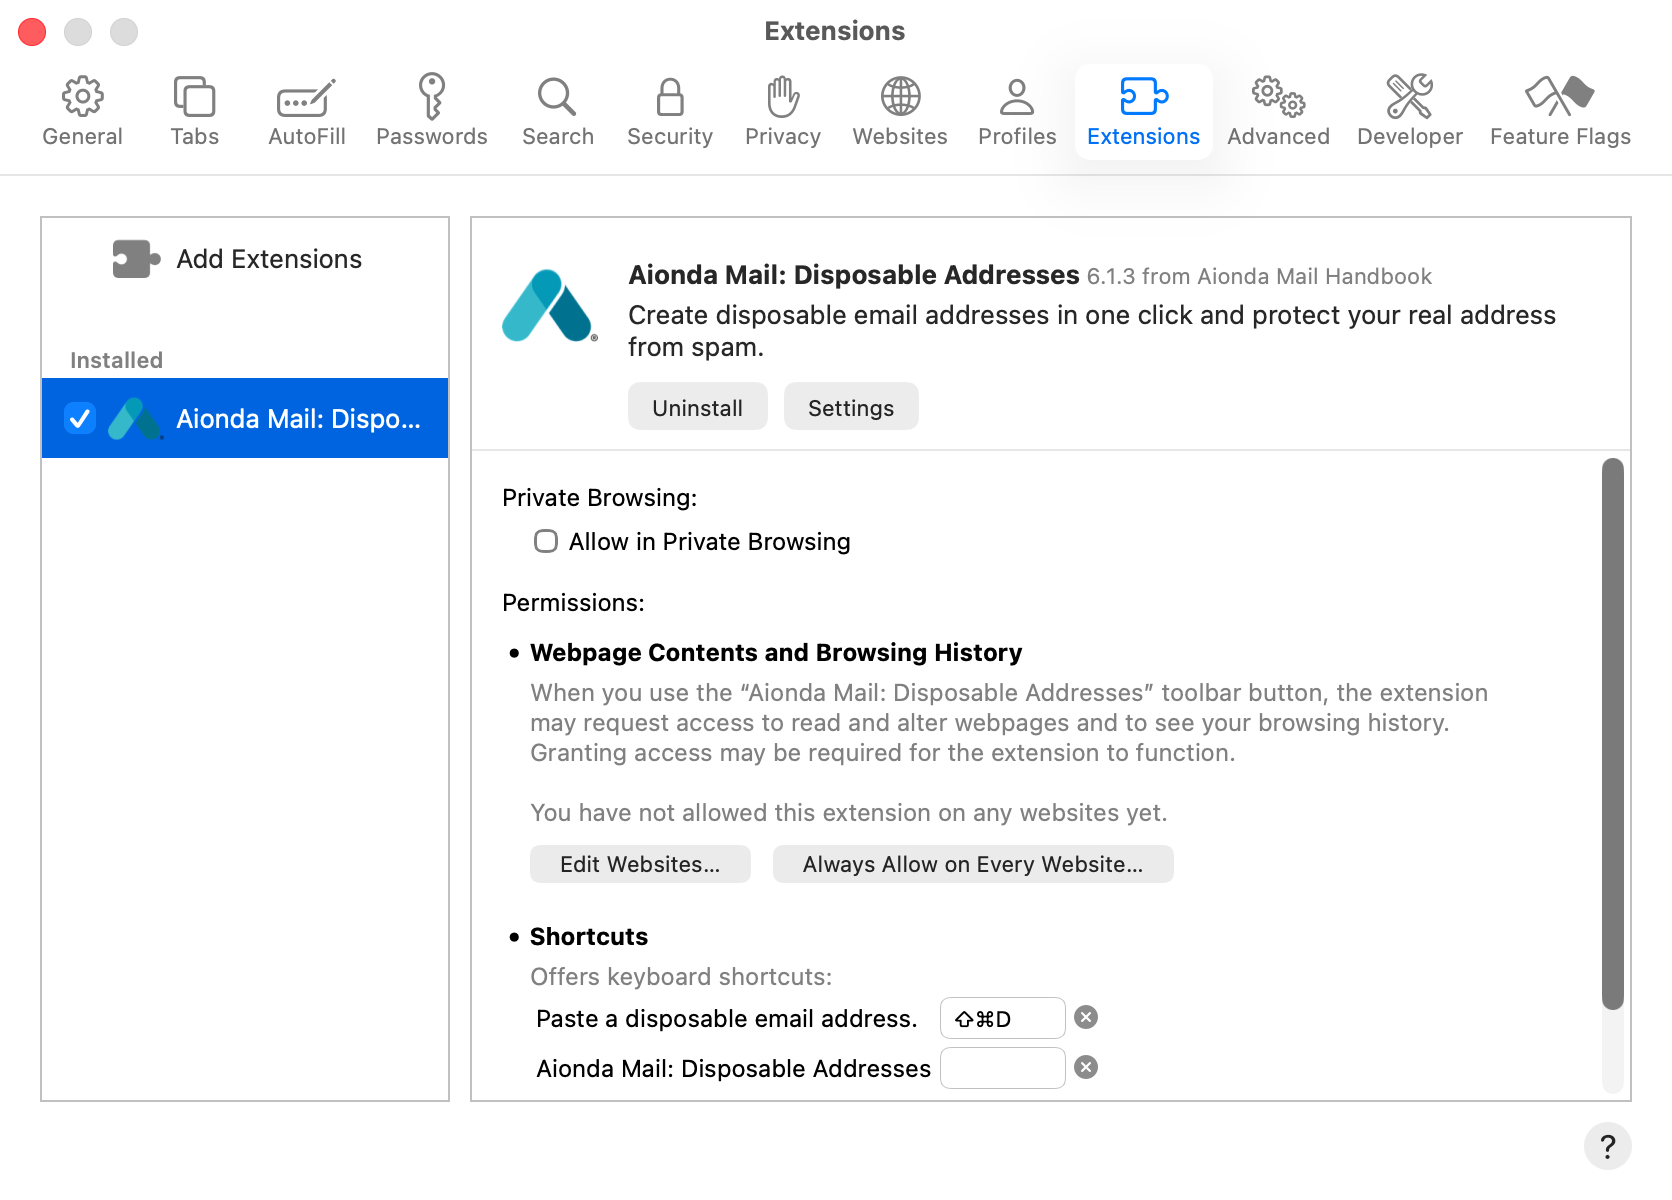
- Open Safari Settings → Extensions.
- Enable Aionda Mail and select its row.
- Open the add-on’s Settings.
- Review access to websites.
Select the screenshot to open the full-size image.
1. Install Aionda Mail for macOS
The Safari extension is included with the Aionda Mail app for Mac. Install the app from the App Store and open it. Installing the Chrome or Firefox extension does not install the Safari extension.
2. Enable it in Safari
- Open Safari.
- In the Mac’s menu bar choose Safari → Settings… (called Preferences in older macOS versions).
- Open the Extensions tab, shown in the screenshot above.
- Tick Aionda Mail: Disposable Addresses in the list on the left and select its row.
- Review the permissions and website access. Allow access to the site where you want to insert an address. Private Browsing has a separate permission.
- Click the extension’s Settings button to open its account and default-address settings in Safari.
The screenshots show Safari on a Mac with an isolated test installation of Aionda Mail; the extension identifies itself as version 6.1.3. Button positions can differ by Safari/macOS version. Apple explains the browser controls in Use Safari extensions.
3. Create a Personal Access Token
For this setup you need your Aionda username and a Personal Access Token (PAT). Signing in to the native app or website does not automatically connect the extension.
- Open the Aionda homepage. Sign in, or choose Back to mailbox if already signed in.
- Open your username menu → Personal Access Tokens → Add.
- Name the token, for example Safari — my Mac, then choose Create new token.
- Copy the Personal Access Token beginning with
tmpat_, then choose Done. Do not paste the separatetmmcp_token into the extension.
Follow the illustrated token walkthrough from the homepage → These account screens are the same for all three browsers. Keep the token private and use a separate one for each browser/device.
4. Sign in to the Safari extension
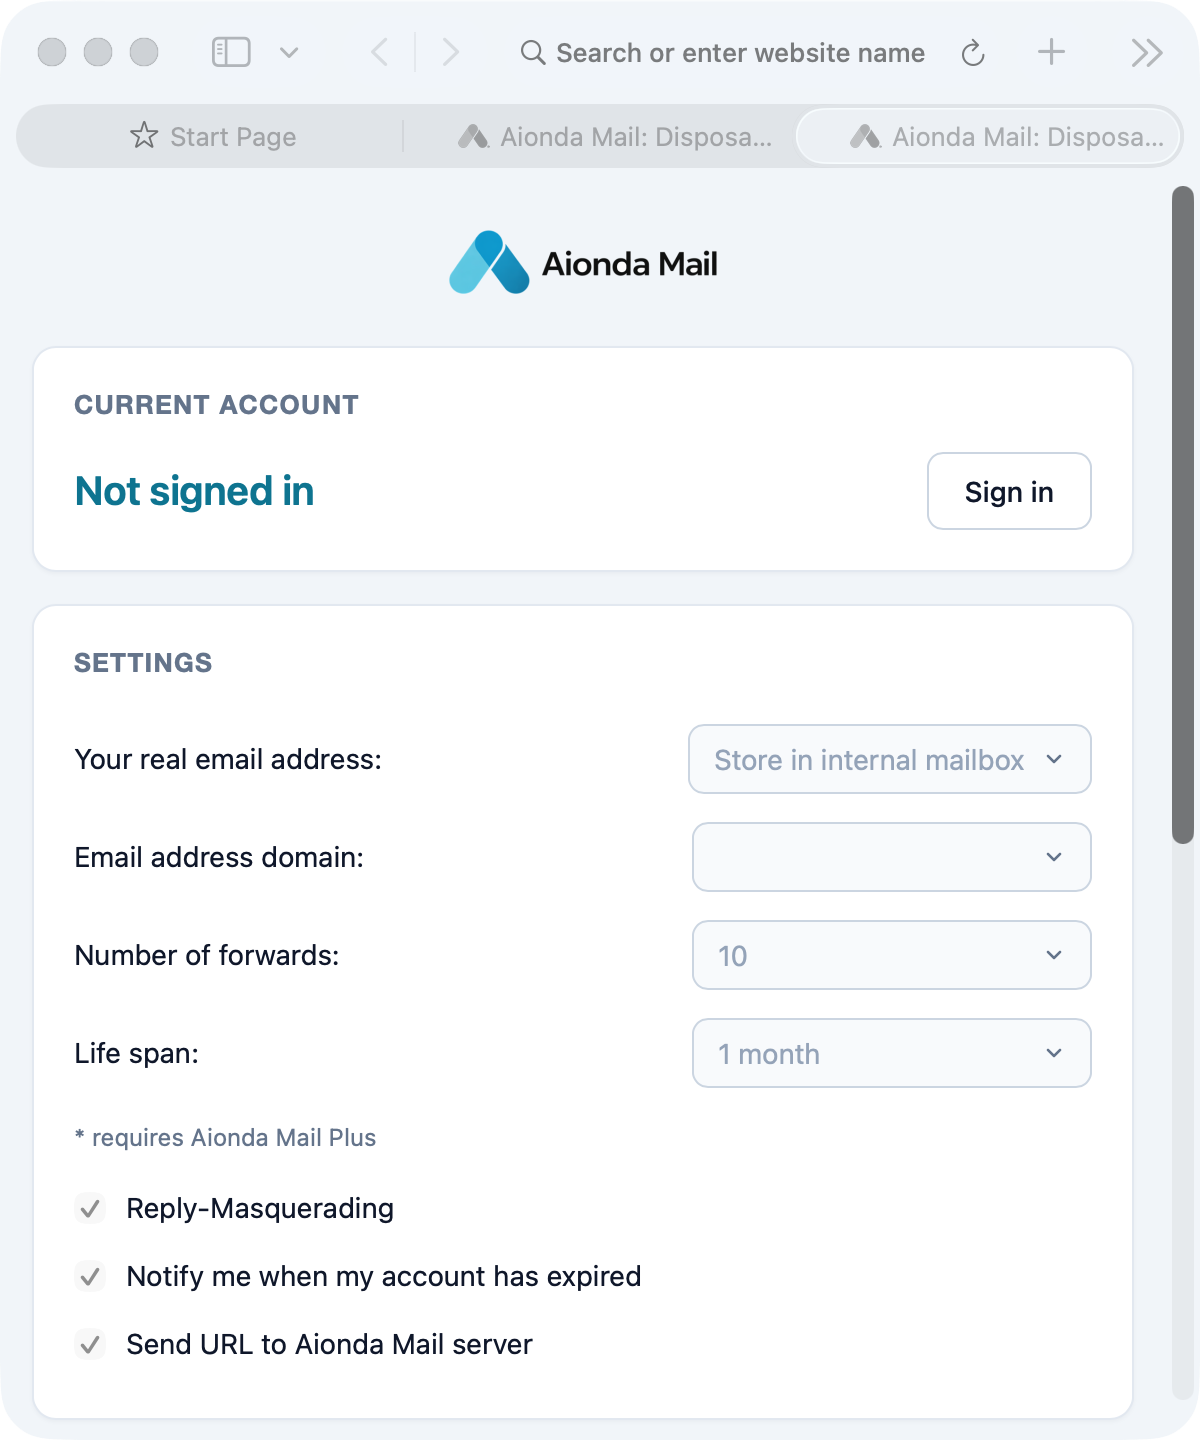
- Open Sign in.
- Set your default delivery and address options after connecting.
Select the screenshot to open the full-size image.
- In the extension’s Settings page, choose Sign in.
- On the welcome screen choose Enter your username and password. The following field also accepts a Personal Access Token.
- Enter your Username and paste your PAT into Password / Personal Access Token.
- Choose Login. Complete any requested verification, then check the account shown in Settings.
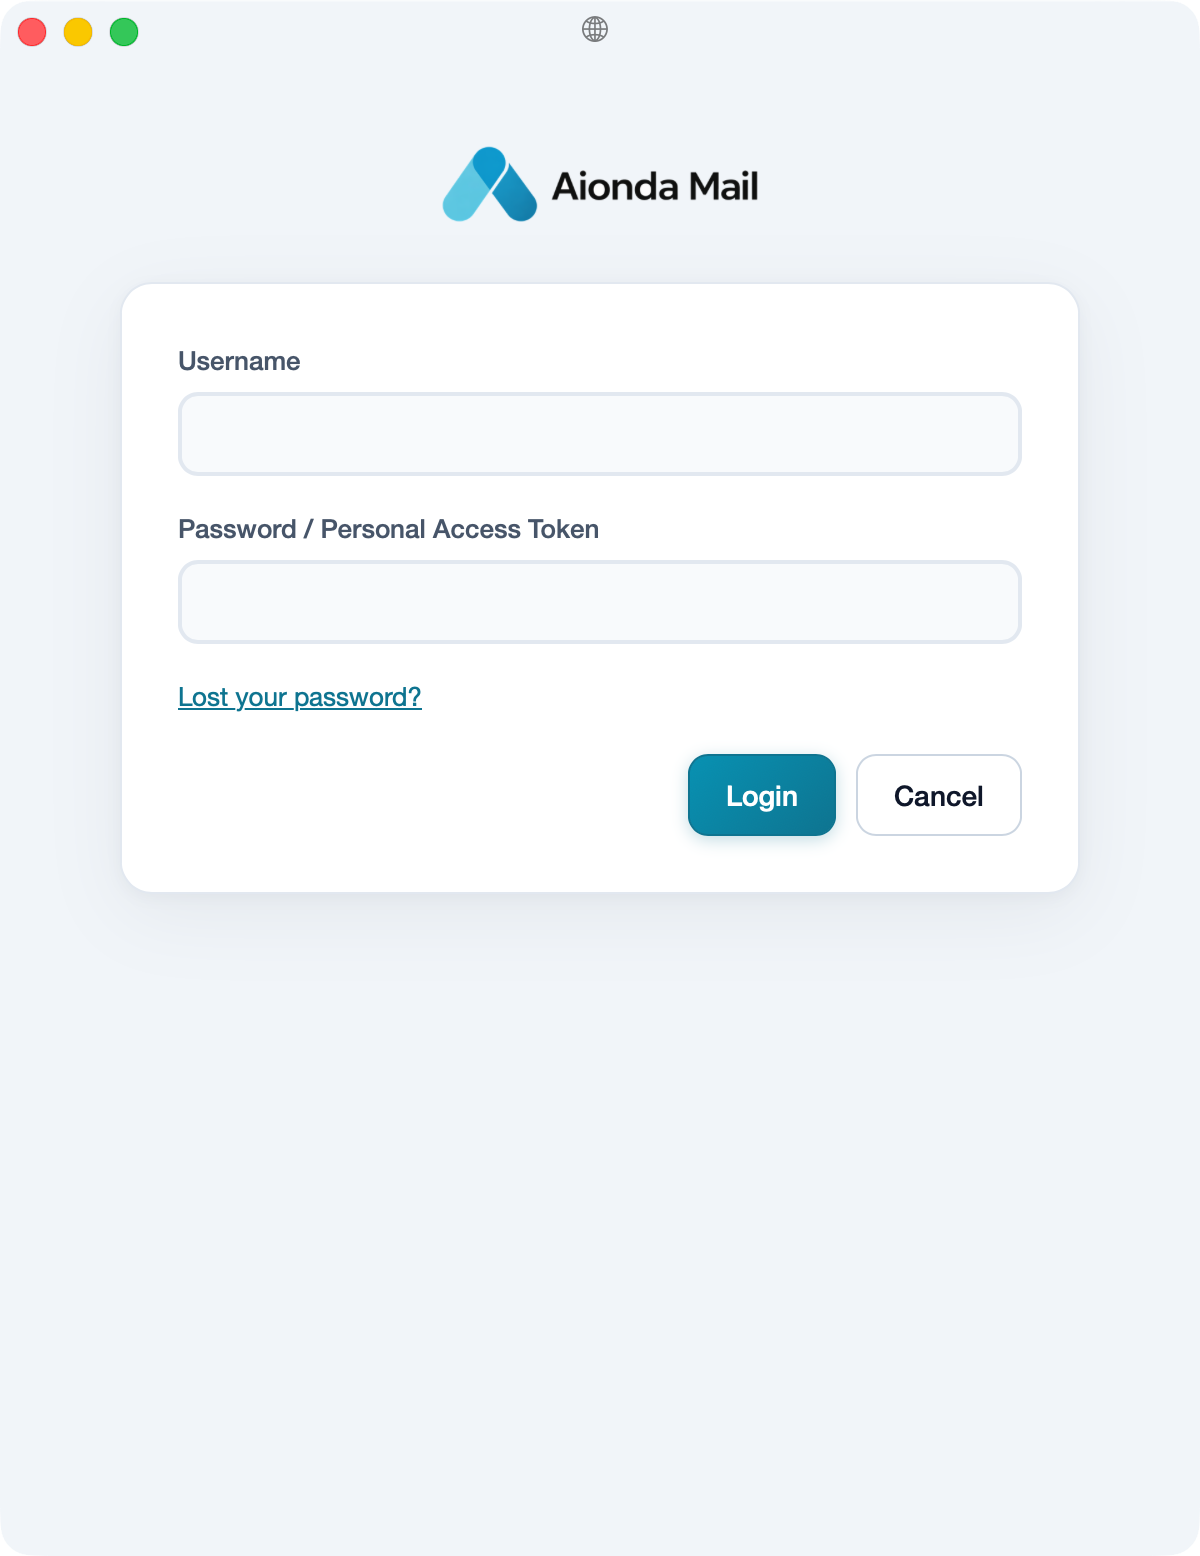
- Enter your username.
- Paste your Personal Access Token.
- Choose Login.
Select the screenshot to open the full-size image.
The example leaves credentials empty. The token is a secret credential, not the name you gave it in the token list.
5. Choose the defaults for new addresses
Choose Your real email address as the delivery destination, or Store in internal mailbox for Aionda’s Secure Mailbox. Choose the default domain, forwarding allowance and life span. Review Reply-Masquerading, expiration notifications and whether to associate the website URL with the address. Options marked with an asterisk require Plus. Scroll down and choose Save.
6. Create and insert an address
- Open the website’s form and focus its email-address field.
- Use the Aionda Mail toolbar button and choose Address for this page, or use the field’s context menu → Paste disposable address. On a Mac, Control-click or a secondary click opens the context menu.
- If Safari asks for access to the website, review and grant the access needed for this action.
- Check the address name, domain, destination, allowance and lifetime in the creation dialog.
- Choose Create address. Verify that it appears in the correct form field; if insertion is blocked, copy the address and paste it manually.
- Review the website’s form before submitting it. Creating an Aionda address does not submit the form for you.
Use Address Manager or the Web app to manage addresses later. Reuse an existing address when signing back in to an existing website account.
If the icon or insertion is missing
- Confirm the Mac app is installed and the extension is enabled in Safari → Settings → Extensions.
- If the toolbar is crowded, check Safari’s additional toolbar items or customize the toolbar.
- Check website permissions; permission on one site does not necessarily grant it on every site. Private Browsing is controlled separately.
- Safari’s internal pages, some protected pages and some website forms may not support insertion. Use manual copy and paste as the fallback.
- Check that Settings shows the intended account and that the chosen address limits are available for your plan.
This walkthrough is for Safari on macOS. iPhone and iPad use a different Settings interface; installing the Mac app does not install an extension on those devices. See native apps for platform access.