

Where to click: from the homepage to MCP access
- Open the Aionda Mail homepage and sign in to your account. If you are already signed in, choose Back to mailbox.
- In the Web app, click your username at the top right to open the account menu, as shown in the first screenshot.
- Choose MCP access, directly below Personal Access Tokens. It is in your account menu, not in the Artificial Intelligence sidebar section.
- The MCP access window opens. Choose Connect to begin the connection setup.
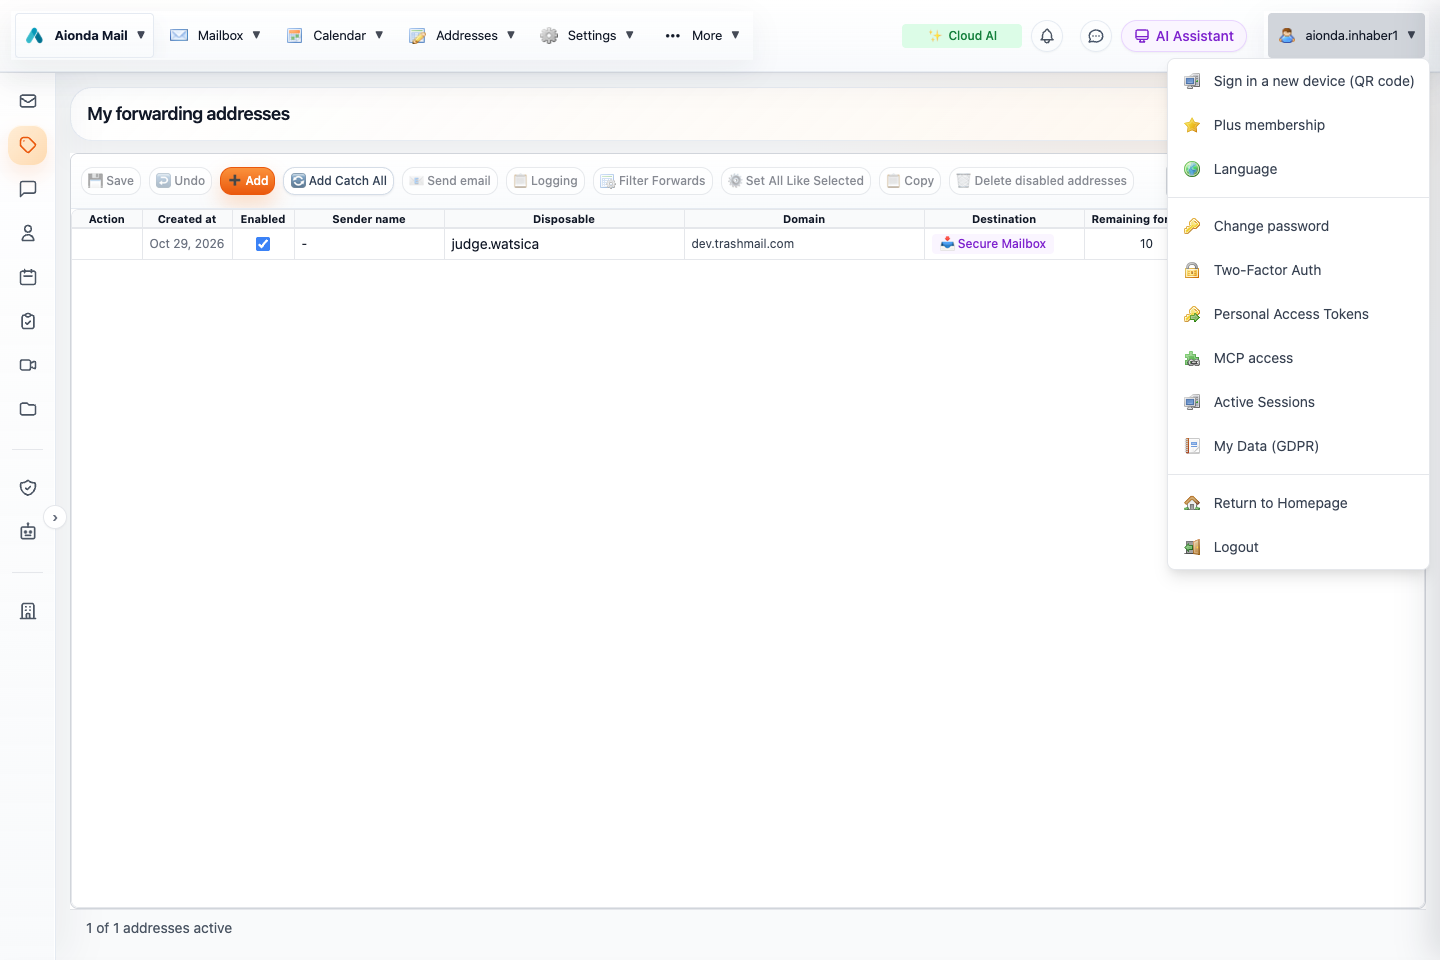
- Click your username at the top right of the Web app.
- Choose MCP access in the account menu.
Select the screenshot to open the full-size image.
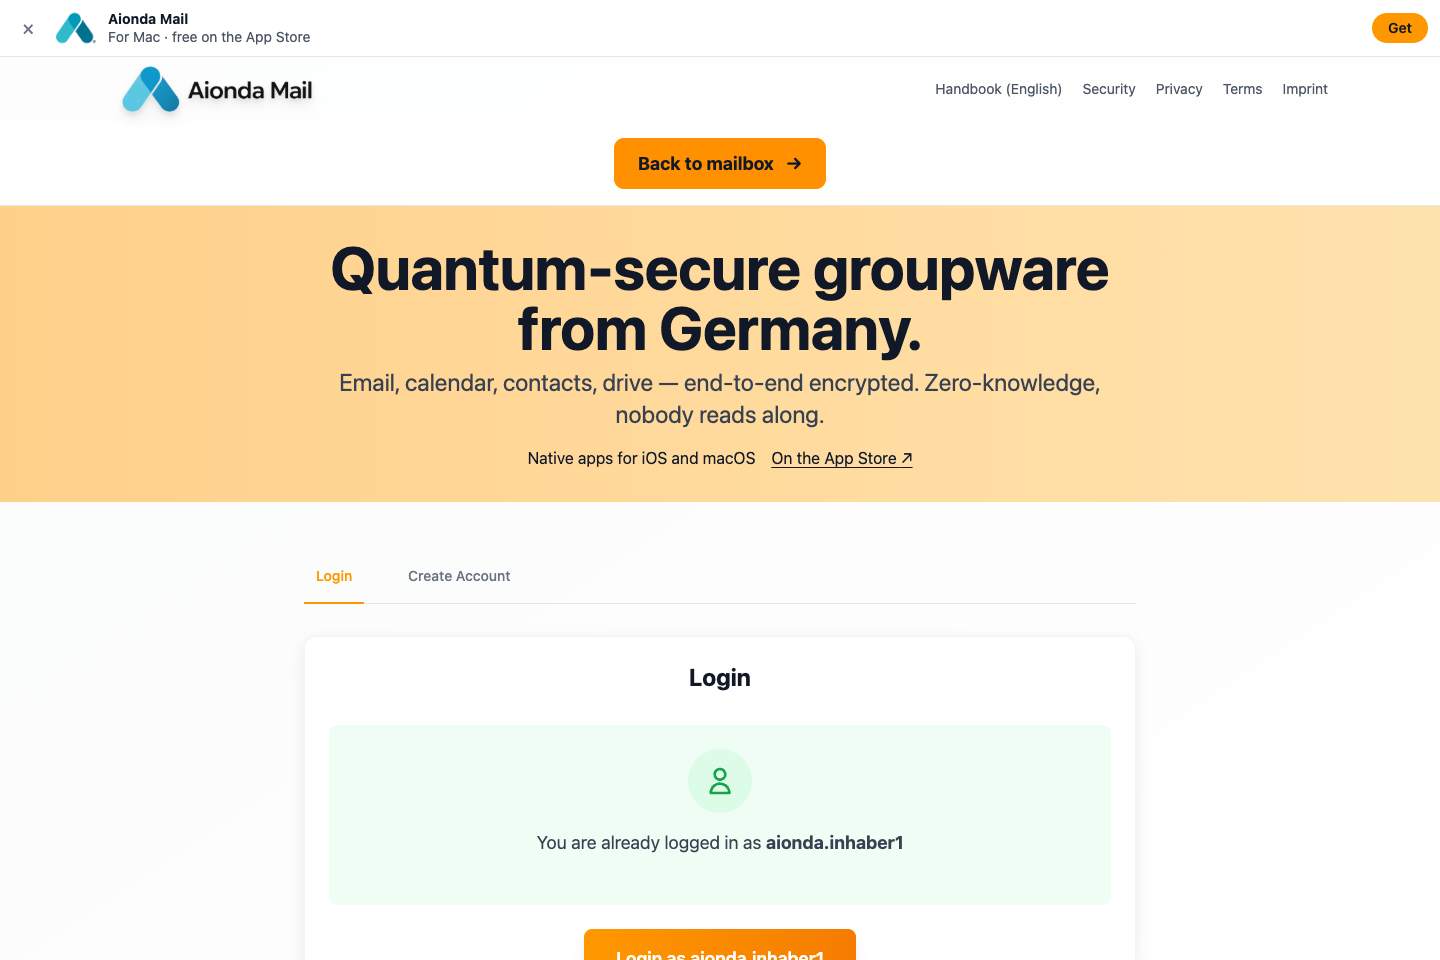
- If already signed in, choose Back to mailbox to open the Web app.
Select the screenshot to open the full-size image.
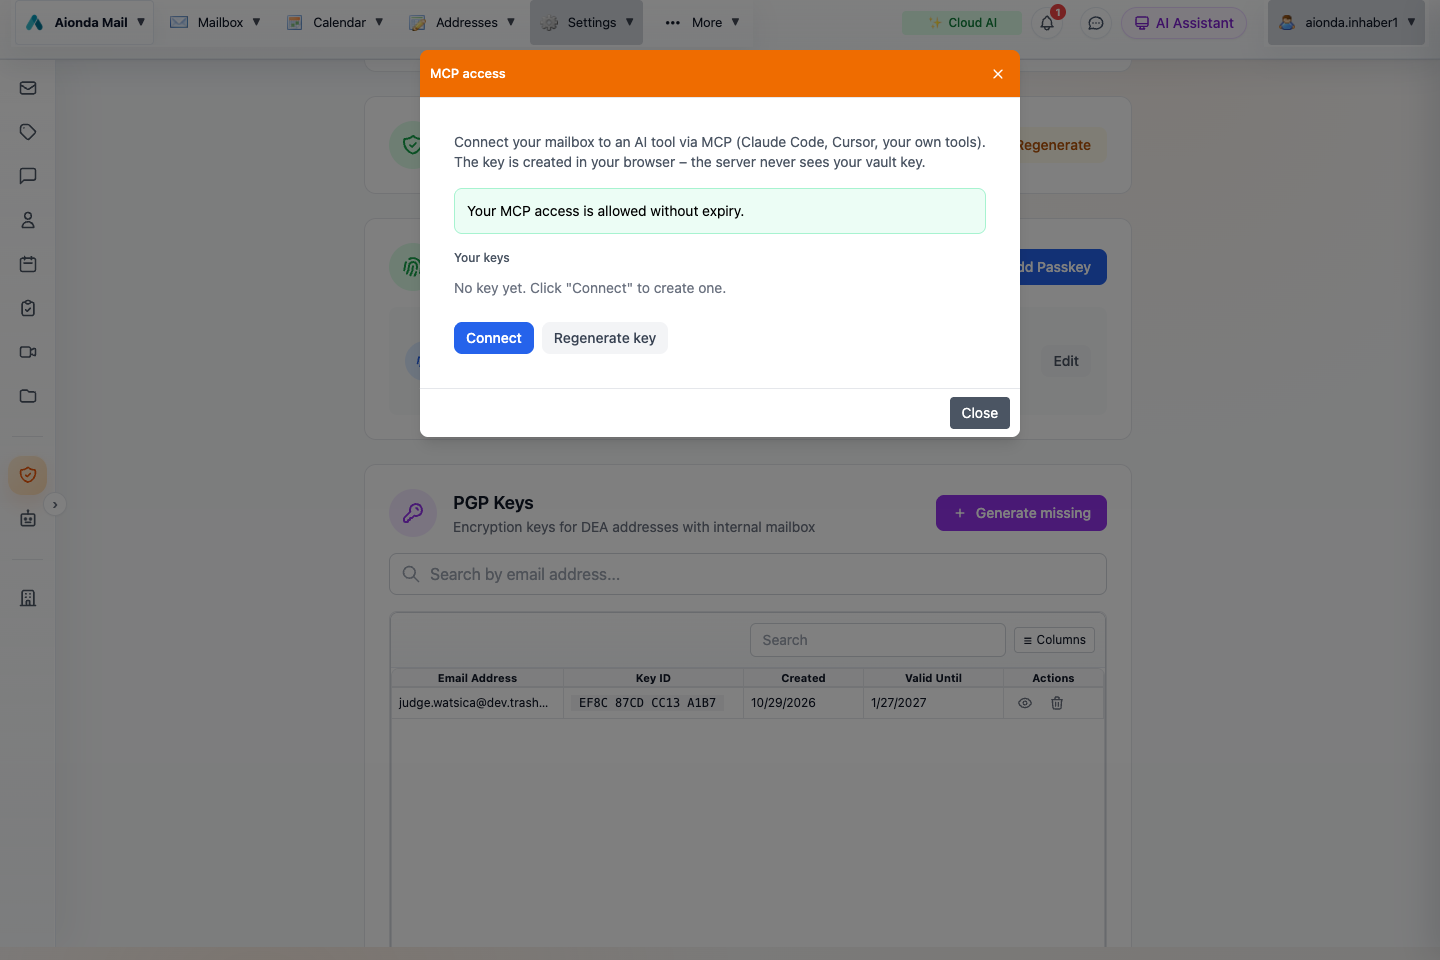
- Your account menu is at the top right.
- Review existing keys or choose Connect. This test account has no key; no credentials are displayed.
Select the screenshot to open the full-size image.
What the connection does
The Aionda Mail MCP client runs as a local bridge for an assistant host that supports stdio MCP servers. It authenticates to Aionda, decrypts supported content locally and returns tool results to that assistant. The external assistant and its provider can therefore receive readable content. Local decryption does not mean that returned content stays away from the assistant provider.
Choose your desktop assistant
OpenAI ChatGPT Desktop · Anthropic Claude Desktop
Before you start
- In Aionda Mail, open your account menu → MCP access → Connect, as shown above. Obtain your API key and vault key.
- Install a supported Node.js LTS release from nodejs.org. The examples launch the Aionda client using
npx, which comes with npm. In Terminal, checknode --versionandnpx --version. - Keep both keys private. Enter them only in the assistant’s local MCP configuration, never in a conversation. Replace the example values below with your own credentials.
The API key authorizes access; the vault key lets the local bridge decrypt supported content. Use STDIO for these examples: the desktop assistant starts the bridge on your computer. Merely entering the Aionda website or server URL in a remote-connector form does not configure this local decryption workflow.
Example 1: OpenAI ChatGPT Desktop
- Open the ChatGPT desktop application, then Settings. Search settings for MCP and select MCPs — Plugins. In the version shown, the path is Plugins → MCPs → Add → Add MCP server. Other versions may show a separate MCP servers settings page.
- Set Name to
aionda-mail, choose STDIO, and enternpxin Command to launch. - Add two separate Arguments:
-yand@aiondadotcom/mail-mcp-client. - Under Environment variables, add the three name/value pairs shown below. Leave environment-variable passthrough and the working directory empty unless your local installation requires them.
- Choose Save. If the server does not appear immediately, use the restart/reconnect control offered by your version or restart the desktop app after saving your work.
- Open a new conversation and check that aionda-mail is available in the MCP/tool controls. Start with the read-only example below.
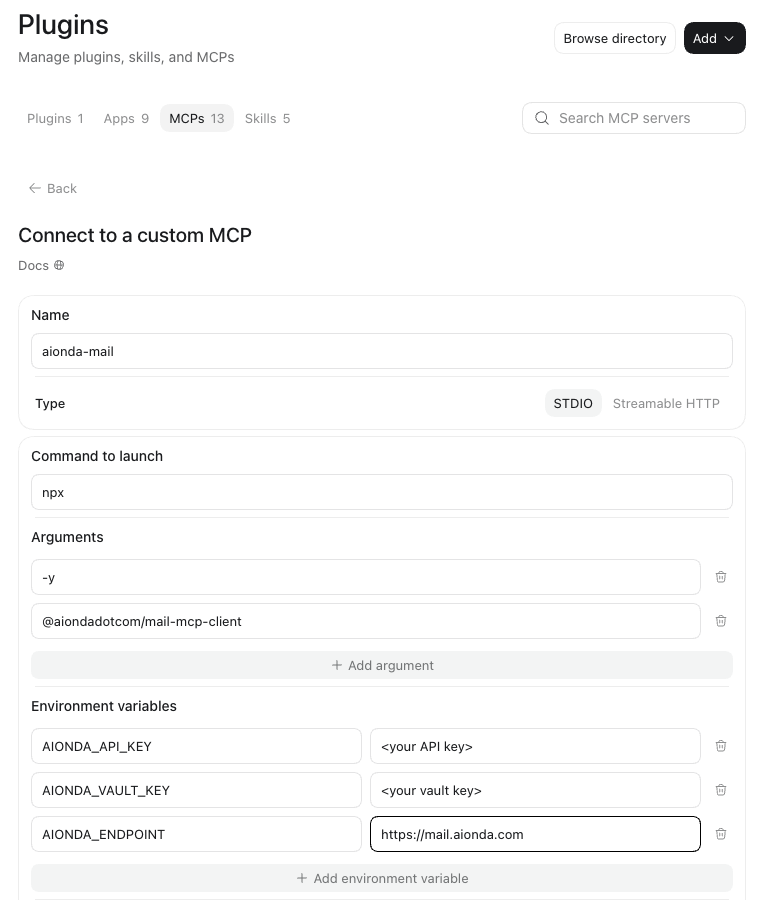
- Open the MCPs tab and add an MCP server.
- Choose STDIO and launch npx with two separate arguments.
- Add your API key, vault key and endpoint; only placeholders are shown here. The example was not saved.
Select the screenshot to open the full-size image.
| Environment variable | Value |
|---|---|
AIONDA_API_KEY | Your Aionda MCP API key |
AIONDA_VAULT_KEY | Your Aionda vault key |
AIONDA_ENDPOINT | https://mail.aionda.com |
The screenshot shows an unsaved example, not a live connection. It uses placeholders and exposes no credentials or conversations. The local-server setup is documented in OpenAI’s MCP guide; menu names and availability can vary by desktop version and organization policy.
Example 2: Anthropic Claude Desktop
- Open Claude Desktop and sign in. On macOS, open Claude → Settings in the system menu bar.
- Find the local MCP settings. Depending on the version, use Developer → Edit Config or Desktop app → Extensions → Local MCP servers. This is the local desktop configuration, not the remote connector URL form.
- Open
claude_desktop_config.json. On macOS it is in~/Library/Application Support/Claude/; on Windows it is in%APPDATA%\Claude\. - Add the following
aionda-mailentry undermcpServers. Preserve any existing servers. If the file already has amcpServersobject, merge the new entry into it rather than replacing the entire file.
{
  "mcpServers": {
    "aionda-mail": {
      "command": "npx",
      "args": ["-y", "@aiondadotcom/mail-mcp-client"],
      "env": {
        "AIONDA_API_KEY": "<your API key>",
        "AIONDA_VAULT_KEY": "<your vault key>",
        "AIONDA_ENDPOINT": "https://mail.aionda.com"
      }
    }
  }
}- Replace both placeholder keys, save valid JSON, then fully quit and reopen Claude Desktop after saving your work.
- In a new conversation, open the + menu and inspect Connectors or the available tools. Enable aionda-mail if required, and try the read-only request below.
See Anthropic’s local MCP guide and the MCP local-server setup guide for version-specific controls. Your organization may restrict local integrations.
Real example: ask ChatGPT to create a welcome draft
This example shows a real MCP action and the resulting draft opened in the native Aionda Mail app. The assistant researched weather for Stuttgart, Germany, wrote a neutral English welcome message and saved an encrypted draft. It did not send the email.
In a new ChatGPT conversation, make your Aionda Mail MCP connection available and enter the prompt below. In this demonstration the connection is named aionda-mail-prod; replace that name with the name you chose during setup, such as aionda-mail.
Create an English welcome email for a public Aionda Mail handbook demo. Research the current weather in Stuttgart, Germany, and cite the source and date in the email. Use a neutral greeting, no personal details, and subject: Welcome to Aionda Mail - Stuttgart weather. Save it as an encrypted draft using aionda-mail-prod. Leave recipients empty. Never send it. Do not read existing emails. If weather or draft creation fails, report that instead of guessing.
The assistant needs a separate weather or web-research capability for the weather lookup; MCP access to Aionda Mail alone is not a weather service. Review the requested operations: creating a draft is a write, while sending is a separate action. Never approve a send operation for this example.
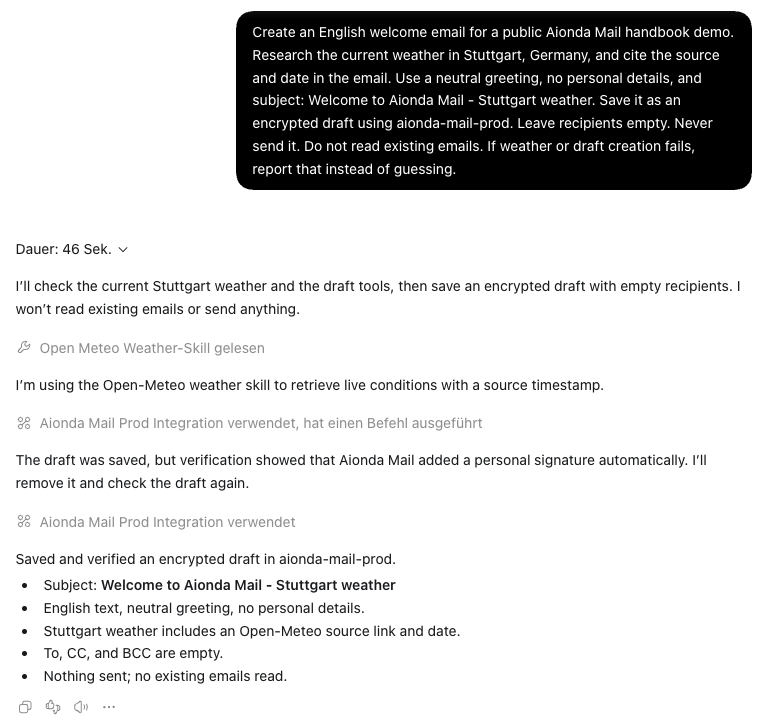
- Ask for a welcome draft, with no recipients and no sending.
- The activity shows use of the Aionda Mail integration.
- ChatGPT reports the saved draft; verify it in Aionda Mail next.
Select the screenshot to open the full-size image.
- Wait for ChatGPT to finish the MCP action and report that the draft was saved.
- Open Aionda Mail → Drafts and select Welcome to Aionda Mail - Stuttgart weather. Refresh the folder if necessary.
- Open the draft for editing and check the subject, body and empty recipient fields. In the macOS app, double-click the draft to open its composer.
- Review the weather source and timestamp. The weather shown in this screenshot is a dated demonstration from 17 November 2026, not a live forecast for the day you read this guide.
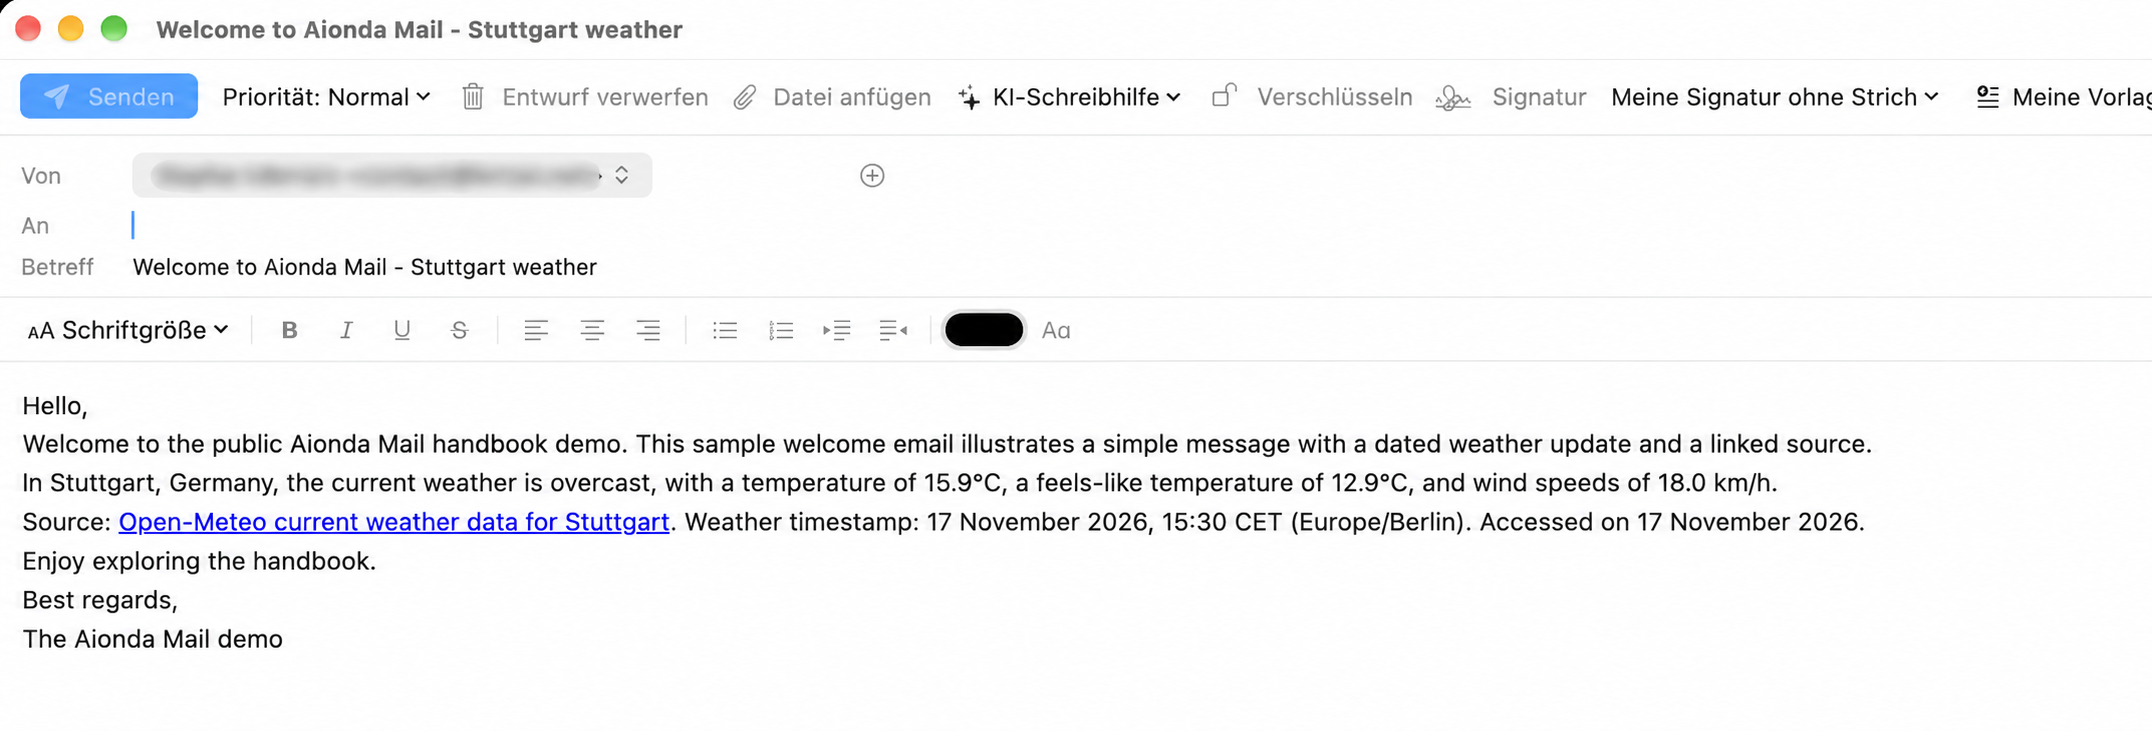
- The recipient field is empty; the example subject identifies the new draft.
- The message includes a dated Stuttgart weather report and its source. Sender name and address are blurred for privacy; the draft was not sent.
Select the screenshot to open the full-size image.
The native app opened and displayed the saved draft, providing a check beyond the assistant’s success message. The screenshot shows the example message only; the sender identity has been blurred for privacy. The existing desktop installations use German controls: Entwürfe means Drafts, An means To, and Betreff means Subject. The prompt and message are English. No message was sent.
First test: read without changing anything
Use Aionda Mail to list my mailbox folders. Do not send, move, delete or modify anything.
Review any tool permission request and allow only the operation you intend. A successful connection returns your actual folders through an Aionda tool call; an assistant merely describing a hypothetical folder list is not proof of a connection. The welcome-draft example above demonstrates a completed draft operation; a capability summary by itself does not prove that mailbox operations work.
If no tools appear, check that Node.js and npx are available to the desktop application, that both keys belong to the intended account, and that the endpoint is correct. If your desktop app cannot find npx, use the full path reported by command -v npx on macOS or where npx on Windows, following your host’s process-launch requirements. Read the host’s MCP logs without sharing secret values. A remote-only connector cannot launch this local STDIO client.
Tools and data changes
Inspect the tool list returned by your installed version. The integration supports mailbox work and related workspace operations; availability depends on permissions and version. Supported reads decrypt locally. Encrypted drafts and supported workspace writes are prepared client-side. Sending ordinary SMTP mail necessarily delivers readable message content to the sending path and ultimately the recipient.
Revoke and troubleshoot
Revoke an unused or exposed API key in MCP access and remove the stored credentials from the host. Revocation stops new authorized use; it does not erase content already returned or saved elsewhere. If access fails, check the endpoint, credential pair, host logs and runtime. Never include secret values when asking for support.